Grilled Pizza Tutorial

Picture 058 copy

Let me preface this by saying that I live in Texas. Down here we grill chicken, brisket, sausage and turkey legs. Not pizza. Grilling pizza is pretty damn unknown here. Well, even if it’s not, I’ll be bold enough to say that it is. Let’s pretend that I’m right. Also, it may be the tail-end of Summer where you are so grilling at this time might seem weird to you, but here it’s still Summer. Today’s high of 100F says so.

Having cleared that up, I have never grilled a pizza. Ever. I had never even heard about it until I started blogging. But once I saw the idea and got past my “Texans only grill BBQ” mind set, I was so intrigued! And it’s taken far too long for me to take the leap.

I’ve lost so many years of the best pizza I’ve ever made at home. But I’m hip to the jive now groovy people. Whoa, taking it back 1975.

4ย  5

Bad blog writing aside, this really is the best pizza I’ve made. The outside of the crust is lightly crispy, the inside is fluffy and soft and once you have the pizza crust ready, it takes no more than 20 minutes, start to finish. It is so worth it.

Note: I realize there are about as many ways to grill a pizza as there are to top them but this seemed easiest to me so I went with it. Head on over to Mel’s blog for a great tutorial with pictures for every step. I would have done that but it’s really hard to grill and NOT burn lunch and take pictures all by yourself ๐Ÿ™‚

Picture 067 copy

Grilled Pizza
via Mel’s Kitchen Cafe

I used this pizza dough, pre-made sauce (I had to use what I had on hand) and a propane grill (although you can just as easily grill this on a charcoal grill.) Have your pizza dough ready and made before proceeding to the grill.

Preheat your grill to medium heat for about 10-15 minutes.

Picture 025 copy

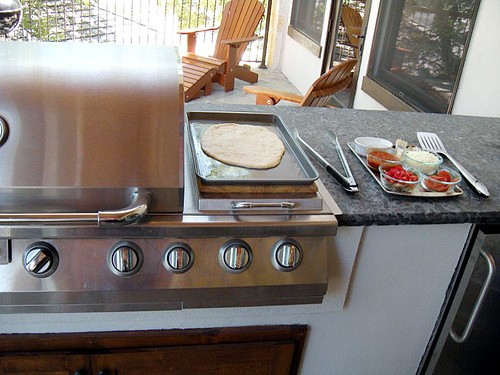
While the grill preheats, lightly grease a baking pan (with non-stick cooking spray or olive oil) and place your dough and shape it into an oval/rectangle shape. Grab another clean baking sheet for your finished pizza and stack it under your baking sheet holding the dough.

Picture 037 copy

Gather all the toppings you intend to use (meats, veggies, cheeses, sauce, everything) in easily accessible bowls, a spoon, a brush, and tongs and place them on another tray.

Picture 028 copy

Time to head outside. Place your tray(s) holding the dough on one side of the grill and place the toppings tray on the opposite side of the grill.

Lightly brush the top side of dough with olive oil.

Picture 046 copy

Open the grill, grab two edges of the dough and in one smooth motion lift the dough and quickly place it on your hot grill surface.

Most likely your pizza dough won’t be perfectly round or rectangular anymore. That’s perfectly fine. Rustic is beautiful. And sassy. Now close the grill and let the dough cook for about 2-4 minutes, depending on the heat of your grill. (Switch your baking sheets so the clean one is now on top.)

Picture 047 copy

The dough will be ready to flip when it lightly bubbles on the surface and the bottom has lovely grill marks but is NOT burned.

1ย  3

Using a pair of tongs, gently flip the dough over. Throughout this process, keep an eye on the grill’s temperature, adjusting up or down as necessary. Burned pizza doesn’t taste that good.

Picture 050 copy

Picture 051 copy

Now working quickly, using a spoon, spread your sauce over the crust. Next, layer with your toppings (mine were red bell pepper, mushrooms, pepperoni and mozzarella cheese).

Once all your toppings are on the pizza, close the grill and let the pizza cook for 2-3 minutes to melt the cheese and finish cooking the crust. You might need to cook a bit longer depending on how much cheese you used but I would not recommend more than another minute or two.

Picture 057 copy

Carefully remove your pizza with a pair of tongs onto your clean baking sheet. Slice and serve with a cold glass of your favorite beer or glass of iced tea ๐Ÿ™‚

Picture 071 copy

Beer Pizza Crust

Picture 041 copy

Sometimes there’s nothing better than sitting back, kicking up your feet, enjoying a slice of pizza, a beer and some football.

Or whatever your television poison is: trashy reality, hockey, CSI version 95, or the weather channel. Either way, pizza is the answer. Made even better when your crust is infused with beer!

Picture 073 copy

Don’t fret, beer haters. I am not what you would call a ‘fan’ of beer. This pizza crust is mildly flavored, although it does depend on the type of beer you use. But if anything, the yeast in the beer gives this dough a beautiful rise and a wonderful flavor and texture. Almost like an artisan pizza crust.

This pizza crust comes together so easily and you don’t even need a stand mixer for it. I made this dough using a big bowl, a wooden spoon and kneaded by hand and it was no trouble at all. I would easily say this crust is tied with my go-to pizza dough. That’s serious business people.

Picture 078 copy

Beer Pizza Crust
adapted from here with tips from here

Ingredients

4 cups all-purpose flour
2 teaspoons instant yeast
1 teaspoon baking powder
1 1/2 teaspoons salt
2 tablespoons olive oil
12 fl oz (1 1/2 cups) room temperature beer (I used Samuel Adams Octoberfest)

Directions

Combine flour, instant yeast, baking powder, salt and olive oil in a large mixing bowl with a whisk. Slowly add beer and using a wooden spoon, mix until you have a shaggy dough.

Picture 902 copy

Flour your hands and your dough and knead the dough with your hands until you have a soft, smooth dough โ€“ it should hardly stick to the mixing bowl or your hands, about 7 minutes (less if using a stand mixer).

1ย  3

Form the dough into a round ball, cover with a dish cloth and allow it to rise for anywhere from 30 minutes to 2 hours.

Once your dough is doubled in size, use your open hand to gently press down on the dough to deflate it. Separate into 2 dough balls or leave whole if making one large pizza.

Preheat the oven to 450F.

If you have a pizza stone, cover with parchment paper. If you donโ€™t, use a large round or rectangular metal pan, cover in foil to make clean-up much easier and sprinkle with a little corn meal or lightly spray with cooking spray; set aside.

Shape (or roll) your dough to about 10 – 12 inches (or to fit the size of your pan) keeping in mind that thin dough makes for a crispier crust and thicker will yield a softer, thicker crust. When you think itโ€™s roughly the right size for your pan (or baking stone), turn the dough down onto it. You might need to let it rest for a few minutes and gently pull at the sides if you find the dough springs back.

Add your sauce and toppings and place in the oven, for 15 minutes or until the cheese is bubbly and melty. If you place the toppings under any cheese, youโ€™ll have a less greasy pizza. Let it sit for a few minutes so you don’t burn off your taste buds then serve with an ice cold beer and some football ๐Ÿ˜‰

Picture 085-1

Stay tuned for my grilled pizza tutorial using this crust ๐Ÿ™‚

Whole Wheat Pizza Crust

10-20-08 432 copy

Someone please explain to me whyyy there are commericals concerning what the ingredients are in dog food followed by pet owners who are disgusted when they find things like corn gluten and meat by-product…

but the following commercial is about children being fed pre-made chicken nuggets (in which the ingredient list has a number of ingredients that I can’t even pronounce) like there’s no problem.

What ever happened to REAL food?

There is a homemade, real food alternative to every pre-made food out there. It may be a bit different but my thought process: if it’s homemade, it HAS to be better for you. I mean… it’s REAL food after all.

Let’s start with pizza! Yes, you can make pizza at home. And you can even healthify it by using whole wheat flour instead of white flour. And it’s simple!! Mix, knead, rise, knead, last rise while you chop your veggies and grate your cheese. Easy cheesey!

10-20-08 439 copy

Whole Wheat Pizza Crust
Adapted from Smitten Kitchen

Makes enough for one small, thin crust pizza. Double it if you like your pizza thick and bready.

1 1/2 cups whole wheat flour
1 teaspoon salt
3/4 teaspoon active dry yeast
1/2 cup lukewarm water (may need up to 1 or 2 tablespoons more)
1 tablespoon olive oil
your choice of sauce and toppings

Stir dry ingredients, including yeast, in a large bowl. Add water and olive oil, stirring mixture into as close to a ball as you can. Dump all clumps and floury bits onto a lightly floured surface and knead everything into a homogeneous ball. Use flour when neededโ€ฆ itโ€™s slightly sticky at this point.

If you are finding this step difficult, simply pause. Leave the dough in a lightly-floured spot, put the empty bowl upside-down on top of it and come back in 2 to 5 minutes, at which point you will find the dough a lot more lovable.

Knead it for just a minute or two. Lightly oil the bowl (a spritz of cooking spray perfectly does the trick) where you had mixed it โ€” one-bowl recipe! โ€” dump the dough in, turn it over so all sides are coated, cover it in plastic wrap and leave it undisturbed for an hour or two, until it has doubled in size.

Dump it back on the floured counter and gently press the air out of the dough with the palm of your hands. Fold the piece into an approximate ball shape, and let it sit under that plastic wrap for 20 more minutes.

Sprinkle a pizza stone or baking sheet with cornmeal and preheat your oven to its top temperature. Roll out the pizza, toss on whatever topping and seasonings you like. If you like a TON-o-toppings and bready crust, slice them thinly so you donโ€™t weigh down the dough.

Bake it for about 10-15 minutes until itโ€™s lightly blistered and impossible to resist.

10-20-08 433 copy

(Super Simple) Homemade Pizza Dough

pizza dough

Once upon a time, there was a girl who lived in a land of frozen pizzas. “Homemade pizza crust is just too daunting to make” she said as she skipped off to the store to buy a ready made pizza.

Then, the baking gods shone upon her with a simple, delicious (did I mention simple?) recipe for pizza crust! She read it over a few times and decided to go for it.

And the girl (her fiance and the cat) lived happily ever after with their yummy, homemade pizza crust. The End. ๐Ÿ™‚

I had my “AHA” moment with this crust. I KNOW that homemade tastes much better, I KNOW that its better for you because there are no preservatives, I KNOW that I can top the pizza with fresh delicious veggies instead of frozen ones, i know, I Know, I KNOW!!!

It’s quick and simple and delicious and customizable… its fantastic. If you’ve never made pizza dough before because it seemed too daunting or you were afraid of messing up the dough, use this recipe as your breakthrough.

The fiance gave it two thumbs up, and I didn’t get any decent pictures because it disappeared into thin air. or at least it seemed like it ๐Ÿ˜‰

pizza dough

Really Simple Pizza Dough

As seen on Smitten Kitchen

Makes enough for one small, thin crust pizza. Double it if you like your pizza thick and bready.

1 1/2 cups flour (can replace up to half of this with whole wheat flour)
1 teaspoon salt
3/4 teaspoon active dry yeast
1/2 cup lukewarm water (may need up to 1 or 2 tablespoons more)
1 tablespoon olive oil

Stir dry ingredients, including yeast, in a large bowl. Add water and olive oil, stirring mixture into as close to a ball as you can. Dump all clumps and floury bits onto a lightly floured surface and knead everything into a homogeneous ball. Use flour when needed… it’s slightly sticky at this point.

If you are finding this step difficult, simply pause. Leave the dough in a lightly-floured spot, put the empty bowl upside-down on top of it and come back in 2 to 5 minutes, at which point you will find the dough a lot more lovable.

Knead it for just a minute or two. Lightly oil the bowl (a spritz of cooking spray perfectly does the trick) where you had mixed it โ€” one-bowl recipe! โ€” dump the dough in, turn it over so all sides are coated, cover it in plastic wrap and leave it undisturbed for an hour or two, until it has doubled in size.

Dump it back on the floured counter and gently press the air out of the dough with the palm of your hands. Fold the piece into an approximate ball shape, and let it sit under that plastic wrap for 20 more minutes.

Sprinkle a pizza stone or baking sheet with cornmeal and preheat your oven to its top temperature. Roll out the pizza, toss on whatever topping and seasonings you like. If you like a TON-o-toppings and bready crust, slice them thinly so you don’t weigh down the dough.

Bake it for about 10-15 minutes until itโ€™s lightly blistered and impossible to resist.

pizza dough

Please forgive the pictures, it was already dark outside and my oven isn’t very cooperative with letting me take pictures of rising dough ๐Ÿ™‚

meeeee

See? I spy a baker ๐Ÿ˜‰