Chocolate Velvet Pound Cake

Chocolate Velvet Pound Cake

Have you ever had one of those days when you just NEED some chocolate to cure whatever ails you? Who am I kidding, of course you have. Or maybe I’m just projecting my issues on you…? Either way chocolate = answer to all questions.

After committing to a healthier lifestyle, chocolate is the one tiny thing that keeps me from being 100% committed. There is just something about it. It’s rich, melty amazingness just draws me in every.single.time. When I see a new, intriguing flavor of chocolate (Wasabi Dark Chocolate, anyone?) I just can’t help myself. I’m very serious about my chocolate! I get angry when it goes to waste (not all recipes work out, whomp) or when it doesn’t match my high hopes or when things just aren’t… chocolatey enough. I’m sure you understand, right?

Chocolate Velvet Pound Cake

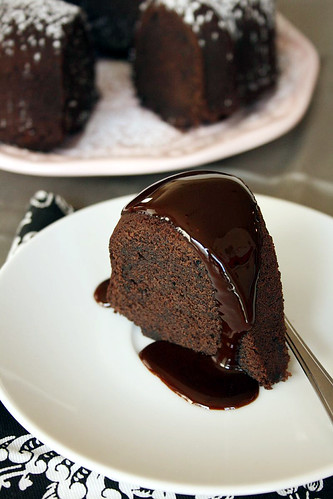
So upon seeing this recipe for chocolate velvet pound cake, I was a bit bummed to find that there aren’t mounds of melted chocolate in it. I was so sure that the chocolate flavor would be too muted for me to fully enjoy it. I’m also not a huge fan of pound cakes, so sadly the cards were mentally stacked against this one before I even got started. But I pressed on, thinking that I could just give it away to someone less picky crazy than me.

Thaaaaaaaaank goodness I pressed on with this. This pound cake was delightful!! That’ll teach me not to judge a book by it’s cover. Probably not. But it sounds good ;)This pound cake came together fairly quickly (it’s definitely no layer cake!) and the end result was smooth, velvetey, rich chocolatey deliciousness. But I couldn’t leave well enough alone and drizzled a bit of chocolate ganache on my slice (it didn’t need it, I just have issues.) If you’re a chocolate connoisseur like myself, do yourself a favor and try this.

Chocolate Velvet Pound Cake Chocolate Velvet Pound Cake

Chocolate Velvet Pound Cake
Yields about 6 cups of batter (enough for one 6-cup bundt pan or one 8 1/2″ x 4 1/2″ loaf pan)

Ingredients:

1 1/2 sticks (6 ounces) unsalted butter, softened
1 1/4 cups (8-3/4 ounces) sugar
1 teaspoon water, at room temperature
2 teaspoons espresso powder
3 large eggs, at room temperature
1 cup (5 ounces) unbleached all-purpose flour
1/2 cup (2 ounces) unsifted unsweetened Dutch-process cocoa powder
1/4 teaspoon baking powder
Pinch of salt
1/2 cup (4 ounces) buttermilk, at room temperature*

* I used buttermilk powder and it still turned out great! My powder requires that you use water as a liquid in place of the buttermilk and add the powder with the dry ingredients. If you decide to go this route, please follow the directions on the container of your powdered buttermilk.

Instructions:

Preheat the oven to 350°F and position an oven rack in the center. Lightly spray your bundt pan with non-stick cooking spray. If using a loaf pan, spray with non-stick cooking spray and fit it with parchment paper to extend up both long sides to the top of the pan (leaving an overhang for easy removal once cool). If your pans have a nasty habit of sticking, butter the pan and then lightly dust the pan with cocoa powder.

Cream the butter and sugar: Place the butter and sugar in the bowl of the stand mixer and beat on medium-high until light – almost white- in color, 4 to 5 minutes. You can also use a hand mixer and a medium bowl, although you may need to beat the mixture a little longer to achieve the same results. Scrape down the sides of the bowl with the spatula.

Add the eggs: In the small bowl, stir together the water and espresso powder until smooth. Crack the eggs into the bowl and whisk to blend. With the mixer running on medium, add the eggs to the butter mixture about 1 tablespoon at a time (I’m impatient so I eyeballed and probably ended up going a few tablespoons at a time), allowing each addition to completely blend in before adding the next. About halfway through, turn off the mixer and scrape down the sides of the bowl, then continue adding the eggs. Scrape down the bowl again.

Add the dry and wet ingredients alternately: With the fine-mesh strainer, sift the flour, cocoa powder, baking powder, and salt into the medium bowl and whisk to blend. With the mixer running on the lowest speed, add the flour mixture and the buttermilk alternately, beginning with one-third of the flour mixture and half of the buttermilk; repeat, then finish with flour mixture. Scrape down the bowl and finish blending the batter by hand if necessary. (I normally give the batter a few quick turns with a silicone spatula before calling it done.)

Bake the cake: Scrape the batter into the prepared baking pan and smooth the top. Bake for 45 to 55 minutes, until firm to the touch and a toothpick inserted into the center comes out clean. Transfer to a rack to cool completely. When cool, remove from the pan, peel off the parchment paper, and serve.

Storing: The cake can be made several days ahead and kept at room temperature, wrapped in plastic wrap. Or double-wrap it, put in a resealable plastic freezer bag, and freeze for up to 8 weeks.

Barely adapted from Sur La Table’s The Art & Soul of Baking

Chocolate Velvet Pound Cake

Brownie Batter Pancakes for One

Picture 055 copy

I am seriously doing a 903 things at once right now.

That may not sound like a lot to you but I’m not too used to multi-tasking and handling a bunch of stuff all at once. I like to give each task my undivided attention. Multi-tasking usually freaks me out.

But today I am trying to find the perfect birthday treat for one of my great friends, make my gma some candied pecans, clean the kitchen, figure out something quick to have for breakfast, look around on Facebook (cus it’s super important, duh!), write this post while uploading pics to my Flickr. See? 903 things! I don’t exaggerate here, I don’t need the drama. And I have to do all that by 11am. It’s 9:18am now. Oh gosh, my life is overrrr!!!

Ahem.

Picture 061 copy

Good thing that I have the best recipe EVER for THE MOST AMAZING QUICK FIX PANCAKES THAT WON’T KILL MY WAISTLINE!! Yes, I’m yelling at you. I want you to understand the sheer awesomeness of these pancakes. These come together super quick, they are chocolatey delicious, a perfect breakfast (or dinner, or dessert) for one, and the best part about these is that you get about 8 silver-dollar sized chocolate pancakes all for yourself and it won’t kill your diet!!! How can anyone NOT get excited about that?! Now, go chow down on some pancakes!!

Picture 064 copy

Brownie Batter Pancakes
Yields about 6-8 silver dollar pancakes

Ingredients:

1/4 cup whole wheat pastry flour (30g) *
1/4 tsp baking powder
1 Tablespoon cocoa powder (I used Hershey’s Special Dark)
1 Tablespoon of Splenda Granulated sugar (or 1 Tablespoon of sugar)
pinch of salt (optional)
1 1/2 Tablespoons unsweetened applesauce (I used this)
1 teaspoon pure vanilla extract
5 1/2 Tablespoon nondairy milk**

*There are several options for flour choice, choose what works for you: spelt flour, whole wheat flour, white whole wheat flour, all-purpose flour, or even a gluten free AP flour.

**Same goes for the milk, feel free to use what you have: soy milk, almond milk, rice milk, coconut milk (oh, YUM) or plain ole dairy milk, I don’t judge 😉

Instructions:

If you have a pan that can handle the heat (such as a cast iron skillet) set a non-stick pan or skillet over medium-low heat. (I do this before anything else so that once the mix is done, the skillet is preheated and ready to go. I’m impatient, clearly.)

In a medium bowl, whisk the dry ingredients together very well.

In a small measuring cup, stir together all the wet ingredients.

Add the wet to the dry and mix until the dry ingredients JUST disappear. You don’t want gummy pancakes.

If you haven’t already, preheat your skillet on medium-low heat and let it get nice and hot (flick some water on the surface of the pan, if it sizzles it’s ready to go!) Pour a very small amount (about 2 Tablespoons, one cookie scoop) worth of batter onto the center of your skillet and let it cook until bubbles start to form and the edges are set. Flip them, taking care not to break the pancakes (they are fragile) and cook them for 30 seconds – 1 minute longer.

Stack, throw on every topping you can think of (not really. Try: powdered sugar, caramel, chocolate sauce, whipped cream, sliced berries, nuts, dried fruit, your favorite yogurt and granola, or maple syrup) and dig in!!

Picture 066 copy

adapted from Skinny Taste

Servings: 1 • Serving size: 6-8 silver-dollar pancakes (one recipe without toppings) • Old Points: 3 pts • Points+: 4 pts
Calories: 172 • Fat: 2.4 g • Carb: 32 g • Fiber: 6.7 g • Protein: 5.3 g • Sugar: 4.7
Sodium: 241.7 (without salt)

Banana Oatmeal Breakfast Bars

Picture 169 copy

I hate doing the same things over and over again.

Repeating myself because you didn’t listen to me the first time I said that awesome thing I said. Getting up after just having sat down because I forgot my water on the counter. Painting my nails AGAIN because I always seem to paint them when I am the most antsy I could ever possibly be. Laundry. Hearing the same commercial on three different radio stations, play some tunes man!

But, there are exceptions.

Picture 171 copy

Playing my song obsession of the moment twice in a row. Or three times, who’s counting? Finding an adorable outfit and wearing it twice in the same week. Rewinding a part in a movie that made you laugh so hard you almost peed just so you can almost pee again! Playing that level of Angry Birds until you get all three stars.

And most importantly, making a recipe that you just LOVE over and over again. And in my kitchen, that’s a pretty big deal. Recipes rarely get a repeat performance. So many recipes, so little time.

Picture 173 copy

But once in a while I make something delicious that I can’t stop thinking about. Like these bars.

Soft and chewy oatmeal bars with a great hit of banana flavor, speckled with chocolate chips, baked and served warm. Don’t let the oatmeal fool you, these are breakfast, lunch, dinner and dessert, if you ask me! Customize them to your liking: add peanut butter cups/chips, toss in some nuts, top with ice cream, whatever you like!

Make these and eat them. Then make them again. Then eat them again. Again. What a lovely vicious cycle.

Picture 179 copy

Banana Oatmeal Breakfast Bars
Yield about 12-16 servings

Ingredients:

1 very ripe banana (mine was 115 g)
1/3 cup vegetable oil
2/3 cup light brown sugar, packed
3/4 cup all purpose flour (or whole wheat pastry flour)
1/2 teaspoon baking soda
1/4 teaspoon salt
1/2 teaspoon cinnamon
2 cups rolled oats (not instant)
2/3 cup dark chocolate chips

Directions:

Preheat oven to 350 degrees. Line an 8×8″ glass baking dish with foil and lightly spray with non-stick cooking spray; set aside.

In a large bowl, mash the banana with a fork and then add the oil and brown sugar. With a whisk, mix well until there are no sugar lumps left.

In a small bowl, whisk together the flour, baking soda, salt, cinnamon and oats until combined. Fold dry ingredients into wet ingredients with a rubber spatula until combined. Fold in chocolate chips until evenly distributed.

Pat batter down evenly into the prepared pan with the rubber spatula. Bake for 25 minutes, or until edges are golden and the center looks set. Let cool before cutting into squares. Or throw caution to the wind and eat them warm straight from the pan. Enjoy!

Picture 166 copy

Recipe adapted from Eat, Live Run

Crazytown Peanut Butter Banana Bread

Picture 349 copy

Let me clarify a point: when I say ‘crazytown’ I mean ‘holy cow, there is so much good stuff in this bread and my impatience doesn’t allow me to list it all.’ I DO NOT mean Crazytown the band that sang that maddeningly catchy song ‘Butterfly’ way back in the day.

But I won’t lie, I liked them. I thought Shifty was cute (for like a week HA!) I know every word to the entire song.

Picture 370 copy

I used to have problems. Don’t verify that with my hubby, he’ll tell you I still have problems. He calls it issues, I call it awesome!!

There is a whole lot of awesome going on in this bread: peanut butter banana bread studded with mini peanut butter cups, snickers, chocolate chips AND caramel. I added some whole wheat pastry flour, you know… to make it “healthy.” I told you, crazytown!!

1  3

And I just couldn’t help myself, I never can leave well enough alone, I drizzled the top with melted bittersweet chocolate. Crazytown.

Come my lady, come come my lady. You’re my butterfly, sugar baby. Oh gosh…

Picture 361 copy
Crazytown Peanut Butter Banana Bread
Yields one 8×4″ loaf

Ingredients:

1 cup all purpose flour
1/2 cup whole wheat pastry flour (or more AP flour)
1/2 teaspoon baking soda
1 1/2 teaspoon baking powder
1/2 teaspoon salt
2 very ripe bananas, mashed
1/2 cup smooth peanut butter
1/4 cup vegetable oil (you can also use canola)
1 large egg
1/2 cup granulated sugar
1/4 cup brown sugar
1 teaspoon vanilla extract
2 oz mini peanut butter cups (I used these)
8 mini snickers, chopped
2 oz milk chocolate chips
8 caramels, chopped

Note: I used an 8×4″ pan but you can use a standard 9×5″ you loaf will be slightly thinner and will bake faster, so keep an eye on it! Also, go nuts with the mix-ins: add toffee bits, different candy bars, nuts, toasted coconut, etc.

Instructions:

Preheat your oven to 350F. Generously grease your loaf pan  with butter or spray with non-stick cooking spray; set aside.

In a medium bowl whisk together your flour, baking soda, baking powder and salt until combined, set aside.

In a large bowl stir together your bananas, peanut butter, oil, egg, sugars and vanilla extract. Whisk vigorously for about 30 seconds to ensure that everything is thoroughly combined. The batter will be a bit lumpy because of the bananas, that’s ok!

Pour your dry ingredients into your wet ingredients and, with a rubber spatula, fold everything together until just combined (the flour JUST disappears.)

Fold in your mini peanut butter cups, snickers and chocolate chips. Spread half of the batter into your prepared pan. Sprinkle the chopped caramels over the batter and give them a light press with your hand. Top with the rest of your batter and smooth the top with your spatula.

Bake for approx 1 hour or until toothpick inserted into center comes out with moist crumbs attached (always check your baked goods early, every oven is different and there’s nothing worse than a rock-solid loaf).

Let cool in pan for 10 minutes, then loosen the edges of the pan with a plastic knife and remove from loaf pan, transferring bread to a cooling rack. Cool completely, or don’t, just don’t burn your tongue. Enjoy!

Picture 358 copy

Recipe adapted from Cookies & Cups

Honey Nut Scones – TWD

Picture 845 copy

Happy Belated Halloween!!

Did you dress up? Did you throw a nifty party that only cool people could go to? Did you steal your kids’ candy? Did you buy a giant bag of different chocolates (because you know that’s what the kids REALLY want)? Did you turn off your porch light early so you could keep the rest of the chocolate for yourself? Are you most likely going to eat candy for breakfast?

If so, we could be great friends.

Picture 848 copy

But just in case you frown upon chocolate bars for breakfast, I made you scones. It has good for you things in it like whole wheat flour, nuts and honey. Have one of these babies warm out of the oven with a glass of milk (for calcium) or orange juice (for vitamin C) or tea (cus it’s warm and yummy and what goes better with warm scones than tea??)

And don’t forget to drench your scone in more honey. If your immediate thought after reading that was something along the lines of “Duh, Jeannette… way ahead of you,” then we could be besties. For serious.

Picture 851 copy

Scones are notorious for being fussy. You can’t overwork the dough or you’re guaranteed tough scones, and the dough is very easily overworked. The best advice that I have ever read regarding making scones (aside from work quickly) is this “Use your hands.” You hands are your best tool here: they are softer and gentler than any rubber spatula or wooden spoon could be; which means they will be gentler on your scone dough and agitate the dough less resulting in fluffy scones. Just be sure to have a napkin handy to turn on the faucet to wash your hands. Unless you think random bits of dough hanging out on your faucet handle-thingies (omg, what the heck are they called?!) is a decorative statement… in which case, I’d have to give you the look -_-

The only change I made to the original recipe was to use pecans instead of walnuts and I made 8 medium scones instead of 12 small-ish scones. That was a direct result of my laziness in not wanting to divide the scone dough so I just patted it into a larger circle and baked for about 2 minutes more. Next time I’ll brush with some cream and sprinkle some raw sugar on it for extra texture. There are a lot of good scone making tips here. Ya learn something new everyday 🙂

Picture 846 copy

Honey-Nut Scones
from Baking: from My Home to Yours

Ingredients:

1 large egg
2 tablespoons honey
1/2 cup cold whole milk (I used 2%)
1 1/2 cups all-purpose flour
1/2 cup whole wheat flour
1 tablespoon baking powder
1/4 teaspoon baking soda
1/4 teaspoon salt
1 stick (8 tablespoons) cold unsalted butter, cut into small pieces
1/2 cup chopped walnuts (I used pecans)

GETTING READY: Center a rack in the oven and preheat to 400 degrees F. Line a baking sheet with parchment paper or a silicone mat.

Stir the egg, honey and milk together.

Whisk the flours, baking powder, baking soda and salt in a large bowl. Drop in butter and, using your fingers, toss to coat the pieces of butter with flour. Quickly, working with your fingertips (my favorite method) or a pastry blender, cut and rub the butter into the dry ingredients until the mixture is pebbly. You’ll have pea-size pieces, pieces the size of oatmeal flakes and pieces the size of everything in between — and that’s just right.

Pour the liquid ingredients over the dry ingredients and stir with a fork (or by hand) just until the dough, which will be wet and sticky, comes together. Don’t overdo it. Stir in chopped walnuts.

Still in the bowl, gently knead the dough by hand, or turn it with a rubber spatula 8 to 10 times. Turn the dough out onto a lightly floured work surface and divide it in half. Working with one piece at a time, pat the dough into a rough circle that’s about 5 inches in diameter, cut it into 6 wedges and place on the baking sheet. (At this point, the scones can be frozen on the baking sheet, the wrapped airtight. Don’t defrost before baking — just add about 2 minutes to the baking time.)

Bake the scones for about 20 minutes, or until the tops are deeply golden and firmish to the touch. Transfer them to a rack and cool for 10 minutes before serving, or wait for the scones to cool to room temperature. Enjoy : )

Picture 854 copy

Head on over to the LYL page to see everyone that baked scones and Far Brenton with us this week. You can find the recipe for Far Brenton (which I sadly didn’t get a chance to make) on Nicole’s blog, Cookies on Friday.

Tuesdays with Dorie is sadly coming to an end. I joined a bit late in the game but I have learned so many things and made so many great friends through this experience. I’d like to thank you all for making this something to remember.

Apple Nut Muffin Cake – TWD

Picture 188 copy

I need an extension cord.

You see, I live in Southern Texas were we don’t have Autumn. To prove my point: just a few days ago it was 96 degrees outside. But today, right now it is 66 degrees outside. SIXTY-SIX, people. I realize it’s only 9:30am. But one takes what one can get 🙂

But instead of typing up this post, sitting indian-style on my “back porch” being enveloped in the cool morning air, I am sitting on the couch. No extension cord. I am positive that this is to be remedied.

1 2

Extension cord is going on the shopping list 🙂

This cake is a great choice for a Fall day (like today!!) so I couldn’t skip it. It is lightly sweet, filled with small bites of apple and perfectly spiced. The texture, for me, wasn’t that of a muffin but rather a soft, slightly dense cake… I guess that it what a muffin is supposed to be; but I’m not lucky enough to churn out muffins with this texuture.

Picture 183 copy

I halved the recipe, omitted the nuts, ramped up the cinnamon, added nutmeg, cloves and some ginger then baked it in an 8×4″ loaf pan and glazed with a simple icing (3/4 cup confectioners sugar + small splash of heavy cream + tiny bit of vanilla, real simple), sliced thick and enjoyed with a fork and a cup of tea. Today couldn’t get any better.

Unless, of course, I had that extension cord.

Thanks to Katrina of Baking and Boys for choosing this gem. Head on over to her blog for the recipe (or simply click here.)

Picture 187 copy

Happy Autumn (finally)!!!

Banana Bread Pancakes

Picture 133 copy

When I was in high school, I was not your typical sleeps-til-noon teenager. Nope, not me. I spent every weekday morning getting out of bed at 5am to be able to get up, shower, beautify, collect my things and be out the door on time to catch the bus. So when the weekend came, sleeping in meant 8am.

Now, being an adult, I seem to have found my love for sleep. I usually wake up no earlier than 10am on my days off (unless certain circumstances arise) and sometimes I can even sleep until noon, depending on how late I stayed up baking the night before.

This newly found adoration for my comfy bed and warm blankie sadly interferes with the other love of my life: pancakes for breakfast.

1 3 4

After staring at the clock in disbelief (and other various distractions), I’m usually ready to decide what to make for breakfast around noon. Then I get distracted some more and I either end up skipping breakfast all together or having pancakes at 1:30pm.

It’s National Pancake Day, don’t be like me: start your day off right, enjoy your pancakes for breakfast 🙂

These pancakes taste like you whipped up banana bread dough and accidentally spilled it in your skillet. It tastes exactly like banana bread; but with the whole wheat flour, small amounts of sugar and butter, you can feel good about piling 4 onto your plate. They are fluffy, thick and full of delicious flavor.

Picture 136 copy

Banana Bread Pancakes
adapted from How Sweet Eats

makes 4 pancakes

Ingredients:

2/3 cups whole wheat pastry flour
1 teaspoon baking powder
pinch of salt
3 tablespoons brown sugar
1/2 teaspoon cinnamon
1/8 teaspoon nutmeg
4 tablespoons milk
1 teaspoon vanilla extract
1 large ripe banana, mashed
1 tablespoon butter, melted

Instructions:

In a medium bowl, combine flour, baking powder, sugar, salt, cinnamon, and nutmeg, whisking until combined. In a meauring cup, measure out the milk and vanilla extract and give it a quick stir. Add the wet ingredients to the dry and stir with a rubber spatula. At this point, the mixture will still be dry. Add in mashed banana and mix thoroughly. Add melted butter and stir until batter is somewhat smooth.

Heat a skillet over medium heat. When hot, spritz with non-stick cooking spray and using a 1/3 cup measure, spoon batter into rounds and cook until bubbles form on top and the pancake looks set around the edges – about 2-3 minutes. Flip and cook for a minute or two more. Repeat with remaining batter. Serve hot with butter and syrup, or however you wish.

Note: If you don’t have whole wheat pastry flour, you can use 1 cup of regular whole wheat + 1 cup of all purpose. Or 2 cups of all purpose.

Picture 122 copy

Single Lady Pancake

Picture 004 copy

If I could have a lifetime supply of anything in the entire world, it would be pancakes.

And shoes.

And money.

And glitter.

And pink. Yes, just pink.

I’m veering from the point.

Which is pancakes. I could eat them for every meal. Every day. All sizes, shapes, flavors, topped with maple syrup, fruit or whatever is within reach of my grubby little hands.

1 3

Pancakes.

When I came across this recipe, I scoffed at the idea of one pancake. ONE. Singular. Sad. But It was simple enough so that if I wanted another one, I could easily mix it together so I decided to give it a shot.

And holy pancake nirvana, was this good. And filling. I only needed one.

Yes, ONE. Singular. Happiness.

Picture 010 copy

Single Lady Pancake
but totally for the married, committed and dating as well 🙂
Adapted from JoytheBaker

makes one large pancake

Ingredients:
1/3 cup whole wheat pastry purpose flour (or sub for AP flour)
1 Tablespoon dried oats (quick cooking or regular)
2 teaspoons sugar
1/4 teaspoon cinnamon
1/2 teaspoon baking powder
1/4 teaspoon baking soda
pinch of salt
1 Tablespoon plus 2 teaspoons vegetable oil
1/4 cup plus 2 Tablespoons buttermilk (you can sub regular or soy milk)
splash of vanilla extract
1 Tablespoon of peanut butter (optional)
small handful semi sweet chocolate chips (I used mini-chips)
toasted pecans*

Picture 013 copy

Directions:
In a small bowl, whisk together flour, oats, sugar, cinnamon, baking powder, baking soda and salt. In a separate bowl whisk together oil, buttermilk, vanilla extract and peanut butter (if using). Combine the wet and dry ingredients and stir to combine. The mixture will be thick. Fold in the chocolate chips.

Heat a small frying pan with a teaspoon of oil (or cooking spray, or if you have a great non-stick pan you don’t need anything). Pour in the pancake batter and spread some with the back of a spoon. Cook over medium heat until bubbles form and pop on the surface of the pancake.

Flip. It’s ok if it doesn’t flip perfectly… which it probably won’t. It’s not you, it’s the pancake. It’s sassy.

Cook until golden brown. Remove from pan and onto a plate. Top with toasted pecans and maple syrup. Or whichever way makes you “mmmm” with delight.

*to quicky toast your pecans, just “saute” them in your hot skillet before you make the pancake. Let them get toasty and warm for about 3-4 minutes, set aside.

Picture 007 copy

Carrot Spice Muffins – TWD

Picture 330 copy

Have you ever tried to grate up a million and three mini carrots to make muffins?

I have. And either I’m extra clumsy or just prone to bad luck, but it seems I grated my own fingers more than the dang carrots.

Scrapes aside, once the carrots were grated, these muffins were very simple to make. I didn’t even use any machinery. Just a whisk and a rubber spatula.

Picture 327 copy

Mix, pour, bake. Simple, simple, simple.

I really should make muffins more often.

Don’t expect these to be like carrot cake (unless you slop a heaping of cream cheese frosting on top) the flavor profile is similar but not exact. But these are a tasty treat either way.

Picture 333 copy

Thank you to the lovely Nancy for choosing these muffins. They made a bunch of hard workers have a bit of a better morning 🙂 Head on over to her blog for the recipe (or click here to be taken directly to it.)

Picture 337 copy

Whole Wheat Buttermilk Blueberry Waffles

Picture 245 copy

Last week my good friend wanted some company as she spent the day with her nieces. For sanity’s sake or just for the sake of some adult company, it didn’t really matter. Shopping and going to see the Smurfs? WIN!

I know what you’re thinking. Aren’t you an adult? A 25 year old without kids? Why yes, yes I am. But Smurfs hold a wonderful place in my heart. I remember having a Smurf book when I was super little and I either read it to myself or it was read to me by my Oma. Either way, it reminds me of a simpler time.

And I love me some NPH.

Picture 235 copy

So I got a Cinnabon Roll Pretzel and watched this adorable child oriented film and let myself fall in love with these adorable little blue lumps of love. I wanted to squish them.

Next thing I knew I wanted blueberries. And I wanted them in waffles. Enter these waffles. Warm, fragrant, fluffy, delicious and pretty darn healthy for a waffle.

I usually go super plain when it comes to waffles because I have a cheap-o tiny 2 slot waffle maker (that I LOVE) that doesn’t really treat my waffle add-ins with tender lovin’ care. But that’s probably because I want to add chopped apples and huge chunks of chocolate. When will I learn?

Also, when will I learn not to overfill the cupcake pan? That’s an issue to tackle another day. Clearly, I have issues.

Issues aside, it’s National Waffle Day. Buck up and make these waffles. Heck make ANY waffles. Then stop by and share them with me because my waffle maker is taking a rest from my huge smurf filled waffles 😉

Picture 246 copy

Whole-Wheat Buttermilk Blueberry Waffles Recipe
adapted from here

Serves 2-3 (yields 8 5×4″ waffles)

Ingredients:
3/4 cup all-purpose flour
1/4 cup whole-wheat pastry flour
1/4 teaspoon baking soda
3/4 teaspoon baking powder
1/2 teaspoon salt
3/4 teaspoon cinnamon
2 Tablespoons granulated sugar
1 1/2 eggs (0.75 grams), at room temp.
2 Tablespoons (1 oz) unsalted butter, melted
1 cups buttermilk, at room temp.
1/4 teaspoon vanilla extract
1 cup blueberries

Instructions:

Preheat your waffle iron. Place a few paper towels underneath it if you are a serial over-filler like I am.

Mix the all-purpose flour, whole-wheat flour, baking soda, baking powder,
salt, cinnamon and sugar in a large bowl with a whisk until fully combined.

In a small bowl (or a 4 cup measuring cup) measure out buttermilk. Add the eggs, melted butter and vanilla and gently whisk together until thoroughly blended. Add the buttermilk mixture to the flour mixture, blending until JUST combined (or the flour disappears) with a whisk or a rubber spatula. It’s best not to over-mix here. A few lumps are better than none, trust me.

Gently and quickly fold the blueberries into the batter taking care not to over-mix.

Spray your waffle iron with a spritz of non-stick cooking spray. Cook the waffle batter in your waffle iron according to manufacturer’s instructions (every waffle iron is different but mine took about 5 minutes per waffle batch).

Serve with fresh blueberries and whipped cream or maple syrup and bacon. Or your favorite way 🙂 Just be sure to eat ’em warm!

To freeze any leftover waffles: let waffles come to room temperature on a cooling rack then pop them in a Ziploc bag and squeeze out as much air as you can. Pop them in the toaster (or toaster oven) for a quick breakfast on a busy morning.

Picture 247 copy