Chocolate-Blackberry Ice Cream

Picture 014 copy

I think I’m finally becoming a true Texan.

Not to say that I haven’t been an ACTUAL Texan these years, but let me tell you… I HATED Summer. Loathed it, even. I yearned for that week of Winter. For years I’ve loved Winter more than any other season. Now I find myself looking forward to the warmer weather.

Ok. Maybe it’s not the actual warm weather I’m looking forward to, but instead everything that warm weather brings with it.

Summer fruit, hello! Shorts. Beautiful flowers. Bright, sunny days. Laying poolside with a margarita in hand. Campfires and s’mores. Weekends at the river. And most importantly… ice cream.

Picture 013 copy

Any and all ice cream. It’s a must down South, it’s kinda hot. Take it from a girl that could get perfectly ripened peaches a month ago. Maybe I should make some peach ice cream next!

But for now, I’m sharing a strange pairing with you: blackberries and chocolate. It works. Use amazing chocolate and ripe blackberries, and a splash or two of heavy cream and never look back.

Picture 006 copy

Chocolate-Blackberry Ice Cream
Yields about 3 cups of ice cream

Ingredients:

1 1/2 cups heavy cream
5 Tablespoons (40 g) unsweetened Dutch-process cocoa powder
2/3 cup (130 g) sugar
2 cups (240 g) blackberries, fresh*
small pinch of salt
1 teaspoon vanilla extract
1 Tablespoons dark rum, optional

* I used fresh blackberries but frozen berries should work just fine. I would suggest to let the berries sit in it’s bath a bit longer.

Instructions:

Measure the heavy cream, cocoa powder, sugar and salt into a medium saucepan and whisk to combine (to make things easier I set my saucepan on my scale and measured all ingredients in it to save dirty dishes).

Set the pan over medium heat and, whisking frequently, bring the mixture to a full, rolling boil. My mixture was pretty thick to start out with, but this is OK, it will thin out once it heats. Turn off the heat under the pan, add the vanilla extract and dark rum and give it a good whisk. Then add the blackberries. Cover the pan and set aside for 10 minutes.

Puree the mixture in a blender, immersion blender or a food processor, making sure that there are no large clumps of blackberries left. Strain mixture into a medium bowl, cover with plastic wrap and refrigerate until thoroughly chilled (overnight is good). The mixture will be thick – almost like pudding – once chilled.

Freeze in your ice cream maker according to the manufacturer’s instructions. Transfer to airtight container and store in your freezer. Top with whipped cream, a healthy dose of unhealthy toppings and dive right into Summer!

Picture 011 copy

Adapted from The Perfect Scoop via Tracey’s Culinary Adventures

Shirley Temple Cupcakes

Picture 243 copy

Hey there, stranger!

Well, technically I’m the stranger. It’s almost as if I dropped off the face of the blog-world. You probably thought I forgot about you, that I gave up on sugar and baking, and that I’ve turned the other cheek. I assure you, I haven’t.

Life happened and in the midst of everything, I needed a hiatus. That hiatus turned to laziness then a loss of motivation. I think I’m ready to give it another go, I hope you’ll still have me.

After all, I made you cupcakes.

Picture 236 copy

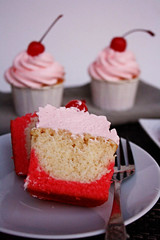
These bad boys are SO tasty. A fluffy vanilla infused cake base with a cherry base, frosted with cherry infused buttercream and topped with a cherry.

So what do you say? Friends again? Pretty please with a cherry on top?

1 3 5

Shirley Temple Cupcakes
Yields 12 cupcakes

Ingredients:

For the cupcakes:
1 and 1/2 cups (6 oz) plus 1 tablespoon all-purpose flour
1 teaspoon baking powder
1/2 teaspoon salt
1/2 cup (1 stick) unsalted butter, at room temperature
1 cup (200g) granulated sugar
2 large eggs, at room temperature
1/2 cup Cherry 7-Up, at room temperature*
1/2 teaspoon vanilla extract
1/2 teaspoon almond extract
1 tablespoon maraschino cherry juice
Red food coloring

*I used regular 7-Up with a splash of maraschino cherry juice. It worked well!!

Instructions:

To make the cupcakes: Preheat the oven to 350 degrees, and prepare a cupcake pan with your desired paper liners, set aside.

In a medium bowl, whisk together 1 and 1/2 cups of flour, baking powder, and salt. Set aside.

In the bowl of your stand mixer fitted with the paddle attachment (or in a large bowl with a hand mixer), add the butter and sugar and beat on medium-high speed until creamy, about 2-3 minutes.

Add the eggs, one at a time, mixing well after each addition. (My mixture looked satiny at this point.)

Reduce the mixer speed to low, and alternate adding the flour mixture and the Cherry 7-Up, beginning and ending with the flour, mixing well and scraping down the sides of the bowl as necessary. Add the vanilla and almond extracts, mixing well. (My mixture actually looked a bit curdled but they baked up great!)

Place about 3/4 cup of the cupcake batter in a separate small bowl and add the remaining 1 tablespoon of flour, maraschino cherry juice, and red food coloring (to your desired tint).

Evenly distribute the red cupcake batter among your prepared liners, about 1-2 teaspoons per liner, gently smoothing out the batter.

Once the red batter is in place, evenly distribute the remaining cupcake batter among the cupcake liners, making sure not to mix the two batters. Be sure to cover the red batter completely so it doesn’t bake up the sides and to the top.

Bake for 15-20 minutes, or until a cake tester inserted in the middle comes out with a few moist crumbs attached (do not overbake). Let cool completely on a wire rack before frosting.

For the Buttercream frosting:
1/2 cup (1 stick) unsalted butter, at room temperature
Pinch salt
2 and 1/2 cups powdered sugar
1/4 teaspoon vanilla extract
1/4 teaspoon almond extract
1 teaspoon fresh lemon juice
1 tablespoon maraschino cherry juice

For garnish:
12 maraschino cherries with stems

To make the Buttercream Frosting: In the bowl of your standing mixer fitted with the paddle attachment, cream the butter until light and fluffy, about 2-3 minutes.

Add the pinch of salt, powdered sugar, vanilla and almond extracts, lemon juice, and maraschino cherry juice into the bowl. On low speed, incorporate the ingredients until the powdered sugar is mixed in. Increase the speed to medium and beat for about 2-3 minutes. If you like your frosting thicker, add more powdered sugar (small amounts at a time) and if you like it thinner add a bit more cherry juice.

Pipe as desired onto your cooled cupcakes and garnish with a maraschino cherry. Enjoy!

Picture 237 copy

Recipe from The Curvy Carrot For a gluten-free version go to Simply Gluten-Free for the recipe.

Dimply Plum Cake

Picture 143 copy

Today’s TWD post is supposed to be a delicious looking fig cake (head on over to Ursula of Cookie Rookie’s blog for the recipe).

I have figs. But I chose to save them for something else as you won’t find figs running rampant around here, so when I saw two packs of great looking mission figs, I nabbed them with a different project in mind. I’ll get to this cake eventually, but for right now please accept this equally delicious plum cake.

Serve it warm, loaded up with some vanilla ice cream or cinnamon-infused whipped cream for a wonderful Autumn dessert.

Picture 149 copy

Dimply Plum Cake
recipe from Baking: From My Home to Yours

Ingredients:

1 1/2 cups all purpose flour
2 teaspoon baking powder
1/4 teaspoon salt
Scant 1/4 teaspoon ground cardamom (optional)
5 Tablespoons unsalted butter, at room temperature
3/4 cup packed light brown sugar
2 large eggs
1/3 cup flavorless oil, such as canola or safflower
grated zest of 1 orange
1 1/2 teaspoons pure vanilla extract
8 plums (Italian prune plums, if you can find them), halved and pitted

Instructions:

Center a rack in the oven and preheat the oven to 350 degress F. Butter an 8-inch square baking pan, dust the inside with flour, tap out the excess and put the pan on a baking sheet.

Whisk the flour, baking powder, salt and cardamom, if you’re using it, together.

Working with a stand mixer, preferably fitted with a paddle attachment, or with a hand mixer in a large bowl, beat the butter at medium speed until soft and creamy, about 3 minutes. Add the sugar and beat for another 2 minutes. Add the eggs one at a time, beating for a minute after each addition. On medium speed, beat in the oil, orange zest and vanilla. The batter will look very light and smooth, almost satiny. Reduce the mixer speed to low and add the dry ingredients, mixing only until they are incorporated.

Run a spatula around the bowl and under the batter, just to make sure there are no dry spots, then scrape the batter into the pan and smooth the top. Arrange the plums cut side up in the batter – I usually make 4 rows of 4 plum halves each – jiggling the plums a tad just so they settle comfortably into the batter.

Bake for about 40 minutes, or until the top is honey brown and puffed around the plums and a thin knife inserted into the center of the cake comes out clean. Transfer the cake to a rack and cool for 15 minutes – during which time the plums’ juice will return to the fruit – then run a knife around the sides of the pan and unmold the cake. Invert and cool right side up.

Picture 157 copy

Key Lime Pie Ice Cream

Picture 223 copy

As I’m sure I’ve said a billion and one times, I’m from Houston. And here in Houston, there really isn’t such a thing as Autumn. In my opinion, 80-something degree weather isn’t reminiscent of Fall.

But this isn’t me complaining (…yet, give me a few more weeks) but rather relishing in these last few weeks of warm weather.

1   3

The last few weeks of shimmering, golden sunlight gently falling on your sleepy face, peeking through that tiny slit in your curtains that, if it were not for the sun, you’d never notice. The last opportunities to walk around the flea markets hand-in-hand with your husband as you point out all the fluffy, adorable puppies that you demand he buy you, but he never does. The last chances to simply stand outside, stretch and breathe in deeply, inhale the warmth of the sunlight. The last moments to enjoy wearing your favorite feminine, flowy, flowery (alliteration!) tank top before you sadly (and begrudgingly) have to banish it for a few months.

And the last few excuses you have to make delicious, creamy ice cream that reminds you of far away islands.

This ice cream is creamy, flavorful and chocked full of graham cracker goodness. And it’s super simple to whip up. Make this before it’s too late 😉

Picture 233 copy

Key Lime Pie Ice Cream
adapted from Cooking Light via Good Life Eats

Ingredients:

1 1/2 cups whole milk
1/2 cup lime juice*
1/2 cup heavy cream
Dash of salt
1 (14-ounce) can sweetened condensed milk
4 graham cracker sheets, coarsely crushed

*Note: I used fresh squeezed lime juice but the original recipe states that bottled lime juice can be used. Just be sure that it is as fresh as possible.

Directions:

In a large bowl, combine milk, lime juice, heavy cream, salt and sweetened condensed milk; whisk to combine.

Pour mixture into your ice cream maker, and freeze according to manufacturer’s instructions. I used my Kitchenaid Ice Cream Maker Attachment and let it run for the suggested 25 minutes and my ice cream was not what you would consider soft serve, so I let it run for another 10 minutes until it became more solid.

Stir in the crushed graham crackers into ice cream. Spoon ice cream into a freezer-safe container, and cover and freeze for 1 hour or until firm. Sprinkle each serving with 1 teaspoon graham crackers. Garnish with lime wedges or lime zest if you wish.

Picture 235 copy

Ahhhh, who am I kidding? I love ice cream so much that I’m sure I’ll post more in the Winter months. After all, I am the loon who drinks hot cocoa and eats chili in the Summer and craves ice cream in the Winter.

Flip Over Plum Cake – TWD

Picture 183 copy

I have taken it upon myself to re-name this recipe to “the key to my mother’s heart.”

Plums are pretty much my mommy’s favorite fruit ever. She loves them all: sweet, sour, black, red, overripe, fresh, baked, dried, juiced… you name it.

So I jumped at the chance to invite her over when I was making these and as soon as I said the magic words (plum cake, duh) she came right over. She says she came for the company but I think she secretly came for the cake 😉 She walked in and could smell the plums mingling with the cake and cinnamon and she was eager to try some! Which is rare as my mom isn’t really one for a lot of sugary baked sweets.

1 2 3

Lucky for her, I scaled back the recipe (I quartered it and it was perfect for 3 ramekins) which meant that it was in and out of the oven in no time. Topping it with some homemade vanilla ice cream (recipe coming soon, promise) guaranteed that this dessert wouldn’t last long.

And that held true. She inhaled it and loved every delicious, warm bite.

Picture 190 copy

That makes it a definite repeat in this house 🙂

A big thanks to Becky of Project Domestication for choosing this recipe, you made my mom very happy 🙂

Head on over to Becky’s blog for the recipe. (Or click here to go directly to it.)

Picture 189 copy

Strawberry Spinach Orzo Salad

Picture 045 copy

Old me: fruit in salad? Weird. Put plate away.

New me: fruit is salad?! GIMMEEEEE!!!!

I’m reformed, I must admit. Up until a few years ago, fruit in a salad was unheard of to me. I liked salad. But salad = vegetables. Period. Nothing fishy here folks.

But one day I woke up and decided that I liked fruit better than I liked veggies and I was bored of the saaaaame old boring salads: lettuce, tomatoes, cucumbers, carrots, onions, avocado and dressing. Bo-ring.

Picture 043 copy

So I was at a restaurant that rhymes with schmilis, and tried a salad with pineapples, mandarin oranges and blueberries and I swear if the floor wasn’t slightly sticky and there wouldn’t have been a baby crying behind me, I would have mistaken this booth for heaven.

One day, I will re-create this salad. But until then, I wanted to experiment with what I had on hand. And that was sweet, sweet strawberries and spinach.

This salad comes together quickly. The most work you’ll do is cooking the orzo, and that’s about as simple as cookie noodles. Scout’s honor. So get to it folks. Don’t wait two decades until you try fruit in your salad.

Picture 040 copy

Warm Strawberry Spinach Salad
Adapted from here and here
serves 2

For the salad:
1/2 cup uncooked whole wheat orzo (or any other grain)
splash of olive oil
1/4 red onion, sliced
1 garlic cloves, minced
1/2 cup chick peas
4 cups raw spinach
4 large strawberries, sliced
salt and pepper to taste

For the “dressing” :
4 large strawberries, sliced
1 Tablespoon club soda (or champagne, if you’re fancy)
pinch of sugar

To make the salad:
In a medium pot, boil water for orzo and cook according to directions. Drain and set aside until ready to use.

Heat a large skillet over medium heat and add a splash of olive oil. Add sliced red onion and chickpeas to the skillet with a sprinkle of salt and stir to coat. Saute until onions are soft, about 10 minutes. Add in garlic and cook for 3 minutes until aromatic.

Turn off heat and toss in spinach. Allow residual heat to slightly wilt the spinach and remove from heat. (Alternatively you can choose to wilt the spinach completely, in which case leave it over the heat until wilted OR toss everything together with fresh spinach and eat is raw, delicious either way.) Add in strawberries and orzo and mix to coat. Season with salt and pepper. Place in a beautiful big bowl.

To make the dressing: toss strawberries, club soda and sugar in a food processor and pulse until liquefied. Drizzle over your salad (and toss to coat if you like).

Serve immediately. It tastes good cold too!

Picture 044 copy

Honey Cranberry Apricot Almond Biscotti

Picture 012 copy

My mommy likes biscotti. And I like my mommy. I want her to be happy. So I wanted to make her yummy fruit studded biscotti since they are her favorite.

But dang I didn’t plan for this.

The dough was sticky and difficult to work with. I pulled the log of biscotti out too soon so the center was still a bit raw. Then, without thinking, I placed the baking sheet on a hot burner and it burned a few of the best looking biscotti. And even after 10 mins of extra oven time, they came out still slightly soft. It didn’t seem to be coming together. I’m still not completely sure that I should share this recipe with all it’s hiccups, but the end result was tasty. Regardless of the mini-stroke that I incurred trying to make these.

Below is my adaptation of the recipe. It originally called for 1 less cup of flour but that left the dough pretty soupy. My only advice it to have a bowl of flour next to your work surface and flour the heck out of your counter and hands while working with the dough.

Picture 015 copy

Cranberry Honey Pistachio Biscotti
adapted from the Gourmet Cookbook as seen on Joy the Baker

Ingredients:

1 1/3 cup dried cranberries
1/2 cup dried apricots, chopped
2 1/2 cups unbleached all-purpose flour
1/2 teaspoon baking soda
1/2 teaspoon baking powder
1/2 teaspoon salt
scant 1 cup sugar
3 large eggs
1 teaspoon vanilla
2 Tablespoons honey
1 cup whole almonds
1 large egg beaten with one teaspoon of water, for an egg wash

Directions:

Soak cranberries in boiling water to cover in a small bowl until softened, about 10 minutes. Drain, then pat them dry with a paper towel.

Put a rack in the middle of oven and preheat oven to 325 degrees F. Line a large baking sheet with parchment paper and set aside.

In the bowl of a stand mixer (or a large bowl), whisk flour, sugar, baking soda, baking powder and salt until combined. Add eggs, vanilla and honey and with your stand mixer, mix (or with an electric mixer) at medium speed until dough forms. Add cranberries, apricots and pistachios and mix at low speed until combined.

Turn dough out onto a WELL-floured surface and knead a few times. The dough will still be QUITE sticky! Halve dough. Using floured hands, form each half into a slightly flattened 13-by-2-inch log on baking sheet, spacing logs about 3 inches apart. (Making two loaves was quite a task so I just made one large log instead) Brush logs with egg wash.

Bake until golden 25 to 30 minutes. Cool logs on baking sheet on a rack for 10 minutes. (Leave oven on.)

Transfer logs to a cutting board. With a serrated knife, cut diagonally into 1/2-inch thick slices. Arrange slices, cut side down in one layer on a baking sheet (it’s fine if slices touch each other). Bake, turning once, until golden and crisp, 20-25 minutes. Transfer biscotti to racks to cool.

Optional: melt a bit of white chocolate and drizzle onto the cooled biscotti and allow to harden.

Picture 013 copy

Fresh Strawberry Ice Cream

Picture 081 copy

I was never a big fan of strawberry ice cream. I was the one who dug out all the chocolate ice cream from the neapolitan mix and left the other two flavors alone and lonely. Yep, that was me. Unrelenting. It’s not that I hated strawberry ice cream (or vanilla for that matter) but it just wasn’t my favorite by any stretch of the imagination. So there it sat with it’s partner in crime, Vanilla.

But this strawberry ice cream… I will eat by the quart, huge spoon in hand. Happily, willingly and blissfully. It is bursting with fresh berry flavor, lightly sweet, and completely enamoring.

1 3 4

I never know when certain fruits and vegetables are in or out of season. I just buy what looks good and what I like to eat but never really pay attention to WHEN I buy it. But one thing I do know is that strawberries are Summer fruit. Strawberries are fruit, right? Sheldon Cooper says they aren’t. But I digress…

When Summer ends, I mourn the loss of fresh, tasty strawberries.

Since it’s still Summer in Texas (and, unfortunately, will be for quite some time) I’m going to go ahead and post this amazing ice cream. I sincerely hope that delicious strawberries are still available where you are. If they aren’t, I’m pretty sure you can use frozen berries, thaw and drain them.

Give strawberry a chance, please make this.

Picture 086 copy

Fresh Strawberry Ice Cream
Adapted slightly from here

Ingredients:

1 pound strawberries, washed and stemmed
1 cup sugar, divided
1 tablespoon lemon juice
2 cups heavy cream
1/8 teaspoon salt
4 egg yolks
1 teaspoon vanilla extract

Directions:

In a medium bowl, lightly mash strawberries with 1/4 cup sugar and the tablespoon of lemon juice. Toss to combine and set aside. Alternatively, put this in your food processor and pulse a few times just to cut up the fruit. You do not want a smooth puree.

In a saucepan, stir together cream, remaining 3/4 cup of sugar, and salt. Bring the cream mixture to a simmer over medium heat, then take the pot off the heat. DO NOT take your eyes away from cream on the stove, ever. It can go from merrily bubbling to overflowing mass in 0.3 seconds.

In a small bowl, whisk the egg yolks until smooth. Slowly add a ladleful of the hot cream mixture to the egg yolks, whisking continuously. Slowly pour the yolk mixture back into the pot of cream and whisk until incorporated. Bring the liquid back to a simmer and cook, stirring, for 5 – 6 minutes until the mixture is thick enough to coat the back of a spoon. Strain the mixture through a sieve into a medium bowl.

Puree the strawberry mixture in a blender or food processor and pulse until smooth. Stir the strawberry puree into the cream mixture until completely incorporated. Stir in the vanilla extract.

Place a piece of plastic wrap directly on the surface to prevent a skin from forming while cooling. Place bowl in the refrigerator and allow the mixture to cool completely – at least two hours.

After it is well chilled, freeze mixture in an ice cream maker according to manufacturer directions. Or make it without an ice cream maker a la David Lebovitz.

Whole Wheat Buttermilk Blueberry Waffles

Picture 245 copy

Last week my good friend wanted some company as she spent the day with her nieces. For sanity’s sake or just for the sake of some adult company, it didn’t really matter. Shopping and going to see the Smurfs? WIN!

I know what you’re thinking. Aren’t you an adult? A 25 year old without kids? Why yes, yes I am. But Smurfs hold a wonderful place in my heart. I remember having a Smurf book when I was super little and I either read it to myself or it was read to me by my Oma. Either way, it reminds me of a simpler time.

And I love me some NPH.

Picture 235 copy

So I got a Cinnabon Roll Pretzel and watched this adorable child oriented film and let myself fall in love with these adorable little blue lumps of love. I wanted to squish them.

Next thing I knew I wanted blueberries. And I wanted them in waffles. Enter these waffles. Warm, fragrant, fluffy, delicious and pretty darn healthy for a waffle.

I usually go super plain when it comes to waffles because I have a cheap-o tiny 2 slot waffle maker (that I LOVE) that doesn’t really treat my waffle add-ins with tender lovin’ care. But that’s probably because I want to add chopped apples and huge chunks of chocolate. When will I learn?

Also, when will I learn not to overfill the cupcake pan? That’s an issue to tackle another day. Clearly, I have issues.

Issues aside, it’s National Waffle Day. Buck up and make these waffles. Heck make ANY waffles. Then stop by and share them with me because my waffle maker is taking a rest from my huge smurf filled waffles 😉

Picture 246 copy

Whole-Wheat Buttermilk Blueberry Waffles Recipe
adapted from here

Serves 2-3 (yields 8 5×4″ waffles)

Ingredients:
3/4 cup all-purpose flour
1/4 cup whole-wheat pastry flour
1/4 teaspoon baking soda
3/4 teaspoon baking powder
1/2 teaspoon salt
3/4 teaspoon cinnamon
2 Tablespoons granulated sugar
1 1/2 eggs (0.75 grams), at room temp.
2 Tablespoons (1 oz) unsalted butter, melted
1 cups buttermilk, at room temp.
1/4 teaspoon vanilla extract
1 cup blueberries

Instructions:

Preheat your waffle iron. Place a few paper towels underneath it if you are a serial over-filler like I am.

Mix the all-purpose flour, whole-wheat flour, baking soda, baking powder,
salt, cinnamon and sugar in a large bowl with a whisk until fully combined.

In a small bowl (or a 4 cup measuring cup) measure out buttermilk. Add the eggs, melted butter and vanilla and gently whisk together until thoroughly blended. Add the buttermilk mixture to the flour mixture, blending until JUST combined (or the flour disappears) with a whisk or a rubber spatula. It’s best not to over-mix here. A few lumps are better than none, trust me.

Gently and quickly fold the blueberries into the batter taking care not to over-mix.

Spray your waffle iron with a spritz of non-stick cooking spray. Cook the waffle batter in your waffle iron according to manufacturer’s instructions (every waffle iron is different but mine took about 5 minutes per waffle batch).

Serve with fresh blueberries and whipped cream or maple syrup and bacon. Or your favorite way 🙂 Just be sure to eat ’em warm!

To freeze any leftover waffles: let waffles come to room temperature on a cooling rack then pop them in a Ziploc bag and squeeze out as much air as you can. Pop them in the toaster (or toaster oven) for a quick breakfast on a busy morning.

Picture 247 copy