Grilled Pizza Tutorial

Picture 058 copy

Let me preface this by saying that I live in Texas. Down here we grill chicken, brisket, sausage and turkey legs. Not pizza. Grilling pizza is pretty damn unknown here. Well, even if it’s not, I’ll be bold enough to say that it is. Let’s pretend that I’m right. Also, it may be the tail-end of Summer where you are so grilling at this time might seem weird to you, but here it’s still Summer. Today’s high of 100F says so.

Having cleared that up, I have never grilled a pizza. Ever. I had never even heard about it until I started blogging. But once I saw the idea and got past my “Texans only grill BBQ” mind set, I was so intrigued! And it’s taken far too long for me to take the leap.

I’ve lost so many years of the best pizza I’ve ever made at home. But I’m hip to the jive now groovy people. Whoa, taking it back 1975.

4  5

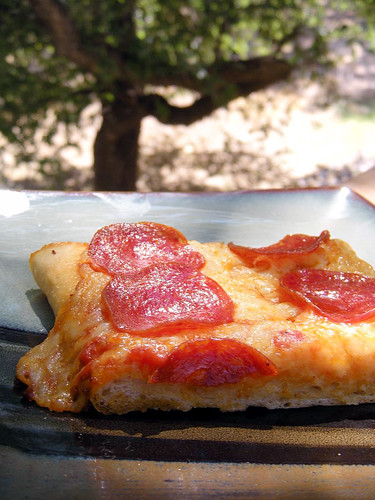
Bad blog writing aside, this really is the best pizza I’ve made. The outside of the crust is lightly crispy, the inside is fluffy and soft and once you have the pizza crust ready, it takes no more than 20 minutes, start to finish. It is so worth it.

Note: I realize there are about as many ways to grill a pizza as there are to top them but this seemed easiest to me so I went with it. Head on over to Mel’s blog for a great tutorial with pictures for every step. I would have done that but it’s really hard to grill and NOT burn lunch and take pictures all by yourself 🙂

Picture 067 copy

Grilled Pizza
via Mel’s Kitchen Cafe

I used this pizza dough, pre-made sauce (I had to use what I had on hand) and a propane grill (although you can just as easily grill this on a charcoal grill.) Have your pizza dough ready and made before proceeding to the grill.

Preheat your grill to medium heat for about 10-15 minutes.

Picture 025 copy

While the grill preheats, lightly grease a baking pan (with non-stick cooking spray or olive oil) and place your dough and shape it into an oval/rectangle shape. Grab another clean baking sheet for your finished pizza and stack it under your baking sheet holding the dough.

Picture 037 copy

Gather all the toppings you intend to use (meats, veggies, cheeses, sauce, everything) in easily accessible bowls, a spoon, a brush, and tongs and place them on another tray.

Picture 028 copy

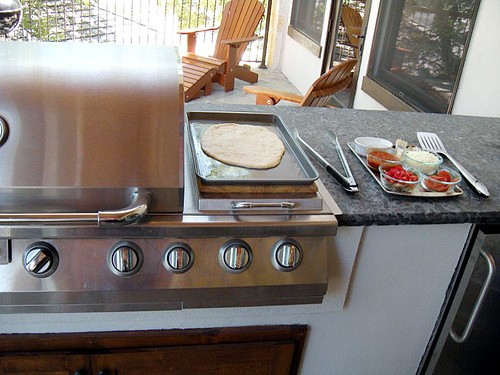
Time to head outside. Place your tray(s) holding the dough on one side of the grill and place the toppings tray on the opposite side of the grill.

Lightly brush the top side of dough with olive oil.

Picture 046 copy

Open the grill, grab two edges of the dough and in one smooth motion lift the dough and quickly place it on your hot grill surface.

Most likely your pizza dough won’t be perfectly round or rectangular anymore. That’s perfectly fine. Rustic is beautiful. And sassy. Now close the grill and let the dough cook for about 2-4 minutes, depending on the heat of your grill. (Switch your baking sheets so the clean one is now on top.)

Picture 047 copy

The dough will be ready to flip when it lightly bubbles on the surface and the bottom has lovely grill marks but is NOT burned.

1  3

Using a pair of tongs, gently flip the dough over. Throughout this process, keep an eye on the grill’s temperature, adjusting up or down as necessary. Burned pizza doesn’t taste that good.

Picture 050 copy

Picture 051 copy

Now working quickly, using a spoon, spread your sauce over the crust. Next, layer with your toppings (mine were red bell pepper, mushrooms, pepperoni and mozzarella cheese).

Once all your toppings are on the pizza, close the grill and let the pizza cook for 2-3 minutes to melt the cheese and finish cooking the crust. You might need to cook a bit longer depending on how much cheese you used but I would not recommend more than another minute or two.

Picture 057 copy

Carefully remove your pizza with a pair of tongs onto your clean baking sheet. Slice and serve with a cold glass of your favorite beer or glass of iced tea 🙂

Picture 071 copy

Beer Pizza Crust

Picture 041 copy

Sometimes there’s nothing better than sitting back, kicking up your feet, enjoying a slice of pizza, a beer and some football.

Or whatever your television poison is: trashy reality, hockey, CSI version 95, or the weather channel. Either way, pizza is the answer. Made even better when your crust is infused with beer!

Picture 073 copy

Don’t fret, beer haters. I am not what you would call a ‘fan’ of beer. This pizza crust is mildly flavored, although it does depend on the type of beer you use. But if anything, the yeast in the beer gives this dough a beautiful rise and a wonderful flavor and texture. Almost like an artisan pizza crust.

This pizza crust comes together so easily and you don’t even need a stand mixer for it. I made this dough using a big bowl, a wooden spoon and kneaded by hand and it was no trouble at all. I would easily say this crust is tied with my go-to pizza dough. That’s serious business people.

Picture 078 copy

Beer Pizza Crust
adapted from here with tips from here

Ingredients

4 cups all-purpose flour
2 teaspoons instant yeast
1 teaspoon baking powder
1 1/2 teaspoons salt
2 tablespoons olive oil
12 fl oz (1 1/2 cups) room temperature beer (I used Samuel Adams Octoberfest)

Directions

Combine flour, instant yeast, baking powder, salt and olive oil in a large mixing bowl with a whisk. Slowly add beer and using a wooden spoon, mix until you have a shaggy dough.

Picture 902 copy

Flour your hands and your dough and knead the dough with your hands until you have a soft, smooth dough – it should hardly stick to the mixing bowl or your hands, about 7 minutes (less if using a stand mixer).

1  3

Form the dough into a round ball, cover with a dish cloth and allow it to rise for anywhere from 30 minutes to 2 hours.

Once your dough is doubled in size, use your open hand to gently press down on the dough to deflate it. Separate into 2 dough balls or leave whole if making one large pizza.

Preheat the oven to 450F.

If you have a pizza stone, cover with parchment paper. If you don’t, use a large round or rectangular metal pan, cover in foil to make clean-up much easier and sprinkle with a little corn meal or lightly spray with cooking spray; set aside.

Shape (or roll) your dough to about 10 – 12 inches (or to fit the size of your pan) keeping in mind that thin dough makes for a crispier crust and thicker will yield a softer, thicker crust. When you think it’s roughly the right size for your pan (or baking stone), turn the dough down onto it. You might need to let it rest for a few minutes and gently pull at the sides if you find the dough springs back.

Add your sauce and toppings and place in the oven, for 15 minutes or until the cheese is bubbly and melty. If you place the toppings under any cheese, you’ll have a less greasy pizza. Let it sit for a few minutes so you don’t burn off your taste buds then serve with an ice cold beer and some football 😉

Picture 085-1

Stay tuned for my grilled pizza tutorial using this crust 🙂

Single Lady Pancake

Picture 004 copy

If I could have a lifetime supply of anything in the entire world, it would be pancakes.

And shoes.

And money.

And glitter.

And pink. Yes, just pink.

I’m veering from the point.

Which is pancakes. I could eat them for every meal. Every day. All sizes, shapes, flavors, topped with maple syrup, fruit or whatever is within reach of my grubby little hands.

1 3

Pancakes.

When I came across this recipe, I scoffed at the idea of one pancake. ONE. Singular. Sad. But It was simple enough so that if I wanted another one, I could easily mix it together so I decided to give it a shot.

And holy pancake nirvana, was this good. And filling. I only needed one.

Yes, ONE. Singular. Happiness.

Picture 010 copy

Single Lady Pancake
but totally for the married, committed and dating as well 🙂
Adapted from JoytheBaker

makes one large pancake

Ingredients:
1/3 cup whole wheat pastry purpose flour (or sub for AP flour)
1 Tablespoon dried oats (quick cooking or regular)
2 teaspoons sugar
1/4 teaspoon cinnamon
1/2 teaspoon baking powder
1/4 teaspoon baking soda
pinch of salt
1 Tablespoon plus 2 teaspoons vegetable oil
1/4 cup plus 2 Tablespoons buttermilk (you can sub regular or soy milk)
splash of vanilla extract
1 Tablespoon of peanut butter (optional)
small handful semi sweet chocolate chips (I used mini-chips)
toasted pecans*

Picture 013 copy

Directions:
In a small bowl, whisk together flour, oats, sugar, cinnamon, baking powder, baking soda and salt. In a separate bowl whisk together oil, buttermilk, vanilla extract and peanut butter (if using). Combine the wet and dry ingredients and stir to combine. The mixture will be thick. Fold in the chocolate chips.

Heat a small frying pan with a teaspoon of oil (or cooking spray, or if you have a great non-stick pan you don’t need anything). Pour in the pancake batter and spread some with the back of a spoon. Cook over medium heat until bubbles form and pop on the surface of the pancake.

Flip. It’s ok if it doesn’t flip perfectly… which it probably won’t. It’s not you, it’s the pancake. It’s sassy.

Cook until golden brown. Remove from pan and onto a plate. Top with toasted pecans and maple syrup. Or whichever way makes you “mmmm” with delight.

*to quicky toast your pecans, just “saute” them in your hot skillet before you make the pancake. Let them get toasty and warm for about 3-4 minutes, set aside.

Picture 007 copy

Strawberry Spinach Orzo Salad

Picture 045 copy

Old me: fruit in salad? Weird. Put plate away.

New me: fruit is salad?! GIMMEEEEE!!!!

I’m reformed, I must admit. Up until a few years ago, fruit in a salad was unheard of to me. I liked salad. But salad = vegetables. Period. Nothing fishy here folks.

But one day I woke up and decided that I liked fruit better than I liked veggies and I was bored of the saaaaame old boring salads: lettuce, tomatoes, cucumbers, carrots, onions, avocado and dressing. Bo-ring.

Picture 043 copy

So I was at a restaurant that rhymes with schmilis, and tried a salad with pineapples, mandarin oranges and blueberries and I swear if the floor wasn’t slightly sticky and there wouldn’t have been a baby crying behind me, I would have mistaken this booth for heaven.

One day, I will re-create this salad. But until then, I wanted to experiment with what I had on hand. And that was sweet, sweet strawberries and spinach.

This salad comes together quickly. The most work you’ll do is cooking the orzo, and that’s about as simple as cookie noodles. Scout’s honor. So get to it folks. Don’t wait two decades until you try fruit in your salad.

Picture 040 copy

Warm Strawberry Spinach Salad
Adapted from here and here
serves 2

For the salad:
1/2 cup uncooked whole wheat orzo (or any other grain)
splash of olive oil
1/4 red onion, sliced
1 garlic cloves, minced
1/2 cup chick peas
4 cups raw spinach
4 large strawberries, sliced
salt and pepper to taste

For the “dressing” :
4 large strawberries, sliced
1 Tablespoon club soda (or champagne, if you’re fancy)
pinch of sugar

To make the salad:
In a medium pot, boil water for orzo and cook according to directions. Drain and set aside until ready to use.

Heat a large skillet over medium heat and add a splash of olive oil. Add sliced red onion and chickpeas to the skillet with a sprinkle of salt and stir to coat. Saute until onions are soft, about 10 minutes. Add in garlic and cook for 3 minutes until aromatic.

Turn off heat and toss in spinach. Allow residual heat to slightly wilt the spinach and remove from heat. (Alternatively you can choose to wilt the spinach completely, in which case leave it over the heat until wilted OR toss everything together with fresh spinach and eat is raw, delicious either way.) Add in strawberries and orzo and mix to coat. Season with salt and pepper. Place in a beautiful big bowl.

To make the dressing: toss strawberries, club soda and sugar in a food processor and pulse until liquefied. Drizzle over your salad (and toss to coat if you like).

Serve immediately. It tastes good cold too!

Picture 044 copy

Avocado Lemon Pasta – A Quick Summertime Meal

Picture 269 copy

Meat and potatoes used to be my idea of dinner. There was a starch (usually mashed potatoes, mac and cheese or some form or rice or noodle), a veggie and always always ALWAYS a meat. Dinner wasn’t dinner without meat. Steak, chicken, meat loaf, meat balls… meat damn-near-anything.

I’m either growing up or growing sick of meat but I rarely have meat for dinner lately. I’ll have the occasional piece of chicken or steal a few pieces of Tony’s steak but other than that, I’m pretty meat free. When it comes to dinner at least.

Now, that’s not saying that I eat a sophisticated meal of eggplant lasagna or a fancy ratatouille. No way. I am no chef here, folks.

Picture 273 copy

So when I stumbled upon this recipe I pretty much freaked. Avocados. Lemon. Pasta. Easy. Fast.

Heaven.

This is a perfect summertime meal. It comes together in about 15 minutes, the flavors are bright and the sauce is creamy. There are only a few ingredients here so it is imperative to use good quality ingredients and to salt and pepper well or this dish will seem lack-luster. And if you insist on some form of meat, I think this would be lovely with a few grilled shrimp or a few sliced of grilled chicken tossed on top.

Picture 277 copy

Avocado Lemon Pasta
adapted from here

Yield: Serves 2

Ingredients:

1 medium sized ripe Avocado, pitted
1/2 lemon, juiced
2 garlic cloves, skins removed
1/2 tsp kosher salt, or to taste
2 tbsp extra virgin olive oil
2 servings (6 oz) of your choice of pasta
Freshly ground black pepper, to taste
parsley, to taste
lemon zest, to garnish

Directions:

In a medium sized pot, bring several cups of water to a boil. Add in your pasta, reduce heat to medium, and cook until al dente, about 8-10 minutes. Pay attention to your pasta, there’s nothing worse than mushy s’getti noodles.

Meanwhile, make the sauce by placing the garlic cloves, lemon juice, and olive oil into a food processor. Process until smooth. Now add in the pitted avocado and salt. Process until smooth and creamy. It will be a lovely shade of green and smell lemony.

When pasta is done cooking, drain and rinse in a strainer and place pasta into a large bowl. Pour on sauce and toss until fully combined. Garnish with lemon zest, black pepper and parsley. Serve immediately.

Note: This dish does not reheat well due to the avocado in the sauce. To experiment, I made both servings (I ate one and refrigerated the other) and left the cold serving out for half an hour and it didn’t brown and was pretty tasty slightly cool.

Picture 267 copy

Whole Wheat Pizza Crust

10-20-08 432 copy

Someone please explain to me whyyy there are commericals concerning what the ingredients are in dog food followed by pet owners who are disgusted when they find things like corn gluten and meat by-product…

but the following commercial is about children being fed pre-made chicken nuggets (in which the ingredient list has a number of ingredients that I can’t even pronounce) like there’s no problem.

What ever happened to REAL food?

There is a homemade, real food alternative to every pre-made food out there. It may be a bit different but my thought process: if it’s homemade, it HAS to be better for you. I mean… it’s REAL food after all.

Let’s start with pizza! Yes, you can make pizza at home. And you can even healthify it by using whole wheat flour instead of white flour. And it’s simple!! Mix, knead, rise, knead, last rise while you chop your veggies and grate your cheese. Easy cheesey!

10-20-08 439 copy

Whole Wheat Pizza Crust
Adapted from Smitten Kitchen

Makes enough for one small, thin crust pizza. Double it if you like your pizza thick and bready.

1 1/2 cups whole wheat flour
1 teaspoon salt
3/4 teaspoon active dry yeast
1/2 cup lukewarm water (may need up to 1 or 2 tablespoons more)
1 tablespoon olive oil
your choice of sauce and toppings

Stir dry ingredients, including yeast, in a large bowl. Add water and olive oil, stirring mixture into as close to a ball as you can. Dump all clumps and floury bits onto a lightly floured surface and knead everything into a homogeneous ball. Use flour when needed… it’s slightly sticky at this point.

If you are finding this step difficult, simply pause. Leave the dough in a lightly-floured spot, put the empty bowl upside-down on top of it and come back in 2 to 5 minutes, at which point you will find the dough a lot more lovable.

Knead it for just a minute or two. Lightly oil the bowl (a spritz of cooking spray perfectly does the trick) where you had mixed it — one-bowl recipe! — dump the dough in, turn it over so all sides are coated, cover it in plastic wrap and leave it undisturbed for an hour or two, until it has doubled in size.

Dump it back on the floured counter and gently press the air out of the dough with the palm of your hands. Fold the piece into an approximate ball shape, and let it sit under that plastic wrap for 20 more minutes.

Sprinkle a pizza stone or baking sheet with cornmeal and preheat your oven to its top temperature. Roll out the pizza, toss on whatever topping and seasonings you like. If you like a TON-o-toppings and bready crust, slice them thinly so you don’t weigh down the dough.

Bake it for about 10-15 minutes until it’s lightly blistered and impossible to resist.

10-20-08 433 copy

FFwD: Hachis Parmentier

10-20-08 220 copy

I’m SO glad that my few years of French in middle/high school finally paid off!! I was actually able to read this title without help. Jeannette – 1 French – 0.

I’ve been wanting to finally get in the kitchen and cook some more involved things outside of the norm. I don’t think the fiancé is looking forward to it, but I am!! Oh boy, am I?!

I did double duty (triple if you count the pumpkin pie that I made at the same time) and made the Hachis and the Gougeres for dinner last night.

10-20-08 236 copy

Don’t let these names fool you. If you’ve been to any Brazilian grill you are likely to have had their cheese bread. Gougeres is just the fancy French version. Although, I managed to Americanize it with cheddar cheese. Sorry Dorie, please don’t disown me.

And Hachis is just the fancy French version of Shepard’s Pie. Yummy, fragrant meat topped with mashed potatoes and a light sprinkle of cheese, baked.

10-20-08 224 copy

The Hachis takes some time to prepare so if you plan on making this, be prepared to make this 2 hours in advance. The meat needs 1-1/2 hours to simmer and then an extra half hour in the oven. But don’t let that deter you from trying this. There isn’t much hands on time and the end result is worth it!

You can even plead insanity (like ME!) and make gougeres and pumpkin pie as the meat is simmering!! Just don’t mix up which cream concoction goes with what!

10-20-08 240 copy

Changes I made (aka what I had on hand): I used ground beef, omitted celery, bay leaf, sausage and used regular pepper instead of peppercorns. I left in the veggies. I only had one large potato (not enough but I made do) and accidentally used too much milk. Sprinkled with mozzarella. It was still delicious!

Fiance: didn’t SAY it was bad, but he didn’t clean his plate. VERY out of the ordinary. So I’ll say thumbs down on his behalf.

Cupcake: thumbs up. I would definitely make it again. When I’m making dinner for just me 🙂

For the recipes, you’ll have to get Dorie’s new book Around My French Table. It’s well worth it!

1 2

Ps. It’s pronounced ah-chis   par-mee-en-tey.

Up next week: Marie-Helene’s Apple Cake

Panko Mozzarella Sticks

10-20-08 382 copy

I know what you’re thinking…. a SAVORY post?? Is hell freezing over? Is the world ending? Has Jeannette lost her mind?!

Well, the answer is no. No. And maybe…

1 2

But in all honesty, I feel like it is my privilege… no my DUTY to share this recipe with you. I mean, who doesn’t like cheese sticks? Warm, melty, gooey, crunchy cheese sticks?

If you don’t… keep it to yourself. I can’t be seen associating with cheese-stick haters. You understand.

3 4

It requires some prep but once you have your assembly line all set and ready to go, you’ll knock these out in no time!!

I promise they are worth your while!! And best of all… you know exactly what’s in them. No old cheese or mystery crumb coating. Yum-o!

10-20-08 387 copy

Ingredients:

16 pieces String Cheese, Removed From Wrappers (I used 24 successfully)
½ cups All-purpose Flour
2 whole Eggs
3 Tablespoons Milk
2 cups Panko Bread Crumbs
1 Tablespoon Dried Parsley Flakes
Canola Oil, For Frying (I used veggie oil)
Marinara Sauce, For Dipping (or buttermilk ranch)

Preparation Instructions:

•Slice string cheese pieces in half, for a total of 32 (or 48 in my case) pieces.
•Place flour in a small bowl*.
•In a separate bowl*, whisk eggs and milk.
•In another separate bowl*, combine panko bread crumbs with parsley flakes.

*I used medium sized tupperware for these. It kept everything from spilling over the sides of the bowl.

TO ASSEMBLE: One by one, roll mozzarella sticks in flour, then dunk in egg/milk mixture, then place in panko crumbs. Use your hand to sweep crumbs all over the mozzarella stick. Gently remove and place on a tray or cookie sheet. Repeat until all mozzarella sticks are coated.

***Place tray in freezer for 20 to 30 minutes to flash freeze. Very important!! It helps to keep the coating from falling off and keeps the cheese from oozing out before the coating is done.***

TO COOK: Heat 1 1/2 inches oil in a large skillet over medium heat. When hot, add mozzarella sticks 8 at a time. Watch closely and turn over to evenly brown, cooking less than 2 minutes. Do not allow cheese to bubble and leak.
Remove to a paper towel-lined plate.
Serve immediately with warm marinara sauce. Or buttermilk ranch if that’s your preference.

Enjoy!!

10-20-08 336 copy