Pizza Swirl Bread

Picture 182 copy

What do you get someone who has absolutely everything they need and the means to get themselves anything they could ever want?

I mean, how HARD does that short, simple sentence make gift giving? Hella hard.

Picture 187 copy

I don’t have the problem of giving a gift that isn’t heartfelt. That’s not my style, any gift given by me always have a loving thought behind them. Always, non-negotiable.

And as (my) luck would have it, those that I want to show an immense love and appreciation for through my savvy gift giving ways, always end up being the ones who stump me due to said reason above.

And it sucks, people.

Picture 191 copy

I know, I know… it’s the thought that counts but dangit I want the item itself to count too. I don’t want it shoved in the darkest corner of your least used closet to gather dust. I want it to be loved.

It’s stressful. I’m stressed. Did I stress you out? Here, have some bread.

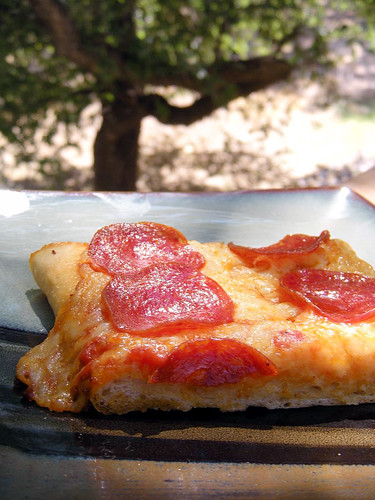
Not just any bread. This is the love child of swirled bread and pizza. All the ooey, gooey saucy toppings of a pizza surrounded by soft, pillowy bread. This really can’t get any better. Bake it and serve it up warm with extra pizza sauce for dipping/slathering. Eat and de-stress.

Picture 189 copy

Pizza Swirl Bread
adapted from How Sweet Eats
makes one loaf

Ingredients:

1/3 cup milk
2 tablespoons butter
1 1/4 cups all-purpose flour
1/2 cup whole wheat flour
1/2 cup whole wheat pastry flour (you can sub AP flour for the WW)
2 1/4 teaspoons instant yeast
1/2 teaspoon salt
1/4 cup warm water
1 large egg
2 garlic cloves, minced
6 ounces mozzarella cheese, grated
4 ounces cheddar cheese, grated
28 slices pepperoni
1/3 cup tomato sauce, or more if desired
1 tablespoon italian seasoning

Instructions:

In a measuring cup, combine milk and 2 tablespoons butter and pop it in the microwave for 30 seconds or until the butter melts; set aside to cool slightly.

In the bowl of an electric mixer, whisk together flours, yeast, and salt.

In your measuring cup with the milk/butter, add 1/4 cup of warm water and the egg and whisk to combine.

With the mixer on low speed (using a dough hook), add the milk mixture to the flour mixture. Mix on medium speed until dough comes together, about 5-6 minutes. Remove dough from bowl and lightly flour your workspace, then knead by hand for a minute or two until the dough becomes smooth. Add a few more teaspoons of flour if dough is sticky.

Coat the stand mixer bowl with non-stick cooking spray, then place dough in the bowl. Cover the bowl and set in a warm place to double in size for about one hour.

Optional: while your dough is rising, stick the pepperoni in the microwave on a paper towel lined plate for 30 seconds to remove a bit of grease. I then dabbed the tops of the pepperoni’s with a paper towel to get the excess grease off the tops as well.

Lightly spray an 8 1/2 x 4″ loaf pan with non-stick cooking spray; set aside.

Preheat oven to 350 degrees F.

After dough has risen, gently press you hand down into the dough to deflate it. Flour your workspace and roll into an 8 x 12 inch rectangle. Spread tomato sauce on first, then minced garlic, then pepperoni, then your cheeses (reserving a small handful) then italian seasoning. Starting at one of the short ends, tightly roll dough into a loaf. Place in loaf pan and brush with a little butter, and sprinkle with reserved cheese and more italian seasoning.

Bake for 45-50 minutes, or until top is golden brown (the top of my bread exploded so it began to leak some cheese and sauce so I slipped some foil in under the loaf to catch the drippings). Let cool for 30 minutes, or not. Reminder: HOT cheese, proceed with caution 🙂

Picture 176 copy

This post was inspired by Di’s Homemade Loaf roundup. A bunch of swell bloggers got together and all made some yummy bread. Head on over to check them all out. A round-up will be posted soon.

Grilled Pizza Tutorial

Picture 058 copy

Let me preface this by saying that I live in Texas. Down here we grill chicken, brisket, sausage and turkey legs. Not pizza. Grilling pizza is pretty damn unknown here. Well, even if it’s not, I’ll be bold enough to say that it is. Let’s pretend that I’m right. Also, it may be the tail-end of Summer where you are so grilling at this time might seem weird to you, but here it’s still Summer. Today’s high of 100F says so.

Having cleared that up, I have never grilled a pizza. Ever. I had never even heard about it until I started blogging. But once I saw the idea and got past my “Texans only grill BBQ” mind set, I was so intrigued! And it’s taken far too long for me to take the leap.

I’ve lost so many years of the best pizza I’ve ever made at home. But I’m hip to the jive now groovy people. Whoa, taking it back 1975.

4  5

Bad blog writing aside, this really is the best pizza I’ve made. The outside of the crust is lightly crispy, the inside is fluffy and soft and once you have the pizza crust ready, it takes no more than 20 minutes, start to finish. It is so worth it.

Note: I realize there are about as many ways to grill a pizza as there are to top them but this seemed easiest to me so I went with it. Head on over to Mel’s blog for a great tutorial with pictures for every step. I would have done that but it’s really hard to grill and NOT burn lunch and take pictures all by yourself 🙂

Picture 067 copy

Grilled Pizza
via Mel’s Kitchen Cafe

I used this pizza dough, pre-made sauce (I had to use what I had on hand) and a propane grill (although you can just as easily grill this on a charcoal grill.) Have your pizza dough ready and made before proceeding to the grill.

Preheat your grill to medium heat for about 10-15 minutes.

Picture 025 copy

While the grill preheats, lightly grease a baking pan (with non-stick cooking spray or olive oil) and place your dough and shape it into an oval/rectangle shape. Grab another clean baking sheet for your finished pizza and stack it under your baking sheet holding the dough.

Picture 037 copy

Gather all the toppings you intend to use (meats, veggies, cheeses, sauce, everything) in easily accessible bowls, a spoon, a brush, and tongs and place them on another tray.

Picture 028 copy

Time to head outside. Place your tray(s) holding the dough on one side of the grill and place the toppings tray on the opposite side of the grill.

Lightly brush the top side of dough with olive oil.

Picture 046 copy

Open the grill, grab two edges of the dough and in one smooth motion lift the dough and quickly place it on your hot grill surface.

Most likely your pizza dough won’t be perfectly round or rectangular anymore. That’s perfectly fine. Rustic is beautiful. And sassy. Now close the grill and let the dough cook for about 2-4 minutes, depending on the heat of your grill. (Switch your baking sheets so the clean one is now on top.)

Picture 047 copy

The dough will be ready to flip when it lightly bubbles on the surface and the bottom has lovely grill marks but is NOT burned.

1  3

Using a pair of tongs, gently flip the dough over. Throughout this process, keep an eye on the grill’s temperature, adjusting up or down as necessary. Burned pizza doesn’t taste that good.

Picture 050 copy

Picture 051 copy

Now working quickly, using a spoon, spread your sauce over the crust. Next, layer with your toppings (mine were red bell pepper, mushrooms, pepperoni and mozzarella cheese).

Once all your toppings are on the pizza, close the grill and let the pizza cook for 2-3 minutes to melt the cheese and finish cooking the crust. You might need to cook a bit longer depending on how much cheese you used but I would not recommend more than another minute or two.

Picture 057 copy

Carefully remove your pizza with a pair of tongs onto your clean baking sheet. Slice and serve with a cold glass of your favorite beer or glass of iced tea 🙂

Picture 071 copy

Beer Pizza Crust

Picture 041 copy

Sometimes there’s nothing better than sitting back, kicking up your feet, enjoying a slice of pizza, a beer and some football.

Or whatever your television poison is: trashy reality, hockey, CSI version 95, or the weather channel. Either way, pizza is the answer. Made even better when your crust is infused with beer!

Picture 073 copy

Don’t fret, beer haters. I am not what you would call a ‘fan’ of beer. This pizza crust is mildly flavored, although it does depend on the type of beer you use. But if anything, the yeast in the beer gives this dough a beautiful rise and a wonderful flavor and texture. Almost like an artisan pizza crust.

This pizza crust comes together so easily and you don’t even need a stand mixer for it. I made this dough using a big bowl, a wooden spoon and kneaded by hand and it was no trouble at all. I would easily say this crust is tied with my go-to pizza dough. That’s serious business people.

Picture 078 copy

Beer Pizza Crust
adapted from here with tips from here

Ingredients

4 cups all-purpose flour
2 teaspoons instant yeast
1 teaspoon baking powder
1 1/2 teaspoons salt
2 tablespoons olive oil
12 fl oz (1 1/2 cups) room temperature beer (I used Samuel Adams Octoberfest)

Directions

Combine flour, instant yeast, baking powder, salt and olive oil in a large mixing bowl with a whisk. Slowly add beer and using a wooden spoon, mix until you have a shaggy dough.

Picture 902 copy

Flour your hands and your dough and knead the dough with your hands until you have a soft, smooth dough – it should hardly stick to the mixing bowl or your hands, about 7 minutes (less if using a stand mixer).

1  3

Form the dough into a round ball, cover with a dish cloth and allow it to rise for anywhere from 30 minutes to 2 hours.

Once your dough is doubled in size, use your open hand to gently press down on the dough to deflate it. Separate into 2 dough balls or leave whole if making one large pizza.

Preheat the oven to 450F.

If you have a pizza stone, cover with parchment paper. If you don’t, use a large round or rectangular metal pan, cover in foil to make clean-up much easier and sprinkle with a little corn meal or lightly spray with cooking spray; set aside.

Shape (or roll) your dough to about 10 – 12 inches (or to fit the size of your pan) keeping in mind that thin dough makes for a crispier crust and thicker will yield a softer, thicker crust. When you think it’s roughly the right size for your pan (or baking stone), turn the dough down onto it. You might need to let it rest for a few minutes and gently pull at the sides if you find the dough springs back.

Add your sauce and toppings and place in the oven, for 15 minutes or until the cheese is bubbly and melty. If you place the toppings under any cheese, you’ll have a less greasy pizza. Let it sit for a few minutes so you don’t burn off your taste buds then serve with an ice cold beer and some football 😉

Picture 085-1

Stay tuned for my grilled pizza tutorial using this crust 🙂

Golden Brioche Loaf – TWD

Picture 410 copy

Picture 417 copy

I knew going into making this brioche that it wouldn’t turn out.

Not because the recipe is flawed, but because I was making it at night, trying to cram it all in before bed. I was doing so well until it came to the last rise.

While the bread was on it’s last rise, I made dinner. Then ate dinner. Then fell asleep on the couch. The bread had risen too much, collapsed in on itself and I was too tired to deal with it then so I put it in the fridge to deal with the next day.

Picture 416 copy

I let it come to room temp and then baked it. It wasn’t pretty. It was pretty hard and smelled like melting cheese(?) but again, I had no patience to deal with it. It tasted ok, but I know that I was missing the whole package because of my oopsy.

Picture 405 copy

So, my lesson: do NOT bake when I’m tired. Just don’t.

I will be trying my hand at this bread again because it looks too good not to.

The awesome Margaret of Tea and Scones chose this recipe for this week’s TWD. Head on over to her blog for the recipe. (Click here for direct link)

Picture 419 copy

Sorting Hat Pita Bread for Harry Potter

Picture 178 copy

Ever wish you could just wave a magic wand and dinner prepares itself on the stove, cookies come perfectly out of the oven every time, the floor mops itself? Me too. More times than I care to mention. You see, I’m a bit obsessed with Harry Potter at the moment, which I may have mentioned.

But if I had my own wand, I would only use my powers for good, not evil. The sorting hat should have no problem putting me in the Gryffindor house.

But just in case it does find some difficulty, I made my own. Out of bread. It does what I tell it to do (or what I mumble in my worst ventriloquist act ever). And when it misbehaves, I’ll just eat it.

You see, my sorting hat it made out of pita bread. Amazing.

Serve this bread at your Harry Potter party along with your favorite spinach dip or even grape jelly (and pretend it’s polyjuice potion, of course) and don’t forget these magical words “Please not Slytherin.”

For a fantastic tutorial with pictures click here.

Picture 176 copy

Sorting Hat Pita Bread
Adapted from here

Ingredients:
1 teaspoon active dry yeast
1 teaspoon sugar
2 1/2 cups warm water (80-90°F)
3 cups whole wheat flour
1 Tablespoon salt
1 Tablespoon olive oil
2-3 cups flour

To make the bread dough:

In a large bowl, add the sugar and warm water. Stir in the yeast and let the mixture proof for 10 minutes.

Once the yeast is bubbly, mix in the whole wheat flour, one cup at a time, until the mixture is silky smooth. This is your sponge; it is not your completed dough. Set aside the mixture for 30 minutes to 8 hours (the longer this sponge is left alone, the better the flavor. I let mine go for 12 hours).

Once time is up, stir in the salt and olive oil. Then mix in the flour. Knead the dough for 8-10 minutes by hand or 6-8 minutes in a stand mixer with a dough hook, then cover the bowl with plastic wrap or a damp towel and let rise in a draft-free place for 2-3 hours, until doubled.

Preheat your oven to 350°F.

To shape and bake your bread:

Form a large cone out of foil (grab sheets and start crinkling it into a cone shape, adding more as necessary), about 8 inches tall and 6 inches in diameter. Gently deflate your dough and take 2/3 of it; keeping the remaining third covered, set aside. (I didn’t end up using the remaining 1/3 so I wrapped it tightly and put it in the freezer to use as pizza dough.)

Spread out the dough in a large circle, like you would a pizza crust, so that it’s big enough to cover the cone. Spray the foil cone with nonstick spray and then gently cover it with your dough. Pinch deep grooves for the eyes, mouth, and random wrinkles (I had a difficult time with this step as my grooves kept drooping but I kept re-pinching it and eventually it stayed long enough for me to get it into the oven). Place the dough covered cone on a baking sheet,on its side, face side up.

Take the remaining third of dough and form a large circle, about 10 inches in diameter. Place it in a parchment lined nonstick 9×9 inch baking pan, keeping the center of the circle flat and wrinkling the edges to fit in the pan. Bake both pans for 20 minutes. Take both trays out of the oven.

Raise the temperature of the oven to 425°F. Now either spray the bread with the face with nonstick spray or brush it with melted butter. Stand the dough up so that it’s no longer on its side. Lower your oven racks so the bread fits and place both trays of bread back in the oven. Bake for 15-20 minutes or until browned. Let cool a bit on a cooling rack. Finally, place the bread covered foil cone on top of the hat bottom when ready to serve.

Picture 177 copy

Isn’t he cute?? I just wanna eat him all up…

Sandwich Thins

Picture 186 copy

Confession time: I went through at least three packs of sandwich thins for work lunches… and made peanut butter and jelly samiches with them. I’m boring when it comes to sandwiches. But these lovely thin breads just stuck with me. You can use them as a fluffy bread replacement, as a hamburger bun replacement… heck toast em and schmear Nutella on them for dessert!

Done, done and done!!

1 3

When I saw on Tracey’s blog that I could make these at home, I was thrilled. But I forewarn you, the packaged ones may have chemicals and other things in them that are no-nos to some people, but they stay softer longer. The homemade version went stale after about 3 days. So if you make the whole batch, I suggest bagging up the amount you’ll eat in a few days’ time and freezing the rest, taking them out to thaw as you need/want them.

Picture 182 copy

As Tracey states “the recipe does call for a few ingredients you may not have in your pantry – vital wheat gluten and wheat bran. If you didn’t have the wheat gluten, you could try using additional all-purpose flour instead.” I didn’t have either the gluten or bran so I subbed AP and whole wheat flour respectively.

Homemade Sandwich Thins
adapted from Tracey’s Culinary Adventures

Ingredients:
1 large egg
1 1/4 cups warm water (about 100 F)
2 tablespoons olive oil
2 cups whole wheat flour
1 cup all-purpose flour
1/2 cup wheat bran
2 tablespoons vital wheat gluten
2 teaspoons instant yeast
1/4 cup sugar
1 teaspoon salt
rolled oats (for sprinkling on top of the sandwich thins)

Directions:
Crack the egg into a 2-cup measuring cup and beat lightly with a whisk. Whisk in the water and olive oil. Add the whole wheat flour, all-purpose flour, wheat bran, wheat gluten, yeast, sugar and salt to the bowl of a stand mixer fitted with the dough hook. Mix briefly just to combine. With the mixer on low speed, slowly add the wet ingredients to the bowl. Once completely incorporated, continue kneading on low speed until the dough is soft and elastic, about 7-8 minutes. If the dough is too sticky, add a small amount of flour; if it is too dry, add a little water.

Spray a large bowl with cooking spray. Add the dough to the bowl, turning to coat. Cover with plastic wrap, and let the dough rise until doubled, about 1 1/2 hours.

Line 2 baking sheets with parchment paper. Divide the dough into 16 equal portions. I weighed the ball of dough first and then used the scale to verify each portion was approximately the same size, but you could definitely just eyeball it. Roll each portion into a ball, then flatten it into a circle between your palms. Transfer to the baking sheet and, using your fingertips, press the circle into a thin round, about 5-inches in diameter. Brush the dough with water and sprinkle each thin with rolled oats. Cover each baking sheet with plastic wrap and let the thins rise just slightly while the oven preheats, about 30 minutes.

Preheat oven to 350 F. Use a wooden skewer to poke 9 holes in each thin. Bake for 12-15 minutes, or until puffed and dry on top. Cool completely before slicing.

Makes 16

Picture 185 copy

TWD – Raisin Swirl Bread (rewind)

10-20-08 977 copy

Today’s post is supposed to be bright and sunshiny muffins.

Obviously, this isn’t a muffin post. No currants and not being a HUGE fan of muffins, I opted out of these and decided to go with something that I missed posting about the first time ’round. (But for the citrus currant sunshine muffins head to Lauryn’s blog, Bella Baker)

Raisin swirl bread. Oh you are my enemy. I love to eat you when you’re soft and plain. I love to eat you toasted with butter… toasted with nutella, with jam… you get the idea.

10-20-08 976 copy

This loaf of bread is a blight upon my kitchen. I’m glad it’s all gone now. Or I’d be in serious trouble. Again.

There’s a bit more work involved in getting this into the oven than a regular loaf would need but it is worth it!! If you’re feeling a bit naughty, toss in some small chocolate chunks along with the raisins. Yum!!

You can find the recipe on Susan’s adorable blog, food.baby (click here for recipe)

10-20-08 978 copy

100% Whole Wheat Bread

Picture 343 copy

Man I am on a roll!!

Err… should I say I am on a loaf…? Of bread….? No…? *crickets*

Don’t mind me.

3 1

I’m just here to share a really swell loaf of bread with you. This is quite possibly one of the most beautiful loaves of bread to grace my oven.

It has fairly simple ingredients and comes together easily. It turns from a shaggy mess to smooth and elastic in a matter of 8 minutes.

Picture 306

Picture 309

I’m going to go ahead and deem this ‘healthy’ because it’s 100% whole wheat. And if you switch out the veggie oil for olive oil, you’re getting some healthy fats in there as well. You can choose your sweetener and the dry milk is non-fat.

So go ahead and slather a slice with a heaping dollop of Nutella (or jam) and have it for breakfast. I do. Everyday. It’s my little slice of heaven, via my toaster : )

Before you start: you can put the first three ingredients in a 2 cup measuring cup, to save on dishes to clean.

Also, I would recommend kneading this bread by hand. It only takes 6-8 minutes and it can be quite a tranquil experience. Just be sure to flour or oil your counter.

Picture 341 copy

100% Whole Wheat Bread
Adapted from King Arthur Flour

Yield: 1 loaf

Ingredients

1 to 1 1/4 cups lukewarm water*
1/4 cup vegetable oil
1/4 cup honey, molasses, or maple syrup
3 1/2 cups King Arthur Premium 100% Whole Wheat Flour
2 1/2 teaspoons instant yeast, or 1 packet active dry yeast dissolved in 2 tablespoons of the water in the recipe
1/4 cup Baker’s Special Dry Milk or nonfat dried milk
1 1/4 teaspoons salt

*Use the greater amount in winter or in a dry climate; the lesser amount in summer or a humid climate.

Directions
1) In a large bowl, combine all of the ingredients and stir till the dough starts to leave the sides of the bowl. Transfer the dough to a lightly greased surface, oil your hands, and knead it for 6 to 8 minutes, or until it begins to become smooth and supple. (You may also knead this dough in an electric mixer or food processor, or in a bread machine programmed for “dough” or “manual.”) Note: This dough should be soft, yet still firm enough to knead. Adjust its consistency with additional water or flour, if necessary.

2) Transfer the dough to a lightly greased bowl or large measuring cup, cover it, and allow the dough to rise till puffy though not necessarily doubled in bulk, about 1 to 2 hours, depending on the warmth of your kitchen.

3) Transfer the dough to a lightly oiled work surface, and shape it into an 8″ log. Place the log in a lightly greased 8 1/2″ x 4 1/2″ loaf pan, cover the pan loosely with lightly greased plastic wrap, and allow the bread to rise for about 1 to 2 hours, or till the center has crowned about 1″ above the rim of the pan. Towards the end of the rising time, preheat the oven to 350°F.

4) Bake the bread for 35 to 40 minutes, tenting it lightly with aluminum foil after 20 minutes to prevent over-browning. The finished loaf will register 190°F on an instant-read thermometer inserted into the center.

5) Remove the bread from the oven, and turn it out of the pan onto a rack to cool. If desired, rub the crust with a stick of butter; this will yield a soft, flavorful crust. Cool completely before slicing. Store the bread in a plastic bag at room temperature.

Notes:

*The liquid sweetener you choose makes a difference. Molasses produces the darkest loaf, one with old-fashioned flavor. Honey yields a lighter, milder loaf. Maple syrup makes a less-sweet loaf — unless you use real maple syrup, in which case it’ll be similar to a loaf made with honey, albeit with a faint hint of maple.

*If you’re someone who tends to taste whole wheat as somewhat bitter, try substituting 1/4 cup of orange juice for 1/4 cup of the water in this recipe. A bit of orange juice tones down whole wheat’s somewhat tannic taste.

Picture 346 copy