Candy Corn Sugar Cookies

Picture 777 copy

Happy Halloween!!

I probably should have posted this recipe much sooner but if you’re a long time reader, you know how I roll. I procrastinate. And I’m sorry.

But who says the fun has to stop just because Halloween is over? You KNOW you’re going to have left over candy!! And I am going to give you a few ideas in the coming week to use up that candy. IF there is any candy left over by then 😉

But for now, let’s talk cookies. These are your run of the mill sugar cookies divided into three batches and colored, stacked, sliced and baked. Simple stuff here folks, but BIG reward. If you want to take it a step further (I’m a minimalist; read: lazy), you can dip the tops in melted chocolate and decorate with sprinkles.

These cookies are your oyster. Ew. Let’s pretend I didn’t say that…..

It may seem that because there are a fair amount of steps that these are difficult cookies to make: they aren’t!! They involve a bit of chill time and some hands on time but nothing you can’t handle.

If you can handle me using oysters and cookies in the same sentence, you can make these 😉

Picture 775 copy

Candy Corn Sugar Cookies
recipe adapted from Our Best Bites and Williams Sonoma

Ingredients:

2 sticks unsalted butter, at room temperature
3/4 cup sugar
3 egg yolks
2 teaspoon vanilla extract
1/4 teaspoon almond extract
2 1/2 cups all-purpose flour
1 teaspoon baking powder
1/2 teaspoon salt
yellow and orange gel food coloring

Directions: 

Note: if you need some process pictures to help you along, head on over to Our Best Bites.

In the bowl of an electric mixer fitted with the flat beater, beat together the butter and sugar on medium speed until light and fluffy, about 4 minutes. Add the egg yolks one at a time, beating well after each addition. Add the vanilla and almond extracts and mix well.

In a sifter, combine the flour, baking powder and salt. Sift the flour mixture directly onto the butter mixture. Reduce the speed to low and beat until well mixed.

Turn the dough out onto a work surface and divide into 3 equal portions (I weighed my dough then divided into three, each portion weighed 428 grams).

You’ll leave one of those portions as is (this will be the white part of the candy corn) and then you’ll color one of the remaining portions yellow and one orange.

Tip: When you’re coloring multiple things in a recipe, use one mixing bowl and color starting from lightest to darkest. That way you won’t have to wash your bowl in between.

Grab a loaf pan (it doesn’t matter what size) but if you have an option between a larger and a smaller pan, you might want the smaller one (I used an 8″ x 4.5″). Line your loaf pan with a big piece of plastic wrap leaving an inch overhang on all sides.

The first thing you’ll do is place your uncolored cookie dough in the bottom of the pan and spread it out as flat as you can.

You’re going to have 3 layers of cookie dough and the height of your dough will determine the size of your cookies. In my case, I made a small batch of cookie dough, and if I spread it out all the way in my large loaf pan each layer would be so thin that it would produce teeny tiny cookies so I didn’t spread my dough to the very end. Shoot for about 3/4 inch per layer at least. You can always make larger cookies if desired.

Place 1/3 of cookie dough in your mixing bowl, add a bit of yellow food coloring and mix until you reach your desired color (adding more food coloring as necessary); set aside. Do the same thing with the remaining dough coloring it orange. Place the orange dough on top of the uncolored dough and flatten out. Do the same with the yellow dough. Use the plastic wrap to even out the dough and cover it.

Place the pan in the refrigerator for a few hours, or the freezer for about 30-60 minutes. You’ll want this very chilled, all the way through so it cuts nice and smooth.

When it’s done chilling, unwrap and slice that loaf into about 1/4-inch slices, working a few at at time.

Now just slice your rectangles into triangle pieces.

Position a rack in the upper third of an oven and preheat to 350°F. Line a baking sheet with parchment paper. Place your cookie triangles on your baking sheet. Since these are slice and bake cookies, they won’t spread very much at all therefore you don’t need to leave a lot of space between cookies (about 1/2 inch).

Bake until the cookies are lightly golden on the edges, about 8 minutes. Transfer the cookies to wire racks and let cool completely. Enjoy : )

Picture 781 copy

Bourbon Vanilla Ice Cream with Salted Bourbon-Caramel Sauce for Sundae Sunday!!

Picture 312 copy

Did you ever have ice cream socials in school? I did. I was lucky, I had them in elementary school and my last one was in high school. To the teachers, it was a comfortable social setting for all the kids to get to know one another. For me, it was an excuse to have copious amounts of ice cream with sprinkles while hanging out with my friends and ditching class with permission 😉 I was a good kid.

Now I am…. a bit older, and I am honored to join in on an online ice cream social with some Twitter friends. Any excuse to make ice cream, right? Not only did I get to make and post about ice cream, I get to see the amazing creations of my twitter peeps AND eat the ice cream that I made.

1 3 4

And with triple digit weather around these parts, my inner peace really needed the calming qualities of ice cream…. and bourbon. I’m still a good kid 😉

If you know me at all, you know that I couldn’t just make any ole ice cream, I had to go all out. I scoured my bookmarks and came across this recipe that I had long forgotten about, checked that I had all the ingredients and I was off. And I can’t be happier with how it turned out! The ice cream is creamy and delicious, the sauce compliments it wonderfully, and the toffee adds texture! Win-win-win.

Now if only this ridiculous heat wave would GO AWAY, life would be pretty much perfect 🙂

I am honored to have participated in Sundae Sunday along with some great company. To see the entire line-up of amazing treats from amazing bloggers, head on over to Di’s blog, or click here to be taken directly to the post.

Picture 304 copy

Bourbon Vanilla Ice Cream
Makes 1 1/2 pints

Ingredients:
1 cup Bourbon (you can probably dial this down to 3/4 cup if you aren’t a huge fan)
1/2 cup granulated sugar
1/4 teaspoon kosher salt
1 teaspoon pure vanilla extract (I used a bit of vanilla bean paste as well)
2 cups heavy cream
4 large egg yolks
1 cup whole milk

Directions:
1. Pour the bourbon into a saucepan, and bring it to a boil over medium-high heat. Add the sugar and salt. Stir until the sugar dissolves, about 2 minutes. Reduce heat to medium, and continue to boil until liquid is reduced by one fourth, about 6 minutes. At this point you’ll notice the strong scent of the bourbon. Don’t inhale too deeply, you’ll get drunk. Just kidding.

2. Add vanilla and cream, and heat over medium heat until a candy thermometer reads 150 degrees F, 2 to 3 minutes.

3. In a large bowl, beat the egg yolks, and pour the bourbon cream into the eggs in a thin stream, whisking until the liquids are combined. Return the mixture to the pan, and heat over medium heat, stirring, until the candy thermometer reaches 175 degrees F, 3 to 4 minutes. Add milk. Transfer the ice cream base to a container with a lid, and refrigerate for 4 hours or overnight. Don’t expect this to be very thick, it will be quite thin for an ice cream base.

4. Pour the chilled bourbon custard into an ice cream maker, and churn according to the manufacturer’s instructions. Transfer the ice cream to a container with a tight-fitting lid, and cover the surface of the ice cream with plastic wrap. Put the lid on the container, and freeze until the ice cream has hardened, at least 2 hours. (It will keep for up to 1 month.)

Salted Bourbon-Caramel Sauce

Ingredients:
1 cup granulated sugar
1/4 cup water
2 tablespoons light corn syrup (I used Lite)
3/4 cup heavy cream
4 tablespoons butter (salted or unsalted, doesn’t matter)
1 teaspoon sea salt
1/4 cup Bourbon

Directions:
1. In a small saucepan, combine the sugar, water and corn syrup. Bring to a low boil.

2. Gently swirl the mixture in a circular motion (do not stir), and allow it to boil down until it is a deep amber color, at least 10 minutes.

3. Carefully whisk in the cream, protecting your hand from the steam. Immediately whisk in the butter. Stir over low heat until mixture is smooth.

4. Stir in salt and bourbon, and whisk again. Remove from heat and allow to cool before using.

Top a few scoops of ice cream with the caramel, stick in some delicious toffee, grab a spoon and enjoy.

5  6

All recipes adapted from Adapted from here

Buttercrunch Toffee

Picture 336 copy

My nail polish is chipping and I just got my manicure two days ago. Not awesome.

My hair is frizzy with fly-aways. So not awesome.

My tummy hurts because I ate much too much toffee. Not even close to awesome.

This toffee… incredibly awesome.

Picture 332 copy

You should make it, eat too much with your chipped fingernail polished hands so I won’t be alone in this. Everyone needs a support system.

This toffee is SO easy to make. One pot, one baking sheet and you have yourself some golden delicious toffee to crumble up and eat, top your favorite ice cream or pack up in a pretty box and give it as a gift. Yum in a box!!

Picture 334 copy

Buttercrunch Toffee
Makes 2 cups

Ingredients:
1 cup pecand (almonds or hazelnuts work too)
1 tablespoon water
4 tablespoons salted butter, cut into small pieces
1/2 cup granulated sugar
2 tablespoons packed brown sugar
1/8 teaspoon baking soda
1/2 teaspoon vanilla extract
3 ounces bittersweet chocolate, chopped (or use your favorite kind)

Directions:
To Prep the pecans: Spread the nuts on a baking sheet, and bake them at 350 degrees F for 10 to 12 minutes, stirring them halfway through so they toast evenly. Let them cool, and chop them finely.

1. Set aside half of the chopped nuts. Place the other half on an ungreased baking sheet (or a 9″ cake pan), and gather the nuts into an 8-inch circle. Set aside.

2. In a small saucepan fitted with a candy thermometer, combine the water, butter, granulated sugar and brown sugar over medium heat. (Don’t overstir!) Cook the mixture until it reaches 300 degrees F. Remove the pan from the heat, and stir in the baking soda and vanilla until just combined.

3. Pour the mixture onto your circle of nuts.

4. Sprinkle chocolate chips over the toffee, and set aside for 2 minutes while the chocolate melts. Using a spatula, spread the chocolate over the toffee.

5. Scatter the remaining half of your nuts over the chocolate. Let the toffee cool completely.

And add it to some ice cream. Come back tomorrow for some amazingly delicious ice cream!!

Picture 337 copy

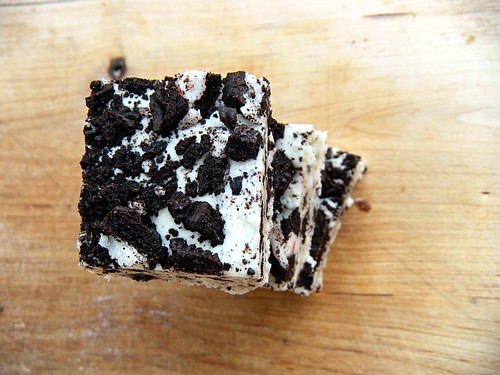
Happy National Fudge Day – Cookie and Cream Fudge!!

I am not a big fudge fan. I think it’s the texture because it most certainly isn’t the amazing array of flavors it can come in. It’s sturdier than a cheesecake, creamier than a brownie, much more dense than a cake. Maybe that bothers me. I’m grasping at straws here.

But just because I don’t like fudge doesn’t mean that YOU don’t. So I’m not going to be selfish and withhold the ONLY fudge recipe that I have made and LOVED. Because that would just be rude. I mean imagine if I alone held the key to turning the world’s biggest fudge hater into a fudge LOVER?! I couldn’t live with it if I kept this to myself.

I made this for Christmas this past year and used candy cane oreos but I imagine that they work just as well with regular Oreos, Halloween Oreos, Eater Oreos, Mint Oreos, Golden Oreos or even Peanut Butter Oreos. Go wild!!

Happy National Fudge Day everyone!!

1

Click here for the recipe!!

Day 23: Cookies and Cream Fudge (candy cane style)

10-20-08 009 copy

I have a confession to make…

I pretty much hate fudge.

I try and try to like it, trying a taste here and there but I’m always disappointed. It’s just not appealing to me. It’s a cross between a brownie and a chocolate bar and to me, someone with major texture issues, can’t get past it.

10-20-08 004 copy

This fudge however is a different story. I LOVE this fudge. LOVE. I’d scream it from the rooftops… if I wouldn’t fall off and end up in a body cast. But you get the picture. This is good stuff. Make it. Don’t argue with me on this one. It’s light but rich, it has that punch of flavor you want without being too cloying. This is my idea of perfect fudge!

It’s day 23 of my Christmas extravaganza and only 2 more days until Christmas!! Are you excited?! I know I am!! I have tons of baking left to do, woo boy!

My only note for this recipe is that all my butter didn’t quite blend all the way into the condensed milk mixture but it turned out fine. I’m betting that you could reduce the butter by a tablespoon or two (if you’re feeling adventurous). I also used candy cane sandwich cookies but you can use your favorite kind of sandwich cookie, the red filling Oreos would give it a nice festive flair!

10-20-08 011 copy

Cookies and Cream Fudge
Slightly adapted from Cookies and Cups

3/4 cup butter
2/3 cup sweetened condensed milk
1 cup Marshmallow Fluff
1 t. vanilla
2 cups white chocolate chips (I used Ghirardelli)
2 cups crushed Oreos (I used candy cane filled cookies)
1 cup coarsely crushed Oreos

Line 9×9 square pan with foil and spray with cooking spray evenly

In a medium saucepan combine butter and sweetened condensed milk.
Heat over medium heat until mixture is boiling, stirring constantly.
Continue to stir while boiling for 2 minutes.

Remove from heat and stir in Fluff, white chocolate chips, vanilla and 2 cups crushed Oreos.

Spread into prepared pan.

Now sprinkle 1 cup coarsely crushed Oreos on top and press gently into fudge.

Chill for 1 hour and cut into squares!

For extra indulgence, melt an ounce or so of white chocolate and drizzle it on top of the cooled fudge. YUM!

10-20-08 010 copy

Shipping Safe: YES. Just pack em up separately and make sure they don’t move around or that you send it during warm weather.

Day 20: Homemade Marshmallows

10-20-08 002 copy

I. Love. S’mores. I really do. They make me feel like a kid, a kid on a camping trip.

I’ve never been on a camping trip so s’mores are the closest thing to camping as I get.

Know what makes s’mores even better? Homemade marshmallows!!

Plus, wrap em up in some adorable baggies and give them as gifts with homemade hot cocoa mix and you have a FAB gift. And you might even be greeted with the same reactions that I’ve been greeted with which include, but are not limited to:

“You can make MARSHMALLOWS?!?”

“These are like fluffy little clouds!”

“Ok, you can make marshmallows… you REALLY need to open up your own shop”

“…wait… you can make MARSHMALLOWS?!?”

10-20-08 003 copy

Day 20 of my extravaganza and it’s almost coming to an end. Don’t fret my lovelies, because these fluffy-as-a-pillow marshies are sure to put a smile on your face!!

Marshmallows have been on my mental ‘to make’ list for a while now but I was put off by the fact that A) they were messy and B) they could go seriously wrong. I’m talking goopy, sludgy, slimy wrong. But I conquered my fears and I learned a few things along the way. Things I will now share with you:

1) Do NOT store them in the fridge to set up. Unless you like slimy goop. Ick.
2) Dust the HECK out of your pan. You’ll thank yourself later.
3) When it says to use a medium saucepan, USE A MEDIUM SAUCEPAN! A small one won’t cut it. My stove and I learned that the hard way.
3) Lastly and perhaps the most important thing I learned was that if it’s not messy, you’re doing it wrong. 🙂

So, get your MEDIUM saucepan, your baking sheet and let’s get to making some of the most incredible marshmallows. Store bought ones pale in comparison to these.

10-20-08 004 copy

Honey Vanilla Bean Marshmallows
adapted from Joy The Baker
makes about 2 dozen marshmallows

1 cup cold water, divided
3 1/4-ounce packages unflavored gelatin
1 1/2 cups sugar
1/4 cup honey
2/3 cup light corn syrup
1/4 teaspoon salt
2 teaspoons pure vanilla extract
half of a vanilla bean, seeds scraped out and reserved
1/2 cup cornstarch
1/2 cup powdered sugar

In a small bowl, whisk together cornstarch and powdered sugar. Spray a 9×13×2-inch baking pan with non-stick cooking spray and coat with the powdered sugar and cornstarch mixture. Set both aside.

Pour 1/2 cup cold water into the bowl of a stand mixer fit with a whisk attachment. Pour the three gelatin packs over the cold water and let sit for about 10 minutes.

In a medium saucepan over medium heat, bring sugar, honey, corn syrup, salt and the remaining cold water to a boil. Stir to dissolve the sugar. Attach a candy thermometer the the side of the pan and bring mixture up to 240 degrees F. There’s no need to stir the mixture, just let it get hot hot hot!

When the sugar is heated to 240 degrees F, turn the mixer with the gelatin and water on low speed. Carefully stream the hot sugar mixture into the bowl and the whisk moves. Be careful onto to pour into the whisk and spatter the hot sugar all over the sides of the bowl. Gradually increase the speed of the mixer until you’ve added all of the hot sugar mixture. Beat on high for several minutes until a thick, fluffy, white marshmallow batter has formed… about 8 minutes. Pour in the vanilla extract and vanilla bean and beat for another 2 minutes.

Spread the marshmallow mixture into prepared pan and smooth with a clean, wet spatula to prevent sticking. Top marshmallow with corn starch and powdered sugar mixture and let set and rest for at least 4 hours, or overnight.

When set, remove marshmallow from the pan and place on a large cutting board coated with cornstarch and powdered sugar, Use a pizza cutter, coated with non-stick cooking spray to slice marshmallows. Once sliced, toss the cut marshmallows in the cornstarch and powdered sugar and store in an airtight container for up to one week.

10-20-08 016 copy

For extra holiday flair: Use a butter knife and dip it into red gel food coloring and swirl gently into your marshmallow fluff (right after you’ve put it into the pan).

Optional: melt some bittersweet chocolate and dip half a marshmallow into the chocolate and sprinkle with crushed peppermint candies or graham crackers. Let them set up, wrap em and tie them with a pretty bow and give as gifts!!

1 2 3

5 6

Shipping Safe: YES! Put em in baggies and let em go!!
DO NOT FREEZE. I haven’t tried this myself but something tells me that the texture would be compromised and after they thaw, they’d be mushy and gross. Just a guess though.

Day 19: Chocolate Mint Brownies + 3 Extra Variations

1 2
3 4

Christmas is almost here.

There are Christmas songs playing non-stop wherever you go. Seriously, it follows you!

There are stockings hung by the chimney with care and I’m pretty sure visions of sugar plums are dancing in your head.

Oh, not to mention there is toxic sludge colored mint on top of brownies.

Whaa?

5 6

Day 19 of my extravaganza and I am sharing brownies. Yummy, fudgy brownies. Yummy, fudgy brownies with a layer of toxic sludge colored mint on top of them. Yum.

But seriously, these are great!! The brownies themselves are a great plain canvas for any number of mix ins and toppings. Just be sure not to have such a heavy hand with the gel food coloring… that stuff is POTENT! Easy does it. Unless toxic sludge green is your favorite color. In which case, color away!!

Chocolate Mint Brownies
adapted from The Joy of Baking via My Baking Addiction

Brownie Layer:
1/2 cup (113 grams) unsalted butter, cut into pieces
4 ounces (114 grams) unsweetened chocolate, coarsely chopped
1 1/4 cups (250 grams) granulated white sugar
1 teaspoon pure vanilla extract
2 large eggs
1/2 cup (70 grams) all purpose flour
1/4 teaspoon salt

Mint Layer:
2 tablespoons(28 grams) unsalted butter, at room temperature
1 cup (115 grams) confectioners (powdered or icing) sugar, sifted
1 – 1 1/2 tablespoons heavy cream
1/2 teaspoon pure peppermint extract or 1-2 tablespoons crème de menthe
green food coloring (optional)

Chocolate Glaze:
3 ounces (90 grams) semisweet chocolate, chopped
1 tablespoon (14 grams) unsalted butter

Directions:
Preheat oven to 325 degrees F (160 degrees C) and place the rack in the center of the oven. Have ready a 9 x 9 inch (23 x 23 cm) square baking pan that has been lined with aluminum foil across the bottom and up two opposite sides of the pan. Set aside.

Brownies: In a stainless steel (heatproof) bowl placed over a saucepan of simmering water, melt the butter and chocolate. Remove from heat and stir in the sugar and vanilla extract. Add the eggs, one at a time, beating well (with a wooden spoon) after each addition. Stir in the flour and salt and beat, with a wooden spoon, until the batter is smooth and glossy and comes away from the sides of the pan (about one minute). Pour the brownie batter evenly into the prepared pan.

Bake in the preheated oven for about 25 minutes or until the brownies start to pull away from the sides of the pan and the edges of the brownies are just beginning to brown. A toothpick inserted in the center of the brownies will come out almost clean. Remove from oven and place on a wire rack to completely cool.

Mint Layer: In the bowl of your electric mixer or with a hand mixer, beat all the ingredients until smooth. Add a few drops of green food coloring if you want the frosting green. If the frosting is too thick, add a little extra cream. (The frosting should be just thin enough to spread.) Spread the frosting evenly over the cooled brownie layer. Place in the refrigerator for about 5-10 minutes or until firm.

Chocolate Glaze: In a heatproof bowl over a saucepan of simmering water, melt the chocolate and butter. Spread over the mint filling and refrigerate for about 30 minutes or until the chocolate glaze starts to dull.

To Serve: Remove the brownies from the pan by lifting with the ends of the foil and transfer to a cutting board. With a sharp knife, cut into 30 squares. It is a good idea to wipe your knife between cuts with a damp cloth to get clean cuts. These brownies can be stored in the refrigerator for several days or else frozen.

Makes about 30 1-inch (2.5 cm) squares.

Optional Garnishes:
chopped peppermint bark (sprinkle over warm brownies and let come to room temp)

7 8

10-20-08 032 copy

chopped candy cane oreos (sprinkle over warm brownies)

9 10

10-20-08 046 copy

a few dollops of caramel sauce (lightly swirl into batter before baking)

Shipping Safe: YES. Brownies can ship great if packed snugly so they do not move around in whatever tin/box you place them in.
Make Ahead and Freeze: YES. Bake the brownies, cool to room temp, wrap tightly and freeze. Take them out one day before they are needed and let them thaw in the fridge and continue with the mint filling and topping.

Day 16: Caramel Surprise Chocolate Cookies

10-20-08 301 copy

Who loves surprises?? I know I do!!

Flowers on a random Tuesday.

A surprise party for my birthday.

A puppy for Christmas.

A pony for New Years…. hey, I’m just sayin’ …

And a caramel surprise in the center of a delicious chocolate cookie. Yes, surprises are fantastic!

Welcome to day 16 of my Christmas Extravaganza!! There’s lots more to come so be sure to come on back!

1 2
3 4

These cookies aren’t exactly ‘Christmas-y’ but they were too good not to share. Plus, who ever said that all Christmas cookies had to be laden with peppermint or ginger? Certainly not I. Who am I to stifle your caramel centered dreams?

The chocolate cookie is to die for, the melty caramel makes it killer (albeit, diet killer) but I digress… please make these. Your taste buds will thank you. As will the recipients of these cookies, should you choose to share, of course.

10-20-08 312 copy

Rolo Stuffed Chocolate Cookies
Adapted from Pillsbury via My Baking Addiction
yield | about 4 dozen cookies

Ingredients:
2 ½ cups all-purpose flour
ž cup unsweetened Cocoa Powder (I used King Arthur’s double dutch dark cocoa)
1 teaspoon baking soda
1 cup sugar
1 cup firmly packed brown sugar
1 cup butter, softened
2 teaspoons pure vanilla extract
2 eggs
48 RoloÂŽ Chewy Caramels in Milk Chocolate; unwrapped (I made half with Rolo’s and half with Brach’s Milk Maid Caramels)

4 oz. vanilla-flavored candy coating, optional
sea salt or crushed candy canes, optional

5 7 6

Directions:
1. In medium bowl, combine flour, cocoa and baking soda; mix well.
2. In large bowl, combine 1 cup sugar, brown sugar and margarine; beat until light and fluffy. Add vanilla and eggs; beat well. Add flour mixture; blend well. If necessary, cover with plastic wrap; refrigerate 30 minutes for easier handling.
3. Preheat oven to 375°F. For each cookie, with lightly floured hands, shape about 1 tablespoon dough around 1 caramel candy, covering completely. Place dough balls 2 inches apart on ungreased cookie sheets.
4. Bake at 375°F. for 7 to 10 minutes or until set and slightly cracked. Cool 2 minutes; remove from cookie sheets. Cool on wire rack for 15 minutes or until completely cooled.

For a little extra pizazz: Melt candy coating in the microwave according to package directions. Drizzle over cookies. Sprinkle with salt or crushed candy canes, if that’s you’re thing.

10-20-08 316 copy

Shipping Safe: YES. Be sure to pack them in a tin or box and make sure that there isn’t any cookie movement. Also, label the box fragile to help it not get tossed around so much.
Make Ahead: You can make the cookie dough 2-3 days ahead of time and keep tightly wrapped in the fridge until you are ready to use. Then simply add the caramels and bake.

Day 14: Muddy Buddies

10-20-08 325 copy

Are you heading out to a Christmas party? I bet you are! I see you wearing your pretty red party dress with your dangly earrings.

Are you bringing something to that party? No time, you say? Well I can fix that. Give me 5 minutes (seriously) and I’ll give you a party treat that will be a hit.

You with me? Let’s get to it!

It’s day 14 and today I am offering up a quintessential Christmas party food. Chex dipped on chocolate, peanut butter and clouded with an insane amount of powdered sugar.

Chex party mix has come a loooong way.

10-20-08 324 copy

Muddy Buddies
Yields 9 cups of mix

Ingredients:
1 cup chocolate chips (you can go fancy and chop up expensive chocolate, but come on! This is party food)
1/2 cup creamy peanut butter
1/2 stick butter
1 teaspoon vanilla extract
9 cups of your favorite Chex Mix cereal
roughly half a bag of powdered sugar

Instructions:
In a microwave-safe bowl, melt chocolate chips, peanut butter, butter in the microwave in 30 second spurts (took me 3-30 sec intervals, be sure to stir with a rubber spatula after each interval). Stir until smooth then add the vanilla and mix until combined.

Now you can go about this next step in 2 ways: 1) Pour the cereal on top of your melted chocolate mixture and carefully fold it together, or 2) Place chex in a big bowl and pour the melted chocolate mixture on top and fold it together. Once your chex mix is ‘muddy’ put it in 2 separate zippy bags and pour about a generous amount of powdered sugar over your mix. Shake, shake, shake until each piece of chex is covered in powdered sugar, adding more if necessary.

Yep, that’s it. Melt, mix, shake, serve.

If you’d like, you can pep this up a bit and add some crushed candy cane pieces in while you’re tossing the chex together. Heck, add crushed oreo’s for all I care. Less is NOT more in this case. Go nuts!!

You can put this in a beautiful, big party bowl and take it with you or place it in a decorative tin and give it as a gift. Either way, you’ll look like a rockstar!

Life is sweet!

Day 9: Candy Manor Peppermint Hot Chocolate

10-20-08 363 copy

Sometimes when the world seems to deal you it’s worst hand or when it’s ridiculously cold outside or even when you scrape your knee… hot chocolate is the best cure for all that ails you.

Don’t believe me? Give this one a try and get back to me.

10-20-08 361 copy

Best part? You can go crazy with the toppings or flavoring of the whipped cream. The cream is your oyster.

Ew, remind me not to ever EVER reference ‘cream’ and ‘oyster’ in the same sentence again. Cringe.

Are you still with me? Good. It’s day 9 of my Christmas Extravaganza and if you’re just now joining me (welcome!) scroll back and catch up on days 1-8. You’ll thank me. Again.

10-20-08 365 copy

Candy Manor Peppermint Hot Chocolate
Adapted from Lora Brody’s “Chocolate American Style” via Ezra Poundcake
Makes 4 to 6 servings

Ingredients:

Whipped Cream:
1 cup (8 ounces) heavy cream, chilled
2 tablespoons powdered sugar

Hot Chocolate:
3 ounces unsweetened chocolate, grated (I used bittersweet)
1 quart (32 ounces) whole milk
1/3 cup (3 ounces) sugar
1/3 cup (3 ounces) boiling water
1 teaspoon vanilla extract
1 teaspoon peppermint extract (recommended: Boyajian)
Crushed candy cane, garnish
Chocolate shavings, garnish

Instructions:

1. For the Whipped Cream: Place the cream, powdered sugar in a chilled mixing bowl, and beat on high speed until soft peaks form. Refrigerate the whipped cream.

2. For the Hot Chocolate: Place the chocolate in a 2 1/2-quart metal mixing bowl. Place the bowl over (but not touching) a pan of simmering water. (The bowl will seem large, but you need the space to mix in the milk.) Stir the chocolate occasionally with a rubber spatula.

3. In the meantime, pour the milk into a heavy-bottomed 2-quart saucepan. Whisk in the sugar and cook over medium heat, stirring occasionally, until the milk begins to simmer and bubbles form around the edge. Turn off the heat.

4. When the chocolate has melted, reduce the heat so the water under the pan barely simmers. Pour the 1/3 cup of boiling water into the melted chocolate, and whisk or beat with an electric mixer until smooth. Dribble in the hot milk mixture as you whisk. When the ingredients are well incorporated, remove the bowl from the water bath, and stir in the vanilla and peppermint.

5. To serve, ladle the hot chocolate into mugs, and top with a generous dollop of the whipped cream. Garnish with crushed candy canes and chocolate shavings.

Notes: The whipped cream can be infused with peppermint extract and crushed candy canes. Just include 1/4 teaspoon peppermint extract (recommended: Boyajian) with the other ingredients and fold in 2 tablespoons crushed peppermint candy at the end.

1 2

This is not shipping safe, but do share this with someone you love 🙂