Homemade Flour Tortillas

Picture 112 copy

I’m horrible at posting delicious recipes in time for holidays. I think I went through about half of my day not remembering it’s Cinco de Mayo.

It’s the friggin fifth of mayonnaise. HOW COULD I FORGET?! I live in Texas, for crying out loud. I should be knee deep in amazing mexican food, margaritas and tequila! Instead, I’m on my couch watching Moneyball.

BUT to my defense, I did tell my hubby that I wanted at pina colada at 9am. I thought it was noon. I’ve been up since 5:30am, leavemealone.

Picture 118 copy

Anyway, if you’re like me and you’re a plight on this world and forgot to celebrate Cinco de Mayo (which Mexico doesn’t even celebrate), make up for it by making homemade tortillas. Or as my very German mother would say “tor-tee-lee-ahs.”

Make em and then stuff them with barbacoa, roll them into enchiladas, fill em with good stuff for quesadillas or shove some chocolate peanut butter and strawberries inside and call it dinner. I’m so grown up.
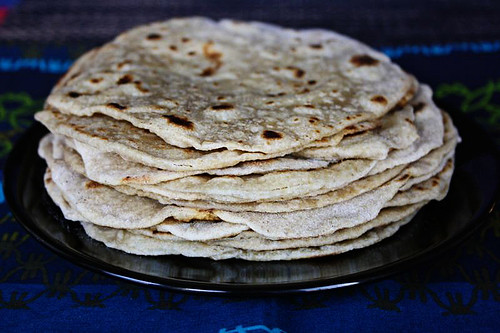
Picture 120 copy

Homemade Tortillas
makes 12 – 7″ tortillas

Ingredients:

3 cups all purpose flour*
1 teaspoon salt
1/2 teaspoons baking powder
1/3 cups canola oil (I used vegetable oil)
1 cup hot water

Note: I used 1/2 whole wheat pastry flour and 1/2 all purpose and they came out yummy. A bit thicker but definitely still tasty!! The original recipe yielded 12 tortillas but my dough weighed 650g and it was just easier to divide that evenly into 13 tortillas (at 50g each).

Instructions:

In a large bowl, mix the flour, salt, and baking powder with a whisk until completely combined. Add the oil and mix it together with your fingers until all the oil is incorporated and the mixture looks like fine crumbs. Add the hot water and resume mixing with your hands until it begins to come together. Lightly flour your surface and knead for a minute until you get a smooth ball of dough. Put your dough in the same bowl you mixed the dough in, cover with plastic wrap and let the dough rest for about 30 minutes (mine ended up sitting for about 2 hours, oops). You can make this dough up to a day in advance and just let it rest, covered in the refrigerator.

Divide the dough into 12 balls (if you have a scale, weigh the dough and divide accordingly). Flour your surface and pat the ball down a bit with your hands to create an even, flat surface. With a rolling pin, roll the dough flipping and adding flour as needed until it is uniform in thickness and about 8-inches in diameter. Cook on a hot, ungreased skillet over medium-high heat. Working one at a time, cook until brown blisters form on one side, then flip. Wrap them in a clean dish towel to keep them warm, before serving.

Keep in mind that these don’t have preservatives and junk so they won’t keep for weeks like store bought ones will. Aim to eat them immediately or at least within a day or two.

Recipe adapted from Tasty Kitchen

Beer and Bacon Macaroni and Cheese

Picture 131 copy

I’m that weird person that wants to eat all the burned cheese off the top of lasagnas, spaghetti and baked mac and cheese. I stare at the dishes coming out of the oven and immediately plot how to remove the crusty, burned bits without anyone catching me in the act.

Because really, how weird would it look for Tony to waltz up to me with a hungry tummy and an empty plate while I am maniacally hunched over the dish, picking it with my fingers and calling it my precious?

1  2  3

One step away from the nut house, is what it’d be.

Luckily for me, I married a man who hates the burned cheese so I get it allllll to myself without looking like too much of a freak. Win.

This mac and cheese is a whole lot greater than the sum of it’s parts. Beer, two different cheeses, homemade panko breadcrumbs, bacon, pasta… oh yes. Bring all these elements together and you get what I would consider premium mac and cheese. And I get all the burny, crunchy cheesy bits all to myself. Be jealous 😉

Picture 126 copy

Beer and Bacon Macaroni and Cheese
adapted from How Sweet It Is
serves 4-6

Ingredients:

2 1/2 cups uncooked shell noodles (you can sub elbow noodles)
2 tablespoons butter
2 tablespoons flour
8 ounces milk*
8 ounces beer (I used Blue Moon Belgian White)
8 ounces freshly grated cheddar cheese
4 ounces freshly grated gruyere cheese
1/4 teaspoon smoked paprika
1/4 teaspoon of black pepper
pinch of nutmeg
1/2 cup whole wheat panko bread crumbs
4 strips thick cut bacon, fried and coarsely chopped

Note: I’m betting that if you used heavy cream in place of the milk that it would yield a creamier, thicker consistency. (Also, I hate bacon. I added it to make it the ultimate mac and cheese. The things I do for you people. If you don’t like bacon, which I’m sure you all do, feel free to leave it off.)

Instructions:

Preheat oven to 375 degrees F.

Prepare water for pasta and boil according to directions, cooking until just al dente.

Heat a medium saucepan over medium high heat and melt butter. Once melted and sizzling, whisk in flour to create a roux and cook until bubbly and golden in color, about 2 minutes (mine was a bit lumpy at first, just keep whisking and it’ll come together). Add milk and beer into saucepan whisking constantly to combine, then add cheeses and stir until melted. Turn heat down to medium and continue to stir, cooking for 5-6 minutes while mixture thickens. Stir in pepper, paprika and nutmeg.

Butter a casserole dish; set aside. Drain noodles and add them to your buttered casserole dish. Then pour cheese over top, mixing gently to combine. Top with panko bread crumbs and an additional sprinkle of cheese if desired. Bake for 20 minutes, sprinkle with bacon and bake for another 5-10 minutes or until the cheese is bubbly and the panko is golden on top.

Remove from oven and let cool for 5 minutes, if you can wait that long. Enjoy : )

This post is going to be a delicious dish at our blogging (early) Thanksgiving dinner table. For the turkey and all the trimmings, check out Phyl’s blog for the round-up. Who knows, you might find something you’d like to add to your dinner table 🙂

PS. This is real life. I was using a beer bottle as background filler for my pictures and the wind knocked it over. And it spilled everywhere. Nice.

Picture 133copy

Pizza Swirl Bread

Picture 182 copy

What do you get someone who has absolutely everything they need and the means to get themselves anything they could ever want?

I mean, how HARD does that short, simple sentence make gift giving? Hella hard.

Picture 187 copy

I don’t have the problem of giving a gift that isn’t heartfelt. That’s not my style, any gift given by me always have a loving thought behind them. Always, non-negotiable.

And as (my) luck would have it, those that I want to show an immense love and appreciation for through my savvy gift giving ways, always end up being the ones who stump me due to said reason above.

And it sucks, people.

Picture 191 copy

I know, I know… it’s the thought that counts but dangit I want the item itself to count too. I don’t want it shoved in the darkest corner of your least used closet to gather dust. I want it to be loved.

It’s stressful. I’m stressed. Did I stress you out? Here, have some bread.

Not just any bread. This is the love child of swirled bread and pizza. All the ooey, gooey saucy toppings of a pizza surrounded by soft, pillowy bread. This really can’t get any better. Bake it and serve it up warm with extra pizza sauce for dipping/slathering. Eat and de-stress.

Picture 189 copy

Pizza Swirl Bread
adapted from How Sweet Eats
makes one loaf

Ingredients:

1/3 cup milk
2 tablespoons butter
1 1/4 cups all-purpose flour
1/2 cup whole wheat flour
1/2 cup whole wheat pastry flour (you can sub AP flour for the WW)
2 1/4 teaspoons instant yeast
1/2 teaspoon salt
1/4 cup warm water
1 large egg
2 garlic cloves, minced
6 ounces mozzarella cheese, grated
4 ounces cheddar cheese, grated
28 slices pepperoni
1/3 cup tomato sauce, or more if desired
1 tablespoon italian seasoning

Instructions:

In a measuring cup, combine milk and 2 tablespoons butter and pop it in the microwave for 30 seconds or until the butter melts; set aside to cool slightly.

In the bowl of an electric mixer, whisk together flours, yeast, and salt.

In your measuring cup with the milk/butter, add 1/4 cup of warm water and the egg and whisk to combine.

With the mixer on low speed (using a dough hook), add the milk mixture to the flour mixture. Mix on medium speed until dough comes together, about 5-6 minutes. Remove dough from bowl and lightly flour your workspace, then knead by hand for a minute or two until the dough becomes smooth. Add a few more teaspoons of flour if dough is sticky.

Coat the stand mixer bowl with non-stick cooking spray, then place dough in the bowl. Cover the bowl and set in a warm place to double in size for about one hour.

Optional: while your dough is rising, stick the pepperoni in the microwave on a paper towel lined plate for 30 seconds to remove a bit of grease. I then dabbed the tops of the pepperoni’s with a paper towel to get the excess grease off the tops as well.

Lightly spray an 8 1/2 x 4″ loaf pan with non-stick cooking spray; set aside.

Preheat oven to 350 degrees F.

After dough has risen, gently press you hand down into the dough to deflate it. Flour your workspace and roll into an 8 x 12 inch rectangle. Spread tomato sauce on first, then minced garlic, then pepperoni, then your cheeses (reserving a small handful) then italian seasoning. Starting at one of the short ends, tightly roll dough into a loaf. Place in loaf pan and brush with a little butter, and sprinkle with reserved cheese and more italian seasoning.

Bake for 45-50 minutes, or until top is golden brown (the top of my bread exploded so it began to leak some cheese and sauce so I slipped some foil in under the loaf to catch the drippings). Let cool for 30 minutes, or not. Reminder: HOT cheese, proceed with caution 🙂

Picture 176 copy

This post was inspired by Di’s Homemade Loaf roundup. A bunch of swell bloggers got together and all made some yummy bread. Head on over to check them all out. A round-up will be posted soon.

Grilled Pizza Tutorial

Picture 058 copy

Let me preface this by saying that I live in Texas. Down here we grill chicken, brisket, sausage and turkey legs. Not pizza. Grilling pizza is pretty damn unknown here. Well, even if it’s not, I’ll be bold enough to say that it is. Let’s pretend that I’m right. Also, it may be the tail-end of Summer where you are so grilling at this time might seem weird to you, but here it’s still Summer. Today’s high of 100F says so.

Having cleared that up, I have never grilled a pizza. Ever. I had never even heard about it until I started blogging. But once I saw the idea and got past my “Texans only grill BBQ” mind set, I was so intrigued! And it’s taken far too long for me to take the leap.

I’ve lost so many years of the best pizza I’ve ever made at home. But I’m hip to the jive now groovy people. Whoa, taking it back 1975.

4  5

Bad blog writing aside, this really is the best pizza I’ve made. The outside of the crust is lightly crispy, the inside is fluffy and soft and once you have the pizza crust ready, it takes no more than 20 minutes, start to finish. It is so worth it.

Note: I realize there are about as many ways to grill a pizza as there are to top them but this seemed easiest to me so I went with it. Head on over to Mel’s blog for a great tutorial with pictures for every step. I would have done that but it’s really hard to grill and NOT burn lunch and take pictures all by yourself 🙂

Picture 067 copy

Grilled Pizza
via Mel’s Kitchen Cafe

I used this pizza dough, pre-made sauce (I had to use what I had on hand) and a propane grill (although you can just as easily grill this on a charcoal grill.) Have your pizza dough ready and made before proceeding to the grill.

Preheat your grill to medium heat for about 10-15 minutes.

Picture 025 copy

While the grill preheats, lightly grease a baking pan (with non-stick cooking spray or olive oil) and place your dough and shape it into an oval/rectangle shape. Grab another clean baking sheet for your finished pizza and stack it under your baking sheet holding the dough.

Picture 037 copy

Gather all the toppings you intend to use (meats, veggies, cheeses, sauce, everything) in easily accessible bowls, a spoon, a brush, and tongs and place them on another tray.

Picture 028 copy

Time to head outside. Place your tray(s) holding the dough on one side of the grill and place the toppings tray on the opposite side of the grill.

Lightly brush the top side of dough with olive oil.

Picture 046 copy

Open the grill, grab two edges of the dough and in one smooth motion lift the dough and quickly place it on your hot grill surface.

Most likely your pizza dough won’t be perfectly round or rectangular anymore. That’s perfectly fine. Rustic is beautiful. And sassy. Now close the grill and let the dough cook for about 2-4 minutes, depending on the heat of your grill. (Switch your baking sheets so the clean one is now on top.)

Picture 047 copy

The dough will be ready to flip when it lightly bubbles on the surface and the bottom has lovely grill marks but is NOT burned.

1  3

Using a pair of tongs, gently flip the dough over. Throughout this process, keep an eye on the grill’s temperature, adjusting up or down as necessary. Burned pizza doesn’t taste that good.

Picture 050 copy

Picture 051 copy

Now working quickly, using a spoon, spread your sauce over the crust. Next, layer with your toppings (mine were red bell pepper, mushrooms, pepperoni and mozzarella cheese).

Once all your toppings are on the pizza, close the grill and let the pizza cook for 2-3 minutes to melt the cheese and finish cooking the crust. You might need to cook a bit longer depending on how much cheese you used but I would not recommend more than another minute or two.

Picture 057 copy

Carefully remove your pizza with a pair of tongs onto your clean baking sheet. Slice and serve with a cold glass of your favorite beer or glass of iced tea 🙂

Picture 071 copy

Beer Pizza Crust

Picture 041 copy

Sometimes there’s nothing better than sitting back, kicking up your feet, enjoying a slice of pizza, a beer and some football.

Or whatever your television poison is: trashy reality, hockey, CSI version 95, or the weather channel. Either way, pizza is the answer. Made even better when your crust is infused with beer!

Picture 073 copy

Don’t fret, beer haters. I am not what you would call a ‘fan’ of beer. This pizza crust is mildly flavored, although it does depend on the type of beer you use. But if anything, the yeast in the beer gives this dough a beautiful rise and a wonderful flavor and texture. Almost like an artisan pizza crust.

This pizza crust comes together so easily and you don’t even need a stand mixer for it. I made this dough using a big bowl, a wooden spoon and kneaded by hand and it was no trouble at all. I would easily say this crust is tied with my go-to pizza dough. That’s serious business people.

Picture 078 copy

Beer Pizza Crust
adapted from here with tips from here

Ingredients

4 cups all-purpose flour
2 teaspoons instant yeast
1 teaspoon baking powder
1 1/2 teaspoons salt
2 tablespoons olive oil
12 fl oz (1 1/2 cups) room temperature beer (I used Samuel Adams Octoberfest)

Directions

Combine flour, instant yeast, baking powder, salt and olive oil in a large mixing bowl with a whisk. Slowly add beer and using a wooden spoon, mix until you have a shaggy dough.

Picture 902 copy

Flour your hands and your dough and knead the dough with your hands until you have a soft, smooth dough – it should hardly stick to the mixing bowl or your hands, about 7 minutes (less if using a stand mixer).

1  3

Form the dough into a round ball, cover with a dish cloth and allow it to rise for anywhere from 30 minutes to 2 hours.

Once your dough is doubled in size, use your open hand to gently press down on the dough to deflate it. Separate into 2 dough balls or leave whole if making one large pizza.

Preheat the oven to 450F.

If you have a pizza stone, cover with parchment paper. If you don’t, use a large round or rectangular metal pan, cover in foil to make clean-up much easier and sprinkle with a little corn meal or lightly spray with cooking spray; set aside.

Shape (or roll) your dough to about 10 – 12 inches (or to fit the size of your pan) keeping in mind that thin dough makes for a crispier crust and thicker will yield a softer, thicker crust. When you think it’s roughly the right size for your pan (or baking stone), turn the dough down onto it. You might need to let it rest for a few minutes and gently pull at the sides if you find the dough springs back.

Add your sauce and toppings and place in the oven, for 15 minutes or until the cheese is bubbly and melty. If you place the toppings under any cheese, you’ll have a less greasy pizza. Let it sit for a few minutes so you don’t burn off your taste buds then serve with an ice cold beer and some football 😉

Picture 085-1

Stay tuned for my grilled pizza tutorial using this crust 🙂

Golden Brioche Loaf – TWD

Picture 410 copy

Picture 417 copy

I knew going into making this brioche that it wouldn’t turn out.

Not because the recipe is flawed, but because I was making it at night, trying to cram it all in before bed. I was doing so well until it came to the last rise.

While the bread was on it’s last rise, I made dinner. Then ate dinner. Then fell asleep on the couch. The bread had risen too much, collapsed in on itself and I was too tired to deal with it then so I put it in the fridge to deal with the next day.

Picture 416 copy

I let it come to room temp and then baked it. It wasn’t pretty. It was pretty hard and smelled like melting cheese(?) but again, I had no patience to deal with it. It tasted ok, but I know that I was missing the whole package because of my oopsy.

Picture 405 copy

So, my lesson: do NOT bake when I’m tired. Just don’t.

I will be trying my hand at this bread again because it looks too good not to.

The awesome Margaret of Tea and Scones chose this recipe for this week’s TWD. Head on over to her blog for the recipe. (Click here for direct link)

Picture 419 copy

Avocado Lemon Pasta – A Quick Summertime Meal

Picture 269 copy

Meat and potatoes used to be my idea of dinner. There was a starch (usually mashed potatoes, mac and cheese or some form or rice or noodle), a veggie and always always ALWAYS a meat. Dinner wasn’t dinner without meat. Steak, chicken, meat loaf, meat balls… meat damn-near-anything.

I’m either growing up or growing sick of meat but I rarely have meat for dinner lately. I’ll have the occasional piece of chicken or steal a few pieces of Tony’s steak but other than that, I’m pretty meat free. When it comes to dinner at least.

Now, that’s not saying that I eat a sophisticated meal of eggplant lasagna or a fancy ratatouille. No way. I am no chef here, folks.

Picture 273 copy

So when I stumbled upon this recipe I pretty much freaked. Avocados. Lemon. Pasta. Easy. Fast.

Heaven.

This is a perfect summertime meal. It comes together in about 15 minutes, the flavors are bright and the sauce is creamy. There are only a few ingredients here so it is imperative to use good quality ingredients and to salt and pepper well or this dish will seem lack-luster. And if you insist on some form of meat, I think this would be lovely with a few grilled shrimp or a few sliced of grilled chicken tossed on top.

Picture 277 copy

Avocado Lemon Pasta
adapted from here

Yield: Serves 2

Ingredients:

1 medium sized ripe Avocado, pitted
1/2 lemon, juiced
2 garlic cloves, skins removed
1/2 tsp kosher salt, or to taste
2 tbsp extra virgin olive oil
2 servings (6 oz) of your choice of pasta
Freshly ground black pepper, to taste
parsley, to taste
lemon zest, to garnish

Directions:

In a medium sized pot, bring several cups of water to a boil. Add in your pasta, reduce heat to medium, and cook until al dente, about 8-10 minutes. Pay attention to your pasta, there’s nothing worse than mushy s’getti noodles.

Meanwhile, make the sauce by placing the garlic cloves, lemon juice, and olive oil into a food processor. Process until smooth. Now add in the pitted avocado and salt. Process until smooth and creamy. It will be a lovely shade of green and smell lemony.

When pasta is done cooking, drain and rinse in a strainer and place pasta into a large bowl. Pour on sauce and toss until fully combined. Garnish with lemon zest, black pepper and parsley. Serve immediately.

Note: This dish does not reheat well due to the avocado in the sauce. To experiment, I made both servings (I ate one and refrigerated the other) and left the cold serving out for half an hour and it didn’t brown and was pretty tasty slightly cool.

Picture 267 copy

Bacon Cheddar Scones

DSCN4139 copy

I don’t like bacon.

There, I said it. Save your gasps, your looks of disbelief, and your monologues about how bacon is America’s greatest food. It’s just not my thang. And I’m ok with that, thankyouverymuch.

But that’s not to say that I am opposed to baking with it. I’m not going to be eating it anyhow, so I might as well experiment. I will say that I tried a corner of a scone and as far as overall flavor goes, it was good. But I wouldn’t choose to eat it because of the bacon. But I taste tested the scones anyway because I won’t post something I can’t get behind.

1 3

And if I were a bacon lover, these would be phenom. Seriously. A whole pack of bacon, enough cheddah to sedate a small horse and pepper enclosed in a flaky, crumbly scone dough? Yep, it’s a winner.

So grab a pack and get baking. Just don’t share it with bacon haters of the world. Although I’m pretty sure that I’m the only one in that club 😉

DSCN4133 copy

Bacon and Cheddar Scones
source: Rebecca Rather, The Pastry Queen

Ingredients:

3 cups all-purpose flour
1 Tbsp baking powder
1 tsp salt
2 tsp freshly ground black pepper
1 stick well-chilled unsalted butter, cut into small cubes
1 1/2 heaping cups grated Cheddar cheese
10 slices bacon, cooked nice and crispy and chopped into 1 inch pieces
3/4 to 1 1/2 cups buttermilk (I needed 1 full cup)
1 large egg
2 tsp water

Directions:

Preheat oven to 400. Line a baking sheet with parchment paper.

Using a mixer fitted with a paddle attachment, combine flour, baking powder, salt, and black pepper in a large bowl on low speed. With mixer running, gradually add cubes of butter until the mixture is crumbly and studded with flour – butter bits about the size of small peas. Alternatively you could prep the scone dough in a food processor, pulsing a few times to cut the butter in. Add grated cheese and mix just until blended. (This can also be done by hand: In a large bowl, stir together flour, baking powder, salt, and pepper. Gradually cut in butter with a pastry blender or two knives until mixture resembles small peas. Stir in cheese.)

Add bacon and 3/4 cup of the buttermilk to flour and cheese mixture. Mix by hand just until all ingredients are incorporated. If dough is too dry to hold together, use remaining buttermilk, adding 1 tablespoon at a time, until dough is pliable and can be formed into a ball. Try not to overwork the dough, the longer you handle it the tougher it will be. Remove dough from bowl and place it on a lightly floured flat surface. Pat dough into a ball. Using your hands, flatten dough into a circle about 10 inches wide and 1/2 inch thick. Cut dough into 8 to 12 equal wedges, depending on the size scone you prefer.

Whisk egg and water in a small mixing bowl to combine. Brush each wedge with egg wash. Bake for 18 to 22 minutes, or until golden brown and no longer sticky in the middle. Serve warm, fresh from the oven.

DSCN4138 copy

Corniest Corn Muffins – TWD

Picture 073 copy

I’m a Texan. And us Texans take cornbread seriously. Just about as serious as we take our chili.

Even with being so serious, there’s still a million ways that us Texans make our favorite chili (beans vs no beans, tomatoes vs no tomatoes, etc) and there’s a million ways we like our cornbread (corn vs no corn, sweet vs savory, etc) so in the grand scheme of things, it really just comes down to personal taste.

Picture 061 copy

And this Texan doesn’t like ‘corny’ cornbread.

Texture is very important to me and my tastebuds. Corn kernels are not welcome in my cornbread and I like it on the sweet side, thankyouverymuch.

But some cheddar and jalapeños works as well. Too bad I forgot this time around.

I guess I’ll have to make these again. With some chili 🙂

Picture 072 copy

I halved the recipe, doubled the sugar and omitted the corn kernels. I decided not to use the nutmeg and used veggie oil instead of the corn oil due to accessibility. The half recipe yielded 6 adorable tasty cornbread muffins. Definite repeat.

Head on over to Jill’s blog, My Next Life for the recipe (or click here)

Picture 081 copy

Whole Wheat Pizza Crust

10-20-08 432 copy

Someone please explain to me whyyy there are commericals concerning what the ingredients are in dog food followed by pet owners who are disgusted when they find things like corn gluten and meat by-product…

but the following commercial is about children being fed pre-made chicken nuggets (in which the ingredient list has a number of ingredients that I can’t even pronounce) like there’s no problem.

What ever happened to REAL food?

There is a homemade, real food alternative to every pre-made food out there. It may be a bit different but my thought process: if it’s homemade, it HAS to be better for you. I mean… it’s REAL food after all.

Let’s start with pizza! Yes, you can make pizza at home. And you can even healthify it by using whole wheat flour instead of white flour. And it’s simple!! Mix, knead, rise, knead, last rise while you chop your veggies and grate your cheese. Easy cheesey!

10-20-08 439 copy

Whole Wheat Pizza Crust
Adapted from Smitten Kitchen

Makes enough for one small, thin crust pizza. Double it if you like your pizza thick and bready.

1 1/2 cups whole wheat flour
1 teaspoon salt
3/4 teaspoon active dry yeast
1/2 cup lukewarm water (may need up to 1 or 2 tablespoons more)
1 tablespoon olive oil
your choice of sauce and toppings

Stir dry ingredients, including yeast, in a large bowl. Add water and olive oil, stirring mixture into as close to a ball as you can. Dump all clumps and floury bits onto a lightly floured surface and knead everything into a homogeneous ball. Use flour when needed… it’s slightly sticky at this point.

If you are finding this step difficult, simply pause. Leave the dough in a lightly-floured spot, put the empty bowl upside-down on top of it and come back in 2 to 5 minutes, at which point you will find the dough a lot more lovable.

Knead it for just a minute or two. Lightly oil the bowl (a spritz of cooking spray perfectly does the trick) where you had mixed it — one-bowl recipe! — dump the dough in, turn it over so all sides are coated, cover it in plastic wrap and leave it undisturbed for an hour or two, until it has doubled in size.

Dump it back on the floured counter and gently press the air out of the dough with the palm of your hands. Fold the piece into an approximate ball shape, and let it sit under that plastic wrap for 20 more minutes.

Sprinkle a pizza stone or baking sheet with cornmeal and preheat your oven to its top temperature. Roll out the pizza, toss on whatever topping and seasonings you like. If you like a TON-o-toppings and bready crust, slice them thinly so you don’t weigh down the dough.

Bake it for about 10-15 minutes until it’s lightly blistered and impossible to resist.

10-20-08 433 copy