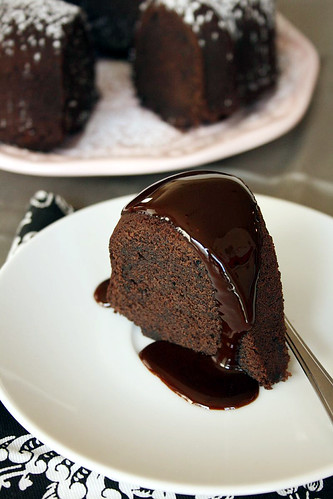
Chocolate Velvet Pound Cake

Chocolate Velvet Pound Cake

Have you ever had one of those days when you just NEED some chocolate to cure whatever ails you? Who am I kidding, of course you have. Or maybe I’m just projecting my issues on you…? Either way chocolate = answer to all questions.

After committing to a healthier lifestyle, chocolate is the one tiny thing that keeps me from being 100% committed. There is just something about it. It’s rich, melty amazingness just draws me in every.single.time. When I see a new, intriguing flavor of chocolate (Wasabi Dark Chocolate, anyone?) I just can’t help myself. I’m very serious about my chocolate! I get angry when it goes to waste (not all recipes work out, whomp) or when it doesn’t match my high hopes or when things just aren’t… chocolatey enough. I’m sure you understand, right?

Chocolate Velvet Pound Cake

So upon seeing this recipe for chocolate velvet pound cake, I was a bit bummed to find that there aren’t mounds of melted chocolate in it. I was so sure that the chocolate flavor would be too muted for me to fully enjoy it. I’m also not a huge fan of pound cakes, so sadly the cards were mentally stacked against this one before I even got started. But I pressed on, thinking that I could just give it away to someone less picky crazy than me.

Thaaaaaaaaank goodness I pressed on with this. This pound cake was delightful!! That’ll teach me not to judge a book by it’s cover. Probably not. But it sounds good ;)This pound cake came together fairly quickly (it’s definitely no layer cake!) and the end result was smooth, velvetey, rich chocolatey deliciousness. But I couldn’t leave well enough alone and drizzled a bit of chocolate ganache on my slice (it didn’t need it, I just have issues.) If you’re a chocolate connoisseur like myself, do yourself a favor and try this.

Chocolate Velvet Pound Cake Chocolate Velvet Pound Cake

Chocolate Velvet Pound Cake
Yields about 6 cups of batter (enough for one 6-cup bundt pan or one 8 1/2″ x 4 1/2″ loaf pan)

Ingredients:

1 1/2 sticks (6 ounces) unsalted butter, softened
1 1/4 cups (8-3/4 ounces) sugar
1 teaspoon water, at room temperature
2 teaspoons espresso powder
3 large eggs, at room temperature
1 cup (5 ounces) unbleached all-purpose flour
1/2 cup (2 ounces) unsifted unsweetened Dutch-process cocoa powder
1/4 teaspoon baking powder
Pinch of salt
1/2 cup (4 ounces) buttermilk, at room temperature*

* I used buttermilk powder and it still turned out great! My powder requires that you use water as a liquid in place of the buttermilk and add the powder with the dry ingredients. If you decide to go this route, please follow the directions on the container of your powdered buttermilk.

Instructions:

Preheat the oven to 350°F and position an oven rack in the center. Lightly spray your bundt pan with non-stick cooking spray. If using a loaf pan, spray with non-stick cooking spray and fit it with parchment paper to extend up both long sides to the top of the pan (leaving an overhang for easy removal once cool). If your pans have a nasty habit of sticking, butter the pan and then lightly dust the pan with cocoa powder.

Cream the butter and sugar: Place the butter and sugar in the bowl of the stand mixer and beat on medium-high until light – almost white- in color, 4 to 5 minutes. You can also use a hand mixer and a medium bowl, although you may need to beat the mixture a little longer to achieve the same results. Scrape down the sides of the bowl with the spatula.

Add the eggs: In the small bowl, stir together the water and espresso powder until smooth. Crack the eggs into the bowl and whisk to blend. With the mixer running on medium, add the eggs to the butter mixture about 1 tablespoon at a time (I’m impatient so I eyeballed and probably ended up going a few tablespoons at a time), allowing each addition to completely blend in before adding the next. About halfway through, turn off the mixer and scrape down the sides of the bowl, then continue adding the eggs. Scrape down the bowl again.

Add the dry and wet ingredients alternately: With the fine-mesh strainer, sift the flour, cocoa powder, baking powder, and salt into the medium bowl and whisk to blend. With the mixer running on the lowest speed, add the flour mixture and the buttermilk alternately, beginning with one-third of the flour mixture and half of the buttermilk; repeat, then finish with flour mixture. Scrape down the bowl and finish blending the batter by hand if necessary. (I normally give the batter a few quick turns with a silicone spatula before calling it done.)

Bake the cake: Scrape the batter into the prepared baking pan and smooth the top. Bake for 45 to 55 minutes, until firm to the touch and a toothpick inserted into the center comes out clean. Transfer to a rack to cool completely. When cool, remove from the pan, peel off the parchment paper, and serve.

Storing: The cake can be made several days ahead and kept at room temperature, wrapped in plastic wrap. Or double-wrap it, put in a resealable plastic freezer bag, and freeze for up to 8 weeks.

Barely adapted from Sur La Table’s The Art & Soul of Baking

Chocolate Velvet Pound Cake

Day 21: Cardamom Crumb Cake

10-20-08 039 copy

I’m going to cheat a bit today and use my TWD post as Day 21’s treat.

I miss baking with TWD, although I haven’t really missed more than 2 assignments (I think) but life gets busy and sometimes you gotta kill two birds with one stone.

Metaphorically, of course. Killing birds isn’t up my alley. It makes me sad.

No birdies were harmed in the making of this crumb cake.

10-20-08 030 copy

If you like cardamom, orange and coffee flavors, this crumb cake is for you! Whip it up for brunch or for breakfast or even for company that drops by. It comes together quickly and is best served warm the day it’s made with some coffee and a side of cinnamon infused freshly whipped cream.

Jill chose this cake and made the comment that this is a good holiday cake… and I agree. That’s why it is for Day 21 of my Christmas baking extravaganza!

I have never done anything with cardamom before but I went ahead and bought some cardamom and I can’t wait to find new ways to use it. I halved this recipe and made it in a 8×5 loaf pan, which is why it’s a bit on the thin side, but it still worked.

1 2

You can find the recipe on her blog. Click here to be taken directly to it.

Day 15: Chocolate Butter Cookies

10-20-08 348 copy

If Christmas had a signature cookie, sugar cookie cut-outs would be it. Every year more and more sugar cookies are cut out, baked and then decorated. Saaaaaame oooooold.

Tired of the same old, same old?

Let me introduce you to the best chocolate cut-outs I’ve gotten my hands on. These bad boys are…. well, bad. Bad = good. You with me? Good.

1 2 3

Day 15 of my Christmas extravaganza! Tired of sugar yet? NO? Me either 😉

These cookies are the perfect answer to your longing change from the boring same old. These are sturdy, crumbly, chocolatey, buttery GOODNESS! They come together quickly, chill overnight and you are ready to roll (out your dough)! Just be sure to bake these up on a flat cookie sheet, unlike me. You’ll end up with weird bubbles on the surface.

Whatever you do with these, whether you serve em plain or decorate with royal icing, promise me you’ll eat just one with caramel drizzle. Promise? You won’t regret it.

10-20-08 308 copy

Chocolate Butter Cookies
Yields about 2 dozen 2-inch cookies

Ingredients:
20 tablespoons unsalted butter (2 1/2 sticks), softened to cool room temperature (about 65 degrees)
1/2 cup cocoa powder (about 2 ounces)
1 teaspoon espresso powder
1 cup sugar (7 ounces)
1/4 teaspoon table salt
2 large egg yolks
1 tablespoon vanilla extract
2-1/4 cups unbleached all-purpose flour (11 1/4 ounces)

Instructions:
1. Adjust oven rack to middle position; heat oven to 375 degrees. Melt 4 tablespoons butter in medium saucepan over medium heat. Add cocoa powder and espresso powder; stir until mixture forms smooth paste. Set aside to cool, 15 to 20 minutes.

2. In standing mixer fitted with paddle attachment, mix remaining 16 tablespoons butter, sugar, salt, and cooled cocoa mixture on high speed until well combined and fluffy, about 1 minute, scraping sides of mixing bowl once or twice with rubber spatula. Add yolks and vanilla and mix on medium speed until thoroughly combined, about 30 seconds. Scrape sides of bowl. With mixer running on low, add flour in three additions, waiting until each addition is incorporated before adding next and scraping bowl after each addition. Continue to mix until dough forms cohesive ball, about 5 seconds. Turn dough onto counter; divide into three 4-inch disks. Wrap each disk in plastic wrap and refrigerate until dough is firm yet malleable, 45 to 60 minutes. (Alternatively, shape dough log, 2 inches in diameter and about 12 inches long; use parchment paper or plastic wrap to roll into neat cylinder. Chill until very firm and cold, at least 1 hour.)

3. Roll out 1 dough disk between 2 large sheets parchment paper to even thickness of 3/16 inch. (If dough becomes soft and sticky, slide rolled dough on parchment onto baking sheet and rechill until firm, about 10 minutes.) Peel parchment from one side of dough and cut into desired shapes using cookie cutter(s); using thin metal spatula, place shapes on parchment-lined baking sheet, spacing them about 1 inch apart. Gather dough scraps and chill. (For cylinder-shaped dough, simply slice cookies 1/4 inch thick and place on parchment-lined baking sheets.)

4. Bake until cookies show slight resistance to touch, 10 to 12 minutes, rotating baking sheet halfway through baking time; if cookies begin to darken on edges, they have overbaked. Cool for 5 minutes, then, using spatula, transfer cookies to wire rack; cool completely. Repeat steps 3 and 4 with remaining dough disks and scraps, rerolling scraps just once. Decorate as desired.

10-20-08 352 copy

Shipping Safe: YES. These are sturdy and can hold up to being shipped.
Make Ahead and Freeze: YES. Just make the dough, form into a disc, wrap tightly and freeze until ready to roll and bake.

Cake Pan Chocolate Cake (AKA: The One Bowl Wonder)

10-20-08 109 copy

Let’s talk about the magic of one bowl cakes for a moment… they are amazing.

Yep, that’s pretty much all there is to it.

There’s no bringing butter to room temperature, there’s no fancy ingredients, and there isn’t a mountain of dishes to wash… just plain ole moist, tasty chocolate cake made in ONE BOWL!

One bowl. What a breath of fresh air.

1 2

One Bowl Chocolate Cake

Adapted from King Arthur Flour (here)
Yield: 12 to 16 servings

Ingredients:
1 1/2 cups (6 1/4 ounces) King Arthur Unbleached All-Purpose Flour
1 cup (7 ounces) sugar
1/4 cup (3/4 ounce) cocoa
1/2 teaspoon salt
1/2 teaspoon espresso powder, optional
1 teaspoon baking soda
1 teaspoon vanilla
1 tablespoon (1/2 ounce) vinegar
1/3 cup (2 5/8 ounces) vegetable oil
1 cup (8 ounces) milk

Process:
Preheat your oven to 350°F.

Grease (and line with parchment paper if you feel so inclined, mine didn’t need it) an 8″ pan with cooking spray and set aside.

Measure all the dry ingredients into a large bowl. Blend the ingredients together thoroughly with a whisk and scoop out three holes, or indentations. These holes will help you keep track of what ingredients you’ve already added!

Pour the vanilla into the first hole, the vinegar into the second, and the vegetable oil into the third.

Take the cup of cold milk and pour it directly over everything in the pan. Stir all the ingredients together until they are well blended.

Bake for 30 to 35 minutes. Serve right from the pan, warm with ice cream or a quick dusting of powdered sugar or double the recipe and make a layer cake with your favorite frosting.

*Alternatively, you can mix all ingredients in the actual pan that you’ll be baking the cake in! Hence, the ‘cake pan’ in the title. But be warned, the cake will stick to the bottom of the pan.

**This recipe can be easily made vegan by substituting water (1 cup), coffee (1 cup) or even rum (3/4 cup water and 1/4 cup rum) for the milk! A winner for everyone!

Enjoy!

10-20-08 123 copy

TWD – Coffee Break Muffins

10-20-08 117 copy

These are THE best.

There’s not much more I can say. There really isn’t much more that I HAVE to say. But I’ll pick a few of my favorite words and leave the rest up to you:

Muffins. Quick. Easy. Moist. Delicious. Crowd-favorite. Coffee. Chocolate. Tender. Addictive. PERFECT.

Are you getting the picture? I hope so.

1 2

I have horrible luck with muffins. Every recipe that I’ve tried has turned out to be a bit disappointing, texturally. I end up with either a dense and heavy crumb or a light and airy crumb that’s too reminiscent of cake. But these, these babies are what all muffins should strive to be.

An espresso flavored dough studded with chocolate chips (my own addition) makes for the perfect breakfast treat or mid-afternoon snack with a wonderful cup of coffee. Both the fiancé and I took these to work and they didn’t last.

10-20-08 114 copy

First thing in the morning I was greeted with two texts: one stating that this is the best thing I’ve ever made and another asking if the muffins were laced with crack, because they were addictive. Need any more incentive to make these? I didn’t think so 😉

10-20-08 121 copy

Head on over to Rhiani of Chocoholic Anonymous‘ blog for the recipe (click here) or buy the book, I promise you’ll love it! And be sure to check out the other TWD bakers’ opinions/variations on this great muffin!

Up next week: Tarte Fine. Baked apples!! I LOVE baking french pastries. I walk around my kitchen dictating the recipe (to myself) in a crummy french accent. Oh the joys of baking 😉