Sugar Cookie Bars

Sugar Cookie Bars

Keep it simple, stupid.

No, I’m not insulting you (obvi!) It’s a little mantra that I try to live by. Life has a habit of getting so complex and difficult and just when you think you can’t take anymore, life throws you an additional curveball. At that point, you have two choices: break down and get nothing done or simplify and start tackling things one by one.

Perfect example: my life. I have a full-time job, a husband, pets, friends and family who (rightfully!) demand my time. I try to hit the gym 4 times a week. I’m starting up the blog again, thinking about taking some online college courses and seriously debating taking guitar lessons. Toss in some curveballs and my plate is damn near full. Some days I sit back and wonder how I’m not a hot mess. But then I remember, I try my hardest to keep things simple. Late night at the gym: dinner is gonna be simple, yo! Blog post to write: get up early and knock that bad boy out. Need to take pics of the brownies I made last night: grab my camera and run outside to snap a quick few before hitting the gym. Feeling run down: rent a Redbox flick and cuddle on the couch with my hubby. If something doesn’t get done: don’t freak, I’ll likely have time tomorrow and if it isn’t super important, it’s ok if it gets pushed off until I DO have time. Life is hard enough, don’t be the main culprit of making it harder.

Yet another perfect example (man, is my timing awesome or what?!) These bar cookies. You want sugar cookies but don’t want to cream and refrigerate and scoop a bagillion tiny balls and bake ninety million batches and then eateversinglecookieallbyyourself. Whip these up. Seriously. It’s all the goodness of a sugar cookie, simplified. Cream everything together, press into a pan, bake, cut, done. You don’t HAVE to frost them. You can sprinkle with cinnamon-sugar or go Plain Jane, I’m ok with that. Don’t wanna wait for them to cool completely (believe me, I understand) fine, don’t! Who doesn’t love warm cookies anyway?! Whatever makes YOUR life easier.

These burned up the blogs some time ago and I never gave them a whirl until I needed something sweet in its simplicity. They are chewy, buttery, sugary goodness. And there’s sprinkles. No wrong done there.

Sugar Cookie Bars

Sugar Cookie Bars
yields 16 small bars, 9 large, 1 HUGE (if you’re having THAT kind of a day.)

Ingredients:

For the cookies:
3/4 cup (150g) granulated sugar
2/3 cup (10 2/3 Tablespoons) butter, softened
1 Tablespoon milk
1 teaspoon vanilla extract
1 large egg
1 1/2 cups (6.37oz) all-purpose flour
1 1/2 teaspoons baking powder
1/4 teaspoon salt

For the frosting:
4 cups powdered sugar
1/2 cup butter, softened
1 teaspoon vanilla extract (or almond, your choice)
3 to 4 Tablespoons milk

Directions:

Preheat oven to 375F. Line a 15x10x1-inch jelly roll pan with foil taking care to leave an overhang on two sides. Spray with non-stick baking spray or butter; set aside.*

*Note: I used a 9×13-inch pan, adding 2 minutes to the baking time and it worked out perfectly. You don’t have to use the pan size specified, use what you have on hand and adjust the baking time accordingly. Let’s just say there’s nothing wrong with a thicker cookie 😉

In a medium bowl, whisk together the flour, baking powder and salt. Set aside.

In the bowl of your stand mixer (or in a large bowl with a hand mixer) combine sugar, butter, milk, vanilla, and egg. Beat at medium speed until creamy, about 2-3 minutes. Add the flour mixture and mix on low until just combined (or until the flour is almost completely mixed in).

Spread mixture as evenly as you can into your prepared pan with a rubber/silicon spatula. Bake for 10-12 minutes (don’t forget to adjust your baking time if you use a different size pan!) or until set. Place the pan on a wire rack and cool completely.

To make the frosting: Combine powdered sugar, 1/2 cup butter, and extract in a large bowl and beat at medium speed until creamy, about 3 minutes. Scrape down the sides of the bowl. Add milk, one tablespoon at a time, mixing on med-high speed for about 30 seconds, scraping down the sides as needed. Once you’ve reached the desired consistency, stop adding milk. BE VERY CAREFUL with the milk, only adding a little at a time! Remember: you can always add more, but you can’t take any away! We don’t want vanilla soup, do we? At this point, you can thoroughly mix in some gel food coloring of your choice to the frosting (of course I went with pink, I’m so predictable!)

Assemble the bars: Using the foil overhang, carefully lift the bars out of your pan. Spread the frosting over cooled bars with an offset spatula and decorate with sprinkles (if you’re fancy. Clearly I’m fancy.) Cut into squares and dig in!

Sugar Cookie Bars

Recipe from Land O’ Lakes via With Sprinkles on Top

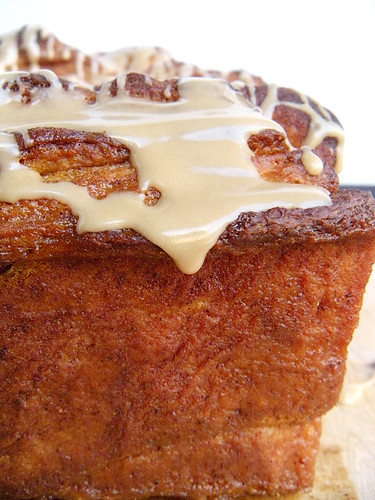
Pumpkin Spice Pull-Apart Bread with Maple Glaze

Picture 577 copy

Back in June I made a lemon scented pull-apart coffee cake and it apparently made a lot of people happy.

Happy and confused.

I got a lot of comments letting me know how yummy it looked and at the same time, how confused they were at the steps. So I thought the best way to remedy this situation was to make this again (with an Autumnal flair, of course) and take some process photos to help clarify some things. This is my first time taking process shots (by myself, with one hand) so stay with me here. It was tough but I powered through. Oh the things I do to make you all happy 😉

Picture 570 copy

Back to this pull-apart bread: it is SO good. Dare I say even better than the lemon version? I have a slight obsession with all things pumpkin and cinnamon spiced, baked up and then glazed. Oh that’s a pure win-win in my book ANY day. Even in a blistering Summer day in July.

Picture 572 copy

It’s warm, soft, spiced, sweet deliciousness that’s perfect for breakfast or a snack or with tea or for dinner. Ok, that last one might be just me. It is best served warm and peeled layer by layer. MAYBE shared with someone you love. Maybe…

1 2 3

Pumpkin Spice Pull-Apart Bread with Maple Glaze
recipe by: willow bird baking
yields one loaf

Pumpkin Pull-Apart Bread Ingredients:
1/2 cup milk
3/4 cup pumpkin puree
1/4 cup white sugar
2 tablespoons unsalted butter
1 teaspoon salt
2 1/4 teaspoons (1 envelope) active dry yeast
2 1/2 cups bread flour

Filling Ingredients:
1 cup granulated sugar
2 teaspoons ground cinnamon
1/2 teaspoon fresh ground nutmeg
2 tablespoons unsalted butter

Maple Glaze Ingredients:
3/4 cup powdered sugar
1/4 teaspoon maple extract
1 teaspoon milk, more if necessary

Directions:

Make the pull-apart bread dough: Lightly spray the inside of a bread pan with non-stick cooking spray; set aside.

In a small saucepan over medium-high heat, brown the 2 tablespoons of butter. Let it bubble and foam and when you see it start to brown, stir it so that it browns evenly. When it’s the color of dark honey, remove it from the heat and pour it into your stand mixer bowl to cool. This can happen quickly, be sure to watch it as it goes from brown to burned in no time.

In the same saucepan over medium-low heat, warm the milk until it gently bubbles. Don’t let it come to a rolling boil as that pretty much ensures it will boil over (learn from my mistakes). Remove it from the heat and pour it into the bowl with the butter. Let these cool until they’re about 100-110 degrees F (about 10 minutes). Set the saucepan aside for another use later.

Stir the sugar and yeast into the milk/butter mixture and let it sit for a few minutes. Stir in pumpkin, salt, and 1 cup flour. If you haven’t already, fit your mixer with a dough hook. Add the rest of the flour 1/2 cup at a time, stirring between each addition. When the dough is combined, knead on low speed with a dough hook until smooth and elastic (about 4 minutes with a mixer).

Take your ball of dough out for just a moment and set aside. Lightly spray the inside of your stand mixer bowl with non-stick cooking spray and place the dough back in the bowl; cover it with a damp cloth and let it rise in a warm place for about an hour until it doubles in size (After it rises, you can put it in the fridge overnight to use it in the morning, but let it sit out for half an hour before rolling if you do.)

Make the filling: While the dough is rising, whisk the sugar, cinnamon, and nutmeg together in a small bowl. Toward the end of the rising time, melt the 2 tablespoons of butter for the filling in the saucepan over medium-high heat and brown it as directed above. Put it in a small heat-safe bowl to cool for use later.

Shape and bake pull-apart bread: Knead a sprinkling of flour (about 1 tablespoon) into the dough, deflating it, and recover it. Let it sit to relax for 5 minutes (I didn’t do this the first time I made this bread and it still worked out ok, it just took a bit longer to roll out the dough.)

Flour a large work surface and turn your rested dough out onto it. Roll it out to a 20 x 12 inch wide rectangle, lifting corners periodically to make sure it’s not sticking. If it seems to be snapping back, cover it with your damp towel and let it rest for 5 minutes before continuing.

Picture 385 copy

Spread the browned butter over the surface of the dough with a pastry brush and then sprinkle the sugar mixture over the top, patting it down to ensure it mostly sticks.

Picture 391 copy

Picture 394 copy

With the long edge of the rectangle toward you, cut it into 6 strips (I used a pizza cutter which made super quick work of it).

Picture 399 copy

Stack these strips on top of one another. It really doesn’t matter if they are the EXACT same size or shape. I think the difference in sizes makes it pretty 🙂

Picture 402 copy

Cut the resulting stack into 6 even portions.

Picture 404 copy

Place these portions one at a time into your greased loaf pan, pressing them up against each other to fit them all in.

4 5
6 7

Cover the pan with your damp cloth and place it in a warm place for 30-45 minutes to double in size.

Picture 422 copy

While dough rises, preheat oven to 350 degrees F (or 325 if you have a glass loaf dish instead of a metal pan). When it’s risen, place the loaf in the center of the oven and bake for 30-35 minutes until dark golden brown on top. If you take it out at light golden brown, it’s liable to be raw in the middle, so let it get good and dark; check the center of the loaf with a thermometer if you’d like. Aim for 185-190 degrees. Cool for 20-30 minutes on a cooling rack in the loaf pan while you make the glaze.

Make the glaze: In a medium bowl, sift the powdered sugar and add the extract and milk. Whisk to combine until smooth adding more milk until you reach your desired consistency. I like mine a bit on the thick side so that it really sticks and coats the bread.

Assemble and serve: Use a butter knife (a plastic one works great if you worry about scratching the finish on your bread pan) to loosen all sides of the bread from the loaf pan and gently turn it out onto a plate. Place another plate on top and flip it to turn it right side up. Drizzle glaze over the loaf. Serve each piece slightly warm with a drizzle of glaze.

Picture 585 copy

Homemade Peppermint Patties

Picture 246 copy

Right now I am obsessed with the following:

the natural waves in my hair

my venti iced white chocolate mocha with 2 pumps of toffee nut

finding the perfect black cardigan before the season is over

and making m favorite candy bars at home without the 15 letter chemical additives

It can be done, I promise.

Picture 249 copyPicture 243 copy

Joy has already conquered the Almond Joy. Nancy was talking about some Milky Way tart. And me, well I conquered the peppermint patty.

And being the true romantic that I am, I made them Valentines Day appropriate so that you can make it for your honey. I’m so thoughtful sometimes 😉

Picture 250 copy

The original recipe called for rolling these into small balls and squishing them into the traditional patty shape. So for regular patties, just follow the recipe below. For heart shaped ones, follow my notes after the recipe.

Picture 247 copy

Homemade Peppermint Patties
Adapted from Sweet Savory Life
Makes roughly 50 patties

Ingredients:

1 can of condensed milk
5 1/2 cups powdered sugar, sifted
1 tablespoon peppermint extract
3 cups semisweet chocolate chips (I used red and pink candy melts and bittersweet chocolate)
3 tablespoons shortening

Picture 257 copy

Directions:

1. Combine condensed milk, 2 cups of powdered sugar, and peppermint extract in a large mixing bowl. Mix everything on medium speed using the paddle attachment (or in a large bowl with a hand mixer) until all the ingredients are well incorporated.

2. Add more powdered sugar to your mixture, a half cup at a time, until the dough is pliable like firm modeling clay. I had to add all 3 1/2 cups.

3. Roll 3/4″ balls of dough between the palms of the hands. *

4. Press each ball down slowly and set the flattened disk on a flat cutting board or plate. Transfer peppermint disks to the freezer for no longer than 30 minutes (I ran out of time and ended up chilling these overnight and they were just fine to work with the next day.) While the dough is chilling, temper the chocolate coating.

5. Place chocolate chips in a microwavable bowl. Melt the chocolate in 30 second increments, making sure to stir after each time until chocolate is smooth. Stir in shortening to thin the chocolate. Remove patties from the freezer.

6. Place a patty on the tongs of the fork and dip in the chocolate until completely covered. Allow excess chocolate to drip off the patty before setting each one on top of wax or parchment paper.

7. Allow the chocolate coated peppermint patties to completely set up. This can be done quicker by placing the patties in the refrigerator. The peppermint patties are ready when they are dry to the touch. Enjoy!

* To make these heart shaped: gently but quickly roll the dough out to about 1/2″ thick then stick it in the freezer for 10-15 minutes until it is firm enough to cut out shapes. Once it’s firm, cut out the shapes and place them on a sheet of wax paper and once you’ve finished all the dough pop it into the freezer while you melt your chocolate and proceed with the recipe.

Picture 259 copy

Day 22: Cinnamon Rolls (in 15 mins)

10-20-08 038 copyThis recipe comes JUST IN TIME for Christmas breakfast.

NOOOooooo, I won’t have you up at 3am so you can get two rises in before they go in the oven and your family wakes up demanding nourishment. No worries. I got ya covered.

The trick is to do the prep work a day up to 4 weeks ahead. While your dough is rising, go wrap some presents or make some hot cocoa for your honey or just veg out on the couch. You deserve it!

All your ‘hard work’ will pay off on Christmas day when everyone is digging into fresh, warm, delicious cinnamon rolls that took you all of 15 minutes to make.

Day 21 of my baking extravaganza and this is the PERFECT way to start your Christmas morning. Well, that and a shiny new food processor *ahem*

1 2
3 4

Cinnamon Rolls

Ingredients

Rolls:
1 cup warm milk (115 degrees F)
1 egg (room temperature), slightly beaten
1/4 cup butter, melted
1/4 cup vegetable oil
1/2 cup white sugar
1/2 teaspoon salt
3 1/2 cups flour plus more for dusting
1 (.25 ounce) package (2 1/4 tsp) instant dry yeast

Filling:
1/2 cup (1 stick) butter melted
1/2 cup sugar
1/2 cup brown sugar
3 tablespoons cinnamon

Frosting:
1/2 cup butter, softened
1/4 cup cream cheese, softened
1 1/2 cups powdered sugar

*Dough can be kneaded by hand, bread machine, or KitchenAid Mixer using the dough hook. However, directions below are written for a KitchenAid.

Directions:

In a KitchenAid mixing bowl, add milk, egg, melted butter, oil, sugar, and salt. Add flour on top of all the liquid mixture sprinkling yeast on top. Using the dough hook, knead bread mixture on speed 3 until dough is smooth and elastic adding additional flour as needed (approx. 5-7 min.). This dough was a bit sticky so I added approximately a scant 1/4 cup extra, the dough was still a bit sticky. Place dough in a greased bowl and cover with a wet towel. Allow the dough to rise until doubled in size, approximately 1 hour in a warm area.

*Hint: To help your dough rise to it’s full potential, preheat the oven to 200 degrees while dough is kneading and turn the oven off when kneading is complete. From there, stick your covered bowl into the oven and leave the oven door cracked open to allow the dough to rise. Or you can turn your microwave on for 5 minutes and once the cycle is done, quickly put your bowl in there and shut the door.

In a small bowl, combine sugar, brown sugar, and cinnamon – set aside.

Turn dough onto lightly floured surface and roll into a rectangle slightly larger than a 9×13 pan (rectangle). Spread surface evenly with the melted butter and sprinkle sugar mixture on top. Use your hands to make the entire surface is evenly coated. Beginning with the long side, roll dough tightly pinching the seam to seal. Cut into 12 equal slices using a sharp knife or dental floss, and place them in a greased 9 x 13 baking pan (0r 2 round cake pans, 6 in each). Cover with a damp towel and allow to rise for 30 minutes.

To make the frosting, beat butter, cream cheese, and sugar on medium-high speed for three minutes. Set aside.

TO BAKE RIGHT AWAY:

Preheat over to 375 degrees F and bake the rolls for 20 minutes or until golden brown. Once they are done, frost immediately with frosting. Serve.

10-20-08 044 copy

TO FREEZE AND STORE:

Preheat oven to 325 degrees F.

Bake the rolls in the oven for 15 minutes. They will feel set, but they won’t be brown. You might see the slightest touch of brown but they should definitely look pale.

Let the rolls cool completely in the pan.

When they’re completely cool, bag the rolls up, and pop them into the freezer. (To make these only a day ahead, just bag the rolls and stick them into the refrigerator until morning. Then continue on to baking them.)

On the day that you are planning to serve the rolls, remove them from the freezer the night before. Let them thaw slowly, still wrapped, in the fridge.

Preheat your oven to 350 degrees F.

Take the rolls out of the bag and place them in the upper part of the oven, and bake them until they’re very lightly browned, about 15 minutes. When they are done, brush them with melted butter to help keep them soft and frost. Serve and enjoy!!

10-20-08 039 copy

Day 17: Toffee – 3 ways

2 1
3 4

Sometimes things are worth the fuss. Sometimes things just aren’t.

And other times things are just fussy because you walk away from a boiling pot of molten sugar thinking ‘oh, it’s just for a minute.’

Don’t ever do that, ok? I knew better and I still did it. Had I not done that, my toffee probably would have been a LOT less fussy!

It’s day 17 of my extravaganza and there are only 8 days left until Christmas. Are your Christmas cards mailed? Are all of your gifts bought? Cookies made? Nah, me either. Here. Enjoy some toffee, it’ll make you feel better.

Despite my self-inflicted fuss, this toffee was really good and should have been really simple to whip up. Boil buttery sugar to a certain temperature and pour, spread and wait. Do the same with chocolate and then sprinkle with toppings of your choice.

Two important notes: DO invest in an accurate and reliable candy thermometer. NO a meat thermometer is NOT the same (learned that one the hard way).

DO NOT walk away from your boiling buttery sugar. Just don’t. It takes all of 3 seconds to go from almost there to ‘OMGOMGOMG it’s boiling over everywhere!!’ Not that I know from experience or anything. *stares*

10-20-08 011 copy

Butter Toffee
Adapted from Tasty Kitchen for original recipe click here

Ingredients:
16 ounces, weight Butter, Melted
16 ounces, weight Granulated Sugar
3 ounces, fluid Water
1 teaspoon Salt
1 teaspoon Vanilla Extract
8 ounces, weight Chopped Topping: Toasted Nuts, Candy Canes, Sea Salt, Etc.
12 ounces, weight Tempered Dark Chocolate For Coating, Melted

Instructions:
*Necessary Equipment: Candy Thermometer*

Prepare a standard cookie sheet with either a silicone mat or good parchment paper, set aside.

Combine butter, sugar, water, and salt in a saucepan. Bring to a boil, stirring constantly.

Cook over moderate heat, stirring gently, until candy thermometer registers 298 degrees.

Remove from heat and stir in vanilla until well combined.

Pour the mixture onto prepared cookie sheet. Use a heatproof rubber spatula or offset spatula to spread quickly before the toffee sets. Spread thin. It doesn’t have to be perfect and it probably won’t go all the way to the edges of your pan. This is FINE, you’ll just break it apart anyhow.

Allow toffee to cool completely. Blot to remove excess oil from the surface. Coat surface with the melted chocolate and immediately sprinkle with topping of your choice.

Allow to set completely, then break into bite-size pieces.
Store in an airtight container. Share. Or don’t. I won’t tell.

10-20-08 025 copy

Shipping safe: YES! Place toffee in a tin filled with tissue paper or some other form of padding and you’re ready to go. If it breaks up more… who cares? It’s toffee for crying out loud 😉
Make ahead and Freeze: NOT SURE. I wouldn’t think there would be a problem, but it keeps really well in an airtight container so freezing is pretty much unnecessary.

SMS – Chocolate Raspberry Truffle Torte

10-20-08 444 copy

I knew this would happen. This aaaalways happens.

I prep to make a and notice that it is damn near the same thing as something I have previously made, save for a few slight differences. Then it happens…

MATCH TO THE DEATH!

The winner gets my unconditional affections. The loser, well… quite the opposite. If they fought, this might be how it plays out:

Contender number 1: Melissa’s chocolate raspberry truffle torte. Contender number 2: Dorie’s soft chocolate raspberry tart.

10-20-08 450 copy

Round 1: #1 and #2 stare each other down. #2 strikes with the delicate creamy texture against #1’s average texture. #1 hesitates…

Round 2: #2 strikes with the ease of preparation and hands on assembly. #1 takes a devastating hit due to the egg whites and tempering. #1 stumbles…

Round 3: The gloves come off and #2 strikes the last blow with the perfect balance of fruit and creamy filling. KO!!

So you see, I prefer Dorie’s version over Melissa’s. To be fair I’m only comparing the filling. In my opinion, there was too much fuss with not enough reward. The results were similar but since both filling textures were that of a truffle, I’d choose Dorie’s based on ease, ingredients used, and final product. Melissa’s has potential, I think I’ll mess with it one day and see what I can come up with.

10-20-08 454 copy

Thank you to Jennifer of The Rookie Baker for choosing this recipe. Head on over to her blog for the recipe.

Up next week: Cherry Almond Granola. I am excited about this one but some ingredients really need to be swapped for me to make this, so nips and tucks it will be!

I wanna know: where do you get your baking crap?

3 4

So, I just ordered a few things that I need for my usual baking routine from King Arthur Flour.

Oh how I love, no ADORE, no…. WORSHIP their black cocoa that Margot sent to me as a surprise gift along with an autographed copy of the Baked cookbook. Not like I’m gloating or anything…

But that 12 oz bag of black cocoa has lasted me a ridiculously long time and I don’t make chocolate ANYTHING without it. I love it.

So I ordered more. Ya know, just in case.

5 6

And as I was scanning their goodies, I spied some cute cupcake liners. But the price seemed a bit… off… to me. I know at the grocery store they are cheaper and less cute. Therefore I automatically realize that buying cute ones online will be a bit more expensive.

HOWEVER, I’d like to know where you buy your cupcake supplies from. It’ll give me a chance to get to know you a bit better and give me some great places to oogle and comparison shop 🙂

Liners, sprinkles, cocoa nibs, the goods. Let me have it, let me know!

Where do you get your uber cute, sanely priced cupcake goodies from?
1 2