Rum, Brown Butter and Pecan Brownies

Picture 023 copy

If you haven’t been here long, you probably don’t know that I’m a Texan. If you have been here for a while, you’re probably tired of me making references to the fact that I’m a Texan. Not the kind that wears cowboy boots with skirts and rides to work on a horse named sugar, but a Texan no less.

I can’t help it, I’m a Texan. It’s a pride unlike any other.

You won’t find better Tex-mex anywhere, steaks seem just a bit bigger, beautiful bluebonnets transform regular hills into waves of blue, seeing cows from the side of the road is perfectly normal, margaritas are a staple, BBQ is an art form, the night sky isn’t more beautiful anywhere else, and pecans run rampant across this great state.

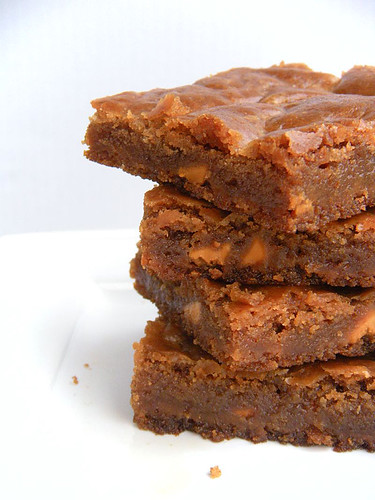
Texas, I made you brownies. Brownies you wouldn’t mind calling home. They have rum and pecans in them, you’d be proud!

Picture 013 copy

Do yourself a favor: if you hate rum or aren’t crazy about the strong flavor of rum in your baked goods, don’t make these. There’s a half cup of rum in these, they are not for sissies. If you don’t like pecans, you can sub for any other nut just be sure to toast them or the flavor will get lost. If you don’t like browned butter, you’re in the wrong place 😉 BUT, you can just as easily use regular melted butter in place of browned. If you don’t like chocolate… we can’t be friends anymore*. If you want to smother these brownies in vanilla ice cream, chocolate sauce, and a drizzle of dark rum for good measure… I think we can be the best of friends.

Picture 028 copy

Rum, Brown Butter and Pecan Brownies
yields 12-16 brownies

Ingredients:

100g unsalted butter, cut into 16 small pieces
175g bittersweet chocolate, chopped
190g (about 3/4 cup) granulated sugar
2 large eggs
1/2 cup dark rum
3 tablespoons cocoa powder
75g (about 1/2 cup) all-purpose flour
1/4 teaspoon salt
heaping 1/4 pecans, toasted and chopped

Instructions:

Preheat your oven to 350F. Line an 8×8″ pan with foil or parchment paper, taking care to leave an overhang on at least two sides for easy removal later. Lightly spray with non-stick cooking spray, set aside.

In a small saucepan over medium-low heat, melt the butter, swirling the pan occasionally until all the butter has melted. After several minutes, the butter will begin to bubble and this is your sign to really pay attention to your butter. The milk solids will separate: stir it frequently at this point, so that the milk solids do not settle at the bottom of the pan and burn (there is no saving burned butter, trust me). Continue stirring as your butter changes from a light brown to a medium brown and smells nutty. Remove from the heat. Let it cool slightly.

In a medium bowl, toss in your chopped chocolate and pour the browned butter over it (swirl the bowl a bit to make sure all the chocolate pieces are submerged in butter). Let it sit for about 3 minutes. Using a whisk, mix the chocolate and butter together vigorously until it is satiny and combined. Add the sugar and whisk until combined. Add eggs, one at a time until incorporated. When both eggs are in, give it a good vigorous whisking for about 10 seconds. Add the rum and mix well.

Sift the cocoa powder, flour and salt together over your chocolate mixture. Fold everything together with a rubber spatula until almost combined and then toss in pecans and fold until combined. Pour batter into your prepared pan and bake for 20-25 mins, begin checking early to ensure your brownies don’t overbake.

Remove from the oven and allow to cool in the pan until room temperature. Remove the brownies from the pan using the overhang, cut and enjoy!

Adapted from Raspberri Cupcakes

Picture 029 copy

Banana Oatmeal Breakfast Bars

Picture 169 copy

I hate doing the same things over and over again.

Repeating myself because you didn’t listen to me the first time I said that awesome thing I said. Getting up after just having sat down because I forgot my water on the counter. Painting my nails AGAIN because I always seem to paint them when I am the most antsy I could ever possibly be. Laundry. Hearing the same commercial on three different radio stations, play some tunes man!

But, there are exceptions.

Picture 171 copy

Playing my song obsession of the moment twice in a row. Or three times, who’s counting? Finding an adorable outfit and wearing it twice in the same week. Rewinding a part in a movie that made you laugh so hard you almost peed just so you can almost pee again! Playing that level of Angry Birds until you get all three stars.

And most importantly, making a recipe that you just LOVE over and over again. And in my kitchen, that’s a pretty big deal. Recipes rarely get a repeat performance. So many recipes, so little time.

Picture 173 copy

But once in a while I make something delicious that I can’t stop thinking about. Like these bars.

Soft and chewy oatmeal bars with a great hit of banana flavor, speckled with chocolate chips, baked and served warm. Don’t let the oatmeal fool you, these are breakfast, lunch, dinner and dessert, if you ask me! Customize them to your liking: add peanut butter cups/chips, toss in some nuts, top with ice cream, whatever you like!

Make these and eat them. Then make them again. Then eat them again. Again. What a lovely vicious cycle.

Picture 179 copy

Banana Oatmeal Breakfast Bars
Yield about 12-16 servings

Ingredients:

1 very ripe banana (mine was 115 g)
1/3 cup vegetable oil
2/3 cup light brown sugar, packed
3/4 cup all purpose flour (or whole wheat pastry flour)
1/2 teaspoon baking soda
1/4 teaspoon salt
1/2 teaspoon cinnamon
2 cups rolled oats (not instant)
2/3 cup dark chocolate chips

Directions:

Preheat oven to 350 degrees. Line an 8×8″ glass baking dish with foil and lightly spray with non-stick cooking spray; set aside.

In a large bowl, mash the banana with a fork and then add the oil and brown sugar. With a whisk, mix well until there are no sugar lumps left.

In a small bowl, whisk together the flour, baking soda, salt, cinnamon and oats until combined. Fold dry ingredients into wet ingredients with a rubber spatula until combined. Fold in chocolate chips until evenly distributed.

Pat batter down evenly into the prepared pan with the rubber spatula. Bake for 25 minutes, or until edges are golden and the center looks set. Let cool before cutting into squares. Or throw caution to the wind and eat them warm straight from the pan. Enjoy!

Picture 166 copy

Recipe adapted from Eat, Live Run

Dimply Plum Cake

Picture 143 copy

Today’s TWD post is supposed to be a delicious looking fig cake (head on over to Ursula of Cookie Rookie’s blog for the recipe).

I have figs. But I chose to save them for something else as you won’t find figs running rampant around here, so when I saw two packs of great looking mission figs, I nabbed them with a different project in mind. I’ll get to this cake eventually, but for right now please accept this equally delicious plum cake.

Serve it warm, loaded up with some vanilla ice cream or cinnamon-infused whipped cream for a wonderful Autumn dessert.

Picture 149 copy

Dimply Plum Cake
recipe from Baking: From My Home to Yours

Ingredients:

1 1/2 cups all purpose flour
2 teaspoon baking powder
1/4 teaspoon salt
Scant 1/4 teaspoon ground cardamom (optional)
5 Tablespoons unsalted butter, at room temperature
3/4 cup packed light brown sugar
2 large eggs
1/3 cup flavorless oil, such as canola or safflower
grated zest of 1 orange
1 1/2 teaspoons pure vanilla extract
8 plums (Italian prune plums, if you can find them), halved and pitted

Instructions:

Center a rack in the oven and preheat the oven to 350 degress F. Butter an 8-inch square baking pan, dust the inside with flour, tap out the excess and put the pan on a baking sheet.

Whisk the flour, baking powder, salt and cardamom, if you’re using it, together.

Working with a stand mixer, preferably fitted with a paddle attachment, or with a hand mixer in a large bowl, beat the butter at medium speed until soft and creamy, about 3 minutes. Add the sugar and beat for another 2 minutes. Add the eggs one at a time, beating for a minute after each addition. On medium speed, beat in the oil, orange zest and vanilla. The batter will look very light and smooth, almost satiny. Reduce the mixer speed to low and add the dry ingredients, mixing only until they are incorporated.

Run a spatula around the bowl and under the batter, just to make sure there are no dry spots, then scrape the batter into the pan and smooth the top. Arrange the plums cut side up in the batter – I usually make 4 rows of 4 plum halves each – jiggling the plums a tad just so they settle comfortably into the batter.

Bake for about 40 minutes, or until the top is honey brown and puffed around the plums and a thin knife inserted into the center of the cake comes out clean. Transfer the cake to a rack and cool for 15 minutes – during which time the plums’ juice will return to the fruit – then run a knife around the sides of the pan and unmold the cake. Invert and cool right side up.

Picture 157 copy

Cocoa Rice Krispies Football Treats

Picture 200 copy

A few days ago, I made mention that I’m a football fan. A pretty hardcore one at that. I am a hometown gal, Go Houston Texans!! Tony and I try to go to as many home games as we can, we live for the atmosphere. While we are there, we usually pick up a souvenir cup and a snack/lunch. It’s kind of a tradition.

When we watch the games at home snacks aren’t usually a MUST, we aren’t big TV snackers.

But since we were going to the in-laws’ house to watch the game, I found it fitting to bring a little football snack. Literally: little football snacks.

1  4  3

These adorable little footballs are basically chocolate rice krispie treats with a bit of peanut butter and some melted white chocolate for the stitching. They are super simple to make, just a few more steps than traditional rice krispie treats. But totally worth it for the adorableness, WOW factor and most importantly… the taste!

I must confess that for not being a TV snacker, I ate way too any of these. As did everyone else. These were a big hit. Tony came back into the bedroom at 7am (before leaving for work) just to tell me that they looked pretty awesome!

And before you ask: yes, I have Texans tupperware!

Picture 197 copy

Cocoa Rice Krispies Football Treats
Makes 16 footballs

Ingredients:

3 tablespoons butter or margarine
1 package (10 oz) regular marshmallows – OR – 4 cups miniature marshmallows
1/2 cup peanut butter
6 cups chocolate flavored crisped rice cereal (such as Cocoa Rice Krispies®)
white chocolate, for decorating

Stove top Instructions:

In large saucepan melt butter over low heat. Add marshmallows and stir until completely melted. Remove from heat. Stir in peanut butter until melted.
Add cereal. Stir until well coated.
Cool slightly. Using buttered hands shape mixture into sixteen 3-inch footballs.
Melt white chocolate, pour into a piping bag (or Ziplock baggie) and snip off a tiny hole at the tip and pipe on the stitches. Best if served the same day.

Microwave Instructions:

In microwave-safe bowl heat butter and marshmallows on HIGH for 3 minutes, stirring after 2 minutes. Stir until smooth.
Add peanut butter, stirring until melted.
Follow steps 2 and 3 above. Microwave cooking times may vary.

Notes:
For best results, use fresh marshmallows.

Store at room temperature in airtight container. To freeze, place in single layer on wax paper in airtight container. Freeze for up to 6 weeks. Let stand at room temperature for 15 minutes before serving.

Picture 208 copy

Let’s Go Texaaaaaaaaans!!!!

Classic Brownies – TWD

Picture 010 copy

Brownies are my kryptonite.

Now, I’m not saying that I’m superwoman. But even if I was, I couldn’t tell you. 😉

But when I give healthy eating my best effort, a brownie is usually what makes all come crashing down in a fiery pit of doom.

Brownies. Warm, fudgy, chocolaty, crackly topped, a la mode… See? Kryptonite.

This particular recipe seems to be pretty fool proof. If I can make these brownies with a whisk, a wooden spoon, a bowl and a foreign (to me) oven… anyone can.

1  3

I did change a few things just to make it all work for me with what I had on hand. I used all semi-sweet chocolate because finding 70% bittersweet chocolate in a tiny town with one grocery store is hard enough already so I took what I could get. Because I didn’t have bittersweet chocolate, I added 3 tablespoons of Hershey’s extra dark cocoa powder. I also didn’t have a brownie pan so I baked in a 8-inch round cake pan lightly sprayed with cooking spray. I omitted espresso powder because I didn’t have any and I baked them for about 10 minutes more than the recipe stated because I was baking in a convection oven that I have NO IDEA how to use. And the fact that my mother in law doesn’t use it often enough didn’t help me out either 😉

All-in-all they turned out wonderful. And I tried to take some nice shots with the ridiculous amount of natural light I had at my disposal, but I got a little side-tracked.

Picture 019 copy

Picture 020 copy

Picture 021 copy

Thanks to Anne for choosing this week’s recipe and keeping it simple. With two birthday “cakes” to make a week apart on top of everything I was juggling, just simple, delicious brownies were a godsend! Head on over to her blog, Anne Strawberry for the recipe (click here for a direct link).

S’mores Brownie Bars

Picture 052 copy

You know how some people can’t live without food and water? Or say… air? Me, I can’t live without brownies and s’mores in my life. Seriously. I have a problem.

I have tried a bagillion different brownie recipes. Not to find the perfect one, but to enjoy all the tiny differences each recipe has to offer. As for s’mores, I think I have tried s’mores anything: cereal, granola bars, brownies, cookies, plain old campfire s’mores and even microwave s’mores. S’mores are love. Try not to smile when sitting in front of a roaring fire, wrapped in blankets, with your sister sticking skewered marshmallows into the fire then squashing the gooey, half burnt marshmallow between some chocolate and graham crackers. It really is the epitome of happiness.

1   3

But when it’s 9 million degrees here in Houston (for the umpteenth day straight) it’s just not reasonable to get a roaring fire going to enjoy some yummy s’mores.

Enter these bars. You get the crunch of the graham cracker in the form of a buttery graham cracker crust (which is great because it won’t get soggy while baking), your dose of chocolate comes in the form of a fudgy brownie and topped off with fluffy, melty marshmallows.

S’mores heaven in a bar.

Picture 056 copy

S’mores Brownie Bars
Adapted from Alice Medrich, as seen here

Yields 16 servings (depending how large you cut the bars)

For the crust:
1 1/2 cups graham cracker crumbs
5 tablespoons unsalted butter; melted
2 tablespoons sugar

For the brownie layer:
8 tablespoons unsalted butter
4 ounces unsweetened chocolate
1 1/4 cups sugar
1 teaspoon vanilla extract
1/4 teaspoon salt
2 eggs
1/2 cup all-purpose flour

For the topping:
20 large marshmallows; cut in half

Directions
1. Preheat oven to 350 degrees F. Line an 8-inch-square metal baking pan with foil and spray lightly with nonstick cooking spray.

2. In a small bowl, combine the graham cracker crumbs, melted butter and sugar and mix until the crumbs are moistened. Press the crumbs evenly into the bottom of the pan and bake at 350 degrees for 7 minutes. Allow crust to cool on wire rack.

3. Turn the oven temperature up to 400 degrees F.

4. In a large microwave safe bowl on low power in a microwave, melt butter and chocolate together in 30 second intervals, stirring every 15-30 seconds until chocolate is almost completely melted, then stir until smooth.

5. Stir in sugar, vanilla and salt. Whisk in eggs one at a time until well combined. Then add flour. Stir until very smooth, about 1 minute, until mixture pulls away from sides of bowl. Scrape batter into prepared pan and bake for 18 minutes.

6. Let cool completely, then lift out using the foil and place brownies onto a broiler safe pan (I used the same brownie pan once everything was cooled). Move your oven rack about 6 inches from your broiler and preheat your broiler to low.

7. Layer marshmallows (sticky side down) across the top and toast under the broiler until golden, (watch this like you have never watched anything before…it can burn QUICK), about 2 minutes. Cool and cut into squares.

Happy National S’mores Day!! Enjoy!!

Picture 050 copy

Bourbon Vanilla Ice Cream with Salted Bourbon-Caramel Sauce for Sundae Sunday!!

Picture 312 copy

Did you ever have ice cream socials in school? I did. I was lucky, I had them in elementary school and my last one was in high school. To the teachers, it was a comfortable social setting for all the kids to get to know one another. For me, it was an excuse to have copious amounts of ice cream with sprinkles while hanging out with my friends and ditching class with permission 😉 I was a good kid.

Now I am…. a bit older, and I am honored to join in on an online ice cream social with some Twitter friends. Any excuse to make ice cream, right? Not only did I get to make and post about ice cream, I get to see the amazing creations of my twitter peeps AND eat the ice cream that I made.

1 3 4

And with triple digit weather around these parts, my inner peace really needed the calming qualities of ice cream…. and bourbon. I’m still a good kid 😉

If you know me at all, you know that I couldn’t just make any ole ice cream, I had to go all out. I scoured my bookmarks and came across this recipe that I had long forgotten about, checked that I had all the ingredients and I was off. And I can’t be happier with how it turned out! The ice cream is creamy and delicious, the sauce compliments it wonderfully, and the toffee adds texture! Win-win-win.

Now if only this ridiculous heat wave would GO AWAY, life would be pretty much perfect 🙂

I am honored to have participated in Sundae Sunday along with some great company. To see the entire line-up of amazing treats from amazing bloggers, head on over to Di’s blog, or click here to be taken directly to the post.

Picture 304 copy

Bourbon Vanilla Ice Cream
Makes 1 1/2 pints

Ingredients:
1 cup Bourbon (you can probably dial this down to 3/4 cup if you aren’t a huge fan)
1/2 cup granulated sugar
1/4 teaspoon kosher salt
1 teaspoon pure vanilla extract (I used a bit of vanilla bean paste as well)
2 cups heavy cream
4 large egg yolks
1 cup whole milk

Directions:
1. Pour the bourbon into a saucepan, and bring it to a boil over medium-high heat. Add the sugar and salt. Stir until the sugar dissolves, about 2 minutes. Reduce heat to medium, and continue to boil until liquid is reduced by one fourth, about 6 minutes. At this point you’ll notice the strong scent of the bourbon. Don’t inhale too deeply, you’ll get drunk. Just kidding.

2. Add vanilla and cream, and heat over medium heat until a candy thermometer reads 150 degrees F, 2 to 3 minutes.

3. In a large bowl, beat the egg yolks, and pour the bourbon cream into the eggs in a thin stream, whisking until the liquids are combined. Return the mixture to the pan, and heat over medium heat, stirring, until the candy thermometer reaches 175 degrees F, 3 to 4 minutes. Add milk. Transfer the ice cream base to a container with a lid, and refrigerate for 4 hours or overnight. Don’t expect this to be very thick, it will be quite thin for an ice cream base.

4. Pour the chilled bourbon custard into an ice cream maker, and churn according to the manufacturer’s instructions. Transfer the ice cream to a container with a tight-fitting lid, and cover the surface of the ice cream with plastic wrap. Put the lid on the container, and freeze until the ice cream has hardened, at least 2 hours. (It will keep for up to 1 month.)

Salted Bourbon-Caramel Sauce

Ingredients:
1 cup granulated sugar
1/4 cup water
2 tablespoons light corn syrup (I used Lite)
3/4 cup heavy cream
4 tablespoons butter (salted or unsalted, doesn’t matter)
1 teaspoon sea salt
1/4 cup Bourbon

Directions:
1. In a small saucepan, combine the sugar, water and corn syrup. Bring to a low boil.

2. Gently swirl the mixture in a circular motion (do not stir), and allow it to boil down until it is a deep amber color, at least 10 minutes.

3. Carefully whisk in the cream, protecting your hand from the steam. Immediately whisk in the butter. Stir over low heat until mixture is smooth.

4. Stir in salt and bourbon, and whisk again. Remove from heat and allow to cool before using.

Top a few scoops of ice cream with the caramel, stick in some delicious toffee, grab a spoon and enjoy.

5  6

All recipes adapted from Adapted from here

Buttercrunch Toffee

Picture 336 copy

My nail polish is chipping and I just got my manicure two days ago. Not awesome.

My hair is frizzy with fly-aways. So not awesome.

My tummy hurts because I ate much too much toffee. Not even close to awesome.

This toffee… incredibly awesome.

Picture 332 copy

You should make it, eat too much with your chipped fingernail polished hands so I won’t be alone in this. Everyone needs a support system.

This toffee is SO easy to make. One pot, one baking sheet and you have yourself some golden delicious toffee to crumble up and eat, top your favorite ice cream or pack up in a pretty box and give it as a gift. Yum in a box!!

Picture 334 copy

Buttercrunch Toffee
Makes 2 cups

Ingredients:
1 cup pecand (almonds or hazelnuts work too)
1 tablespoon water
4 tablespoons salted butter, cut into small pieces
1/2 cup granulated sugar
2 tablespoons packed brown sugar
1/8 teaspoon baking soda
1/2 teaspoon vanilla extract
3 ounces bittersweet chocolate, chopped (or use your favorite kind)

Directions:
To Prep the pecans: Spread the nuts on a baking sheet, and bake them at 350 degrees F for 10 to 12 minutes, stirring them halfway through so they toast evenly. Let them cool, and chop them finely.

1. Set aside half of the chopped nuts. Place the other half on an ungreased baking sheet (or a 9″ cake pan), and gather the nuts into an 8-inch circle. Set aside.

2. In a small saucepan fitted with a candy thermometer, combine the water, butter, granulated sugar and brown sugar over medium heat. (Don’t overstir!) Cook the mixture until it reaches 300 degrees F. Remove the pan from the heat, and stir in the baking soda and vanilla until just combined.

3. Pour the mixture onto your circle of nuts.

4. Sprinkle chocolate chips over the toffee, and set aside for 2 minutes while the chocolate melts. Using a spatula, spread the chocolate over the toffee.

5. Scatter the remaining half of your nuts over the chocolate. Let the toffee cool completely.

And add it to some ice cream. Come back tomorrow for some amazingly delicious ice cream!!

Picture 337 copy

Butterbeer Blondies for Harry Potter

Picture 179 copy

If I could live in any fictional world inside a book, it would be Harry Potter’s.

I could make a 3 course meal in seconds with a simple wave of my wand, I could apparate to see my family abroad without those pricey flights. During a power outage I could simply cry “lumos” and ta-da… instant light. And with a wave of my wand, I could suspend my hubby in mid-air by his leg when he’s been a bad boy 😉

And best of all, I could have treats like pumpkin pasties, chocolate frogs that come to life if you don’t eat ’em quickly enough, cauldron cakes, and these butterbeer blondies every single day, if I so choose. And let’s face it… I choose yes.

Picture 174 copy

There is no definite recipe for butterbeer but butterbeer as I imagine it is a perfect blend between cream soda, butterscotch topped off with whipped cream. These blondies incorporate my idea of the drink into fudgy, gooey delicious bars.

Share these with all your wizard-wanna be friends or hide them under your invisibility cloak and keep them all for yourself. I won’t tell 😉

Picture 184 copy

Butterbeer Blondies
adapted from here

Yields one 9×9″ pan (9-16 blondies depending on the size you cut them)

Ingredients:
2 cups flour
1/2 tsp baking soda
3/4 tsp baking powder
1/4 tsp salt
2 sticks unsalted butter, softened
1 1/2 cups brown sugar
1/2 cup granulated sugar
1 egg
3 Tbsp cream soda
1/2 tsp vanilla extract
1 cup butterscotch chips

Directions:
Preheat the oven to 325 degrees.

Line a 9×9″ baking dish with foil or parchment paper leaving extra over the sides as a sling. Spray lightly with cooking spray, set aside.

In a medium bowl, whisk together the flour, baking soda, baking powder and salt. Set aside.

In the bowl of a stand mixer (or a large bowl with a hand mixer) cream together the butter and sugars until smooth, about 3 minutes scraping down the sides if necessary. Add in the egg and beat for one minute. Beat in the cream soda and vanilla until thoroughly mixed in. On low speed, mix in the dry ingredients just until the flour disappears. Using a rubber spatula, stir in the butterscotch chips.

Spoon the batter into the dish and spread evenly.

Bake for 30-35 minutes or until a knife inserted in the center comes out mostly clean and the top is golden brown. If your edges brown too quickly, loosely tent the pan with foil for the remainder of the baking time.

Transfer the pan to a wire rack to cool completely before cutting into bars. If you can wait that long. It is totally acceptable to eat these warm with some cinnamon ice cream, Harry would be proud 🙂

Picture 182 copy

Cheesecake Chocolate Chip Cookie Bars

Picture 069 copy

Hybrids are awesome.

Ok, let’s back up… BAKING hybrids are awesome. I’m not talking Prius’ here people.

I’m talking about a perfect mix between a warm chocolate chip cookie and delicious cheesecake. Kind of like a cheesecake sandwich if you will. You read right. It is possible. It is delicious.

It could possibly be the best hybrid invention ever. Next to the Chevy Volt. *Swoon* but that’s a whole other discussion for another time.

1   3

These actually come together quickly. There is no refrigerating the cookie dough or making a water bath for the cheesecake. It’s make and bake. Your hands get a little messy pressing in the cookie dough but other than that it’s pretty straight-forward and simple.

I know that a lot of people are averse to vegetable shortening, so feel free to substitute butter for in it’s place. But I am uncertain if it will work out as I have not tested it myself. Please do let me know if you do. Also, don’t be worried about the vinegar… I was a bit put off about it but you will never know it’s there, scouts honor.

Picture 027 copy

Cheesecake Chocolate Chip Cookie Bars

Chocolate chip cookie layer:

2 cups all-purpose flour
1 tsp baking soda
3/4 tsp salt
1/2 cup unsalted butter
1/2 cup shortening
1 cups light brown sugar
1/2 cup granulated sugar
2 tsp vanilla extract
1 T cider vinegar (I used white without problem)
1 large egg
2 cups semisweet chocolate chips

Cheesecake layer:

1 package (8 oz) cream cheese, at room temp
1/2 cup sugar
1 egg
1/2 tsp vanilla

Directions:

Preheat oven to 350 degrees F. Line a 9 x 13″ pan with foil and spray lightly with baking spray. Set Aside.

In a small bowl, whisk together flour, baking soda and salt. Set aside.

In a large mixing bowl, cream together the butter, shortening, sugars, vanilla and vinegar until light and fluffy, about 5 minutes. Scrape down the bowl and beat in the egg until thoroughly mixed in, then add the baking soda and flour. Fold in the chocolate chips. Divide the dough into two equal portions and set aside.

In a medium mixing bowl cream the cream cheese with the sugar until thoroughly combined. Beat in the egg and vanilla until fully combined.

Spread 1/2 of the cookie dough mixture evenly across the bottom of your prepared pan. (This is somewhat tricky to do. I find it easier to add dollops of cookie dough throughout the pan and then spread all the dollops together with your fingers.) Spread the cream cheese mixture on the top of the cookie dough. With the remaining cookie dough, flatten chunks of dough between your hands into discs, and then place on top of the cream cheese mixture, placing as close together as possible. Don’t worry if the dough discs don’t touch, they will bake into each other in the oven.

Bake for 35-45 minutes, or until the top is brown and cooked through. Cool completely (if you can wait that long), top with vanilla ice cream and caramel sauce. Enjoy!

Picture 029 copy3Whole lotta YUM!!