
Back in June I made a lemon scented pull-apart coffee cake and it apparently made a lot of people happy.
Happy and confused.
I got a lot of comments letting me know how yummy it looked and at the same time, how confused they were at the steps. So I thought the best way to remedy this situation was to make this again (with an Autumnal flair, of course) and take some process photos to help clarify some things. This is my first time taking process shots (by myself, with one hand) so stay with me here. It was tough but I powered through. Oh the things I do to make you all happy 😉
Back to this pull-apart bread: it is SO good. Dare I say even better than the lemon version? I have a slight obsession with all things pumpkin and cinnamon spiced, baked up and then glazed. Oh that’s a pure win-win in my book ANY day. Even in a blistering Summer day in July.

It’s warm, soft, spiced, sweet deliciousness that’s perfect for breakfast or a snack or with tea or for dinner. Ok, that last one might be just me. It is best served warm and peeled layer by layer. MAYBE shared with someone you love. Maybe…


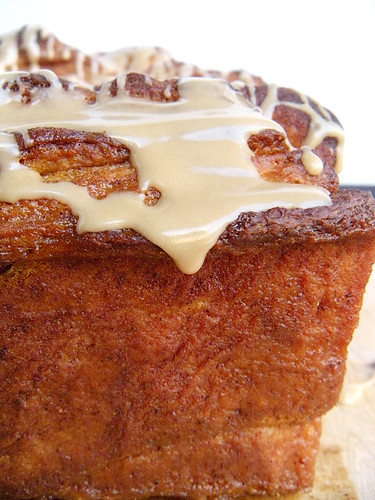
Pumpkin Spice Pull-Apart Bread with Maple Glaze
recipe by: willow bird baking
yields one loaf
Pumpkin Pull-Apart Bread Ingredients:
1/2 cup milk
3/4 cup pumpkin puree
1/4 cup white sugar
2 tablespoons unsalted butter
1 teaspoon salt
2 1/4 teaspoons (1 envelope) active dry yeast
2 1/2 cups bread flour
Filling Ingredients:
1 cup granulated sugar
2 teaspoons ground cinnamon
1/2 teaspoon fresh ground nutmeg
2 tablespoons unsalted butter
Maple Glaze Ingredients:
3/4 cup powdered sugar
1/4 teaspoon maple extract
1 teaspoon milk, more if necessary
Directions:
Make the pull-apart bread dough: Lightly spray the inside of a bread pan with non-stick cooking spray; set aside.
In a small saucepan over medium-high heat, brown the 2 tablespoons of butter. Let it bubble and foam and when you see it start to brown, stir it so that it browns evenly. When it’s the color of dark honey, remove it from the heat and pour it into your stand mixer bowl to cool. This can happen quickly, be sure to watch it as it goes from brown to burned in no time.
In the same saucepan over medium-low heat, warm the milk until it gently bubbles. Don’t let it come to a rolling boil as that pretty much ensures it will boil over (learn from my mistakes). Remove it from the heat and pour it into the bowl with the butter. Let these cool until they’re about 100-110 degrees F (about 10 minutes). Set the saucepan aside for another use later.
Stir the sugar and yeast into the milk/butter mixture and let it sit for a few minutes. Stir in pumpkin, salt, and 1 cup flour. If you haven’t already, fit your mixer with a dough hook. Add the rest of the flour 1/2 cup at a time, stirring between each addition. When the dough is combined, knead on low speed with a dough hook until smooth and elastic (about 4 minutes with a mixer).
Take your ball of dough out for just a moment and set aside. Lightly spray the inside of your stand mixer bowl with non-stick cooking spray and place the dough back in the bowl; cover it with a damp cloth and let it rise in a warm place for about an hour until it doubles in size (After it rises, you can put it in the fridge overnight to use it in the morning, but let it sit out for half an hour before rolling if you do.)
Make the filling: While the dough is rising, whisk the sugar, cinnamon, and nutmeg together in a small bowl. Toward the end of the rising time, melt the 2 tablespoons of butter for the filling in the saucepan over medium-high heat and brown it as directed above. Put it in a small heat-safe bowl to cool for use later.
Shape and bake pull-apart bread: Knead a sprinkling of flour (about 1 tablespoon) into the dough, deflating it, and recover it. Let it sit to relax for 5 minutes (I didn’t do this the first time I made this bread and it still worked out ok, it just took a bit longer to roll out the dough.)
Flour a large work surface and turn your rested dough out onto it. Roll it out to a 20 x 12 inch wide rectangle, lifting corners periodically to make sure it’s not sticking. If it seems to be snapping back, cover it with your damp towel and let it rest for 5 minutes before continuing.

Spread the browned butter over the surface of the dough with a pastry brush and then sprinkle the sugar mixture over the top, patting it down to ensure it mostly sticks.


With the long edge of the rectangle toward you, cut it into 6 strips (I used a pizza cutter which made super quick work of it).

Stack these strips on top of one another. It really doesn’t matter if they are the EXACT same size or shape. I think the difference in sizes makes it pretty 🙂

Cut the resulting stack into 6 even portions.

Place these portions one at a time into your greased loaf pan, pressing them up against each other to fit them all in.


Cover the pan with your damp cloth and place it in a warm place for 30-45 minutes to double in size.

While dough rises, preheat oven to 350 degrees F (or 325 if you have a glass loaf dish instead of a metal pan). When it’s risen, place the loaf in the center of the oven and bake for 30-35 minutes until dark golden brown on top. If you take it out at light golden brown, it’s liable to be raw in the middle, so let it get good and dark; check the center of the loaf with a thermometer if you’d like. Aim for 185-190 degrees. Cool for 20-30 minutes on a cooling rack in the loaf pan while you make the glaze.
Make the glaze: In a medium bowl, sift the powdered sugar and add the extract and milk. Whisk to combine until smooth adding more milk until you reach your desired consistency. I like mine a bit on the thick side so that it really sticks and coats the bread.
Assemble and serve: Use a butter knife (a plastic one works great if you worry about scratching the finish on your bread pan) to loosen all sides of the bread from the loaf pan and gently turn it out onto a plate. Place another plate on top and flip it to turn it right side up. Drizzle glaze over the loaf. Serve each piece slightly warm with a drizzle of glaze.


