Flip Over Plum Cake – TWD

Picture 183 copy

I have taken it upon myself to re-name this recipe to “the key to my mother’s heart.”

Plums are pretty much my mommy’s favorite fruit ever. She loves them all: sweet, sour, black, red, overripe, fresh, baked, dried, juiced… you name it.

So I jumped at the chance to invite her over when I was making these and as soon as I said the magic words (plum cake, duh) she came right over. She says she came for the company but I think she secretly came for the cake πŸ˜‰ She walked in and could smell the plums mingling with the cake and cinnamon and she was eager to try some! Which is rare as my mom isn’t really one for a lot of sugary baked sweets.

1 2Β 3

Lucky for her, I scaled back the recipe (I quartered it and it was perfect for 3 ramekins) which meant that it was in and out of the oven in no time. Topping it with some homemade vanilla ice cream (recipe coming soon, promise) guaranteed that this dessert wouldn’t last long.

And that held true. She inhaled it and loved every delicious, warm bite.

Picture 190 copy

That makes it a definite repeat in this house πŸ™‚

A big thanks to Becky of Project Domestication for choosing this recipe, you made my mom very happy πŸ™‚

Head on over to Becky’s blog for the recipe. (Or click here to go directly to it.)

Picture 189 copy

Banana Bread Pancakes

Picture 133 copy

When I was in high school, I was not your typical sleeps-til-noon teenager. Nope, not me. I spent every weekday morning getting out of bed at 5am to be able to get up, shower, beautify, collect my things and be out the door on time to catch the bus. So when the weekend came, sleeping in meant 8am.

Now, being an adult, I seem to have found my love for sleep. I usually wake up no earlier than 10am on my days off (unless certain circumstances arise) and sometimes I can even sleep until noon, depending on how late I stayed up baking the night before.

This newly found adoration for my comfy bed and warm blankie sadly interferes with the other love of my life: pancakes for breakfast.

1 3 4

After staring at the clock in disbelief (and other various distractions), I’m usually ready to decide what to make for breakfast around noon. Then I get distracted some more and I either end up skipping breakfast all together or having pancakes at 1:30pm.

It’s National Pancake Day, don’t be like me: start your day off right, enjoy your pancakes for breakfast πŸ™‚

These pancakes taste like you whipped up banana bread dough and accidentally spilled it in your skillet. It tastes exactly like banana bread; but with the whole wheat flour, small amounts of sugar and butter, you can feel good about piling 4 onto your plate. They are fluffy, thick and full of delicious flavor.

Picture 136 copy

Banana Bread Pancakes
adapted from How Sweet Eats

makes 4 pancakes

Ingredients:

2/3 cups whole wheat pastry flour
1 teaspoon baking powder
pinch of salt
3 tablespoons brown sugar
1/2 teaspoon cinnamon
1/8 teaspoon nutmeg
4 tablespoons milk
1 teaspoon vanilla extract
1 large ripe banana, mashed
1 tablespoon butter, melted

Instructions:

In a medium bowl, combine flour, baking powder, sugar, salt, cinnamon, and nutmeg, whisking until combined. In a meauring cup, measure out the milk and vanilla extract and give it a quick stir. Add the wet ingredients to the dry and stir with a rubber spatula. At this point, the mixture will still be dry. Add in mashed banana and mix thoroughly. Add melted butter and stir until batter is somewhat smooth.

Heat a skillet over medium heat. When hot, spritz with non-stick cooking spray and using a 1/3 cup measure, spoon batter into rounds and cook until bubbles form on top and the pancake looks set around the edges – about 2-3 minutes. Flip and cook for a minute or two more. Repeat with remaining batter. Serve hot with butter and syrup, or however you wish.

Note: If you don’t have whole wheat pastry flour, you can use 1 cup of regular whole wheat + 1 cup of all purpose. Or 2 cups of all purpose.

Picture 122 copy

Thick, Chewy Peanut Butter Chocolate Chip Cookies

Picture 767 copy

I’m a thick and chewy cookie kinda gal. I’ve tried crispy and crunchy, thin and chewy, thick and cakey, undercooked, overcooked… any which way you can try a cookie, I’ve tried them that way.

Definitely a thick and chewy girl. Wait, I’m not saying that I’M thick and chewy. And although that’s debatable, I was talking about the cookies.

So when I saw these gems on Jessica’s blog I had stars in my eyes.

1Β  3
4Β  5

Stars in my eyes people. I’m talking serious cookies here.

These are super easy to whip up and you’re likely to have all the ingredients on hand. There’s no pesky refrigeration time for the cookie dough and no bringing the butter to room temperature. The cookies come out thick, chewy, melty and delicious and…

Like I said, STARS.

Picture 764 copy

Thick, Chewy Peanut Butter Chocolate Chip Cookies
adapted from here
makes about 18 cookies

Ingredients:

8 tablespoons of butter, cut into 8 pieces
6 tablespoons of creamy peanut butter
1 cup all-purpose flour
1 cup whole wheat pastry flour (or sub for more AP flour)
1/2 teaspoons baking soda
1/4 heaping teaspoon salt
3/4 cup brown sugar
1/2 cup sugar
1 egg + 1 egg yolk, at room temperature
2 teaspoons vanilla extract
1 heaping cup chocolate chips

Instructions:

Preheat oven to 325 degrees F. Line a baking sheet with parchment paper or a silicone mat and set aside.

Add butter and peanut butter to a large microwave safe bowl, and heat in 30 second increments, stirring in between, until melted. Give the mixture a good whisk until combined and smooth. Let cool completely (pop into the fridge if you’re as impatient as me. Ps: I couldn’t wait for it to cool COMPLETELY, I proceeded with a slightly warm mixture and still yielded great cookies).

In a medium bowl, whisk the flours, baking soda and salt until combined and set aside.

In the bowl of the cooled butter/peanut butter mix, add sugars and whisk vigorously until they are combined and no lumps remain. Add the egg, egg yolk, and vanilla and stir until combined. Gradually add flour and mix until a dough forms (I used a rubber spatula and folded in the flour mixture in three parts until just combined). Fold in chocolate chips.

Shape the dough into a ball the size of a golfball (I weighed my dough and divided by 18 to ensure equal sized pieces; mine were about 54 grams each). Place on prepared baking sheet two inches apart and bake for 10-12 minutes or until the edges are slightly brown. The centers should be soft and puffy. Do not over bake. Let cool. Or not, your choice. πŸ˜‰

Picture 761 copy

Grilled Pizza Tutorial

Picture 058 copy

Let me preface this by saying that I live in Texas. Down here we grill chicken, brisket, sausage and turkey legs. Not pizza. Grilling pizza is pretty damn unknown here. Well, even if it’s not, I’ll be bold enough to say that it is. Let’s pretend that I’m right. Also, it may be the tail-end of Summer where you are so grilling at this time might seem weird to you, but here it’s still Summer. Today’s high of 100F says so.

Having cleared that up, I have never grilled a pizza. Ever. I had never even heard about it until I started blogging. But once I saw the idea and got past my “Texans only grill BBQ” mind set, I was so intrigued! And it’s taken far too long for me to take the leap.

I’ve lost so many years of the best pizza I’ve ever made at home. But I’m hip to the jive now groovy people. Whoa, taking it back 1975.

4Β  5

Bad blog writing aside, this really is the best pizza I’ve made. The outside of the crust is lightly crispy, the inside is fluffy and soft and once you have the pizza crust ready, it takes no more than 20 minutes, start to finish. It is so worth it.

Note: I realize there are about as many ways to grill a pizza as there are to top them but this seemed easiest to me so I went with it. Head on over to Mel’s blog for a great tutorial with pictures for every step. I would have done that but it’s really hard to grill and NOT burn lunch and take pictures all by yourself πŸ™‚

Picture 067 copy

Grilled Pizza
via Mel’s Kitchen Cafe

I used this pizza dough, pre-made sauce (I had to use what I had on hand) and a propane grill (although you can just as easily grill this on a charcoal grill.) Have your pizza dough ready and made before proceeding to the grill.

Preheat your grill to medium heat for about 10-15 minutes.

Picture 025 copy

While the grill preheats, lightly grease a baking pan (with non-stick cooking spray or olive oil) and place your dough and shape it into an oval/rectangle shape. Grab another clean baking sheet for your finished pizza and stack it under your baking sheet holding the dough.

Picture 037 copy

Gather all the toppings you intend to use (meats, veggies, cheeses, sauce, everything) in easily accessible bowls, a spoon, a brush, and tongs and place them on another tray.
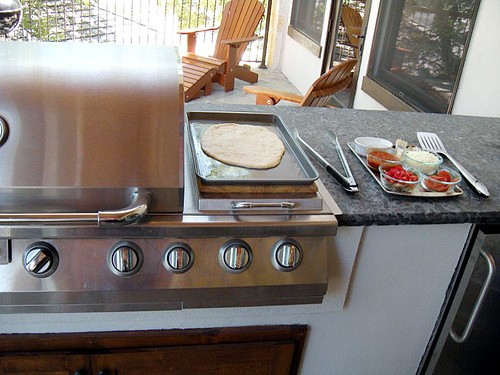
Picture 028 copy

Time to head outside. Place your tray(s) holding the dough on one side of the grill and place the toppings tray on the opposite side of the grill.

Lightly brush the top side of dough with olive oil.

Picture 046 copy

Open the grill, grab two edges of the dough and in one smooth motion lift the dough and quickly place it on your hot grill surface.

Most likely your pizza dough won’t be perfectly round or rectangular anymore. That’s perfectly fine. Rustic is beautiful. And sassy. Now close the grill and let the dough cook for about 2-4 minutes, depending on the heat of your grill. (Switch your baking sheets so the clean one is now on top.)

Picture 047 copy

The dough will be ready to flip when it lightly bubbles on the surface and the bottom has lovely grill marks but is NOT burned.

1Β  3

Using a pair of tongs, gently flip the dough over. Throughout this process, keep an eye on the grill’s temperature, adjusting up or down as necessary. Burned pizza doesn’t taste that good.

Picture 050 copy

Picture 051 copy

Now working quickly, using a spoon, spread your sauce over the crust. Next, layer with your toppings (mine were red bell pepper, mushrooms, pepperoni and mozzarella cheese).

Once all your toppings are on the pizza, close the grill and let the pizza cook for 2-3 minutes to melt the cheese and finish cooking the crust. You might need to cook a bit longer depending on how much cheese you used but I would not recommend more than another minute or two.

Picture 057 copy

Carefully remove your pizza with a pair of tongs onto your clean baking sheet. Slice and serve with a cold glass of your favorite beer or glass of iced tea πŸ™‚

Picture 071 copy

Classic Brownies – TWD

Picture 010 copy

Brownies are my kryptonite.

Now, I’m not saying that I’m superwoman. But even if I was, I couldn’t tell you. πŸ˜‰

But when I give healthy eating my best effort, a brownie is usually what makes all come crashing down in a fiery pit of doom.

Brownies. Warm, fudgy, chocolaty, crackly topped, a la mode… See? Kryptonite.

This particular recipe seems to be pretty fool proof. If I can make these brownies with a whisk, a wooden spoon, a bowl and a foreign (to me) oven… anyone can.

1Β  3

I did change a few things just to make it all work for me with what I had on hand. I used all semi-sweet chocolate because finding 70% bittersweet chocolate in a tiny town with one grocery store is hard enough already so I took what I could get. Because I didn’t have bittersweet chocolate, I added 3 tablespoons of Hershey’s extra dark cocoa powder. I also didn’t have a brownie pan so I baked in a 8-inch round cake pan lightly sprayed with cooking spray. I omitted espresso powder because I didn’t have any and I baked them for about 10 minutes more than the recipe stated because I was baking in a convection oven that I have NO IDEA how to use. And the fact that my mother in law doesn’t use it often enough didn’t help me out either πŸ˜‰

All-in-all they turned out wonderful. And I tried to take some nice shots with the ridiculous amount of natural light I had at my disposal, but I got a little side-tracked.

Picture 019 copy

Picture 020 copy

Picture 021 copy

Thanks to Anne for choosing this week’s recipe and keeping it simple. With two birthday “cakes” to make a week apart on top of everything I was juggling, just simple, delicious brownies were a godsend! Head on over to her blog, Anne Strawberry for the recipe (click here for a direct link).

What 9/11 Helped Me Remember

1 photo credit

I debated all day about writing this post. Would it be too controversial? Too commonplace? Come across as too insensitive, picked apart, taken the wrong way? Then I went through the entire day and everything I witnessed gave me the courage to write it.

Today was a great day.

In spite of everything that happened on this date, 10 years ago, today was a reminder of the common woes of all Americans. Stay with me, it will all make sense.

When 9/11 happened, it was a tragedy. It was unspeakable. Many great and brave people died, a lot wounded and everyone impacted. Every. Single. American. Impacted.

It reminded me of the unity we found that day, ten years ago. Unity that I think we forgot about going along with our lives judging, banishing, misunderstanding. One split second later, everything changed. We depended on the help, information and comfort of total strangers. We welcomed it. We remembered that we were all just people. Beating hearts.

Today, I was lucky enough to attend the Texans game where I witnessed the most beautiful rendition of TAPS on the jumbo-tron and I was instantly united with all the other fans and players of various teams across the United States who, in that exact same moment, were doing the same as I: watching, listening, thanking, crying.

And as that 100-yard long American Flag was beautifully spread across our field and Clay Walker started singing our National Anthem, we all sang along. Remembered, held hands, comforted. Once again, ten years later, we stood united. We remembered.

Unfortunately it was a travesty that united us, but it is pure and simple human choice to stay united long after. 9/11 reminds me that we’re not so different, you and I. And THAT, makes it a good day.

3 photo credit

Beer Pizza Crust

Picture 041 copy

Sometimes there’s nothing better than sitting back, kicking up your feet, enjoying a slice of pizza, a beer and some football.

Or whatever your television poison is: trashy reality, hockey, CSI version 95, or the weather channel. Either way, pizza is the answer. Made even better when your crust is infused with beer!

Picture 073 copy

Don’t fret, beer haters. I am not what you would call a ‘fan’ of beer. This pizza crust is mildly flavored, although it does depend on the type of beer you use. But if anything, the yeast in the beer gives this dough a beautiful rise and a wonderful flavor and texture. Almost like an artisan pizza crust.

This pizza crust comes together so easily and you don’t even need a stand mixer for it. I made this dough using a big bowl, a wooden spoon and kneaded by hand and it was no trouble at all. I would easily say this crust is tied with my go-to pizza dough. That’s serious business people.

Picture 078 copy

Beer Pizza Crust
adapted from here with tips from here

Ingredients

4 cups all-purpose flour
2 teaspoons instant yeast
1 teaspoon baking powder
1 1/2 teaspoons salt
2 tablespoons olive oil
12 fl oz (1 1/2 cups) room temperature beer (I used Samuel Adams Octoberfest)

Directions

Combine flour, instant yeast, baking powder, salt and olive oil in a large mixing bowl with a whisk. Slowly add beer and using a wooden spoon, mix until you have a shaggy dough.

Picture 902 copy

Flour your hands and your dough and knead the dough with your hands until you have a soft, smooth dough – it should hardly stick to the mixing bowl or your hands, about 7 minutes (less if using a stand mixer).

1Β  3

Form the dough into a round ball, cover with a dish cloth and allow it to rise for anywhere from 30 minutes to 2 hours.

Once your dough is doubled in size, use your open hand to gently press down on the dough to deflate it. Separate into 2 dough balls or leave whole if making one large pizza.

Preheat the oven to 450F.

If you have a pizza stone, cover with parchment paper. If you don’t, use a large round or rectangular metal pan, cover in foil to make clean-up much easier and sprinkle with a little corn meal or lightly spray with cooking spray; set aside.

Shape (or roll) your dough to about 10 – 12 inches (or to fit the size of your pan) keeping in mind that thin dough makes for a crispier crust and thicker will yield a softer, thicker crust. When you think it’s roughly the right size for your pan (or baking stone), turn the dough down onto it. You might need to let it rest for a few minutes and gently pull at the sides if you find the dough springs back.

Add your sauce and toppings and place in the oven, for 15 minutes or until the cheese is bubbly and melty. If you place the toppings under any cheese, you’ll have a less greasy pizza. Let it sit for a few minutes so you don’t burn off your taste buds then serve with an ice cold beer and some football πŸ˜‰

Picture 085-1

Stay tuned for my grilled pizza tutorial using this crust πŸ™‚

I Am Humbled and Quite Astonished!!

When I posted about a zebra stripe cake I made a while back, I had no idea that it would impact a tiny corner of the internet world!

I’m new to this StumbleUpon business but when Katrina enlightened me that my cake was doing great on SU, I had to take a look for myself. And whoa dang.

stumbleupon

And to those of you who stumbled, commented, and passed it along: Thank you so much. You’ve made my day!!

Now back to your regularly scheduled sugar-coma.


Chocolate Spice Quickies

Picture 016 copy

Baking in my kitchen can go 1 of 3 ways.

Hover Mode: I check the book a million and three times to make sure I’m proceeding as written, that I have added EVERYTHING I need to, and that I am making no mistakes. Slightly obsessive, slow paced, afraid.

Middle Mode: I read the recipe all the way through carefully at least once (hopefully without distractions) and retain most of the info and check back every so often to make sure I’m proceeding correctly. Cool, calm, collected.

Pro Mode: I read through the recipe once, maybe twice and proceed as I’m pretty damn sure I should. Careless, fast(er) paced, confident.

Picture 012 copy

I made these cookies utilizing Pro Mode. I don’t know WHAT was going on in my head but for some reason I felt like a pro and I proceeded as such.
And I made every single mistake that I could possibly think of. Seriously.

I made the dough for these cookies COMPLETELY out of order. I mixed the flour and dry ingredients, tossed in the egg or butter (I’m not sure which order anymore) and once I decided to check what the next step was, all that escaped my mouth was β€œcrap!” But I decided that I wasn’t going to be deterred and pressed on hoping for at least edible cookies.

Picture 009 copy

Well, I’ve just eaten 3 and the raw dough end pieces (you know, those funky shaped ends) so I’d say they are freaking tasty.. They are soft, bespeckled and delicious.

They are fab plain, but toss in a small scoop of vanilla (or toasted marshmallow. Recipe coming soon) ice cream and make ice cream sandwiches and you’re in heaven. (Or just toss them in a bowl with some ice cream to make it easier). Either way, tastyyy.

Picture 002 copy

A special thanks to a fellow Texan, Jessica for choosing this recipe. Head on over to her beautiful blog, My Baking Heart for the recipe (or click here to go directly to it). I will be making these again!!

Oh, Labor Day

Today is a holiday.

Did you know? I’m sure you did. I almost missed it until all the TV commercials reminded me that I need to spend my hard earned money in everysinglestore because it’s Labor Day and apparently that’s what it means. To spend money.

To me, it means relaxation. It means BBQ. It means family. It means sitting on your lazy butt and enjoying your national Monday off.

But just in case you’re like me and you can’t fully enjoy your Labor Day without sweets to snack on, here are a few of my favorite things:

S’mores Brownie Bars. Just put it in your face.

1

Buttercrunch Toffee. Super easy to make, even easier to scarf.

3

Cheesecake Chocolate Chip Cookie Bars. OMWOW.

4

If you like brownies, try these, these or these. Or these. (Or these.)

One Pan Chocolate Cake. It’s mixed in one cake pan. Just one.

5

Want some cookies? Try these hot chocolate cookies, my favorite chocolate chip cookies, or one giant skillet cookie. It’s a cookie, in a skillet. Awesome.

9Β Β 11Β Β 10

Pancakes for breakfast (or dinner?) try these, they taste like cinnamon buns!! Or these, they taste like red velvet cake!!

7Β Β 8

Don’t see anything here that strikes your fancy, just have a look around, I’m sure you’ll find something πŸ™‚

Have a relaxing Labor Day!!